Last updated: March 30, 2026
The dosa is one of the most quietly virtuosic things you can cook at home. A paper-thin, lacquered crepe of fermented rice and lentil batter, golden-brown on the bottom and lacy at the edges, it is the everyday breakfast of South India and the centerpiece of Tamil, Karnataka, Kerala, and Andhra tables. Master the dosa and you unlock an entire family of dishes: crisp masala dosa folded around spiced potato, soft set dosa for sambar mopping, tangy onion uttapam, rava dosa shot through with cumin, and the lesser-known neer dosa from coastal Karnataka. This complete technique guide walks you through grain selection, soaking ratios, grinding strategy, fermentation windows, tava temperature, the spread, and the finish so you can produce restaurant-quality dosas in a home kitchen.
What Is a Dosa? An Overview of the Technique
A dosa is a thin, savory crepe made from a wet-ground, fermented batter of parboiled rice and split black gram lentil (urad dal). What separates dosa from a French crepe or an Indian roti is fermentation: wild yeasts and lactic acid bacteria—mostly Leuconostoc mesenteroides and Lactobacillus species—colonize the soaked batter overnight and produce both carbon dioxide and a tangy aromatic profile. That gas creates the dosa’s signature lacy holes, the lactic acid drops the pH below 5.0 to deliver its faintly sour finish, and the rice starch crisps under heat to form the characteristic golden-brown shellac.
South Indian cooks treat dosa as more than a recipe. It is a technique with at least a dozen regional expressions: the long, tube-like Mysore masala dosa stained orange with red chutney, the four-inch Tamil set dosa eaten in stacks of three, the spongy Karnataka neer dosa made with unfermented rice batter, and the Andhra pesarattu built from green gram instead of urad. Each variant tweaks one or two variables—rice type, fermentation time, ratio, the addition of fenugreek, or the spread on the tava—but the technique chassis remains the same. Get that chassis right and you can pivot to any regional style with minor adjustments.
The reward for technique is texture. A properly made dosa shatters on the first bite and softens as it absorbs the sambar or coconut chutney on the plate. It is gluten-free, naturally vegan in its base form, high in plant protein because of the urad dal, and far more nutritious than its golden color suggests. Fermentation also makes the rice and lentil starches more digestible, increases B-vitamin content, and improves mineral absorption by breaking down phytic acid—a nutritional bonus baked into the method.
The Science of Dosa Fermentation
Understanding what is happening inside the bowl is what separates cooks who occasionally get a good dosa from cooks who get a great one every time. Dosa batter is a spontaneous fermentation—you do not add a starter—so the microbes come from the urad dal husks, the air, the grinder, and your hands. The dominant organisms in a healthy ferment are Leuconostoc mesenteroides, which produces both CO2 and lactic acid, and a succession of Lactobacillus species that take over as the pH drops.
Three variables drive the ferment: temperature, hydration, and salt. The microbial sweet spot sits between 80 and 90°F (27 to 32°C). Below 75°F (24°C) the ferment stalls and you get a flat, sour-only batter; above 95°F (35°C) the bacteria outrun the yeasts and you get a sharply acidic batter without the airiness that produces lace. Hydration matters because a batter that is too thick suffocates the microbes and one that is too thin lets gas escape before it can structure the crepe. Salt is a regional variable—some cooks add a teaspoon before fermenting because it sharpens flavor and slows runaway acidity, others add it just before cooking to maximize rise. Both work; consistency matters more than which side you pick.
The visible signal that fermentation is finished is volume. A well-fermented dosa batter doubles in the bowl and develops a domed top studded with small bubbles. Smell tells you the rest: it should be pleasantly yeasty and faintly tangy, similar to sourdough starter at peak activity. A sharp, acetone-like odor means you have over-fermented and need to discard a third of the batter, refresh with new ground rice and lentil, and let it briefly rest before cooking.
Equipment You Need
You do not need much specialized gear to make dosa, but a few well-chosen tools transform the result. Most South Indian home kitchens own a heavy iron tava, a wet grinder, and a flat-edged ladle dedicated to dosa-making. Each addresses a specific failure mode in the technique.
| Equipment | Purpose | Home Substitute | Notes |
|---|---|---|---|
| Cast iron tava (12 to 14 inch) | Holds heat steadily and crisps the bottom evenly | Heavy carbon steel pan or seasoned cast iron skillet | Nonstick works for beginners but does not produce the same lace |
| Wet grinder or high-power blender | Grinds soaked rice and dal into smooth aerated batter | Vitamix, Ninja, or Indian-style table-top wet grinder | Wet grinders produce fluffier batter; blenders need ice water to stay cool |
| Flat-bottomed brass ladle (4 oz) | Pours and spreads batter in a tight spiral | Half-cup measuring cup with flat bottom | Roundness of the base matters more than the material |
| Wide-mouth glass or stainless bowl | Holds rising batter with headroom | Any container with 50% extra capacity | Avoid airtight lids during ferment |
| Half-cut onion or muslin cloth | Seasons the tava between dosas | Folded paper towel dipped in oil | The onion adds moisture that helps the next dosa release |
| Plastic dough scraper | Lifts the edge to check doneness | Thin metal turner | Plastic is gentler on tava seasoning |
| Instant-read thermometer | Confirms tava temperature | Water-drop test | Aim for 400 to 425°F (205 to 220°C) at the cooking surface |
If you can only buy one piece of dedicated equipment, choose the cast iron tava. A properly seasoned, fully heated cast iron surface delivers the controlled high heat that produces lace, releases the dosa cleanly, and lasts for decades. A new tava needs three to four seasoning rounds before it cooperates—rub it with sesame oil, heat it for 20 minutes, cool, and repeat—but once the patina sets you will reach for it every weekend.
Choosing Your Rice and Dal
Dosa batter is a two-grain system: parboiled rice for structure and urad dal for the airy crumb. Substituting one for the other will compromise the result. Parboiled rice—called idli rice or boiled rice in South Indian markets—has been steamed in its husk before milling. That process gelatinizes some of its starch, which gives the milled grain extra absorbency and creates a stickier, more structured batter than raw rice. You can use a 50/50 blend of parboiled and raw rice for a slightly crispier dosa, but pure parboiled rice produces the most reliable lace.
Urad dal—split black gram with its black skin removed, so the lentil itself is creamy white—is the other half of the equation. Its proteins (mostly globulins) and mucilaginous starches whip into a thick foam during grinding, which traps fermentation gas and gives the dosa its lift. Buy whole or split urad dal that is bright white and free of debris. Old, yellowing dal has lost its mucilage and will not foam properly; if your batter never doubles even after 12 hours, suspect the dal first.
Fenugreek seeds (methi) are the third ingredient that most cooks add. A teaspoon of methi soaked with the rice contributes three things: a small dose of mucilage that improves browning, antimicrobial compounds that keep the ferment from going off-flavor, and a faint maple-like aroma that signals proper dosa to anyone who grew up eating them. Skip it if you must, but the result will taste subtly thinner.
The Ratio Question: How Much Rice to Dal?
Dosa-to-dal ratio is the single most-discussed variable in South Indian home cooking, and every family has an opinion. The classical Tamil Brahmin ratio is 3:1 rice to urad dal, which produces a crisp, golden dosa with restrained fermentation. The Karnataka-style ratio used at restaurants like Mavalli Tiffin Room runs closer to 4:1 with a small added handful of poha (flattened rice) for crispness. Andhra Telugu households tend toward 2:1 for a softer, more sour dosa. For your first attempts, use the ratio in the table below as a starting point and adjust over time.
| Dosa Style | Rice : Urad Dal | Add-In | Fermentation Time | Resulting Texture |
|---|---|---|---|---|
| Plain Crispy Dosa | 3 : 1 | 1 tsp fenugreek | 10 to 12 hours | Thin, crisp, golden, lacy |
| Masala Dosa (restaurant style) | 4 : 1 | 2 tbsp poha + 1 tsp fenugreek | 8 to 10 hours | Extra crisp, structural for filling |
| Set Dosa (soft, spongy) | 3 : 1 | 2 tbsp poha + 1/2 tsp baking soda | 10 to 12 hours | Thick, soft, full of holes |
| Mysore Sada Dosa | 2 : 1 | 1 tsp fenugreek + 1 tbsp chana dal | 12 to 14 hours | Slightly thicker, deeply tangy |
| Pesarattu (green gram) | 1 : 0 (whole moong instead) | Ginger, green chili, cumin | None (use immediately) | Earthy, soft, savory |
| Neer Dosa (Coastal Karnataka) | 1 : 0 (rice only) | Grated coconut, salt | None (use immediately) | Paper-thin, soft, lacy |
| Rava Dosa (instant) | 1 : 0 (semolina, rice flour) | Yogurt, cumin, ginger | 30 minutes rest | Crispy, lacy, no fermentation |
The other variable hidden in the ratio is whether you measure by volume or by weight. Volume measurement is faster but inconsistent because the bulk density of parboiled rice varies by brand. If you cook dosa more than once a month, switch to weight: 400 grams parboiled rice plus 100 grams urad dal plus 5 grams fenugreek gives a tight, repeatable batter for a household of four. Once you nail that baseline, every regional variation is a small adjustment from there.
Step-by-Step: Making the Batter from Scratch
Step 1: Wash and Soak
Measure 2 cups (400 g) parboiled rice into one bowl and 1/2 cup (100 g) urad dal plus 1 teaspoon fenugreek seeds into a second bowl. Rinse each three times in cool water until the water runs clear. Cover with at least double their volume of filtered water—chlorine in tap water can suppress fermentation, so filtered is worth using. Soak the rice for 4 to 6 hours and the dal-fenugreek for 4 hours. Soaking longer than 8 hours invites unwanted bacterial growth before grinding, especially in warm climates.
Step 2: Grind the Dal First
Drain the urad dal and fenugreek and transfer to a wet grinder or high-power blender. Reserve the soaking water—you will need it for grinding. Start the blender on low and gradually add cold water (ice water if your blender heats up quickly). Grind for 15 to 20 minutes in a wet grinder or in 30-second pulses in a blender until the dal becomes a smooth, white, fluffy paste that resembles whipped marshmallow. Test by dropping a teaspoon of paste into a bowl of water; if it floats, the dal has incorporated enough air. If it sinks, grind longer.
The fluffiness of the dal paste is the single most important predictor of dosa quality. Aerated dal traps fermentation gas, lifts the batter, and produces the lacy holes. A dense paste produces a flat, gummy dosa no matter how long you ferment it. Transfer the finished dal to a wide-mouthed stainless or glass bowl with at least 50 percent extra headroom for the rise.
Step 3: Grind the Rice
Drain the rice and grind it the same way, but to a slightly grainier texture—think the consistency of fine semolina rather than smooth paste. A barely perceptible grit is what makes the dosa crisp; an over-smooth rice batter goes gummy. Use only enough water to keep the blender moving. Pour the ground rice into the bowl with the dal.
Step 4: Mix and Check Consistency
Mix the two ground pastes by hand for 2 to 3 minutes. Your hand temperature and skin microbiota help inoculate the batter—this is a small but real factor in spontaneous fermentation. Check consistency by lifting a ladleful: the batter should fall in a thick, slow ribbon similar to American pancake batter or slightly thicker. If too thick, add cold water a tablespoon at a time. If too thin, you have either over-ground or added too much grinding water; you cannot easily reverse this, so err thicker.
Step 5: Ferment
Cover the bowl loosely with a plate or muslin cloth (never airtight) and place it in a warm spot. Ideal locations: inside an unlit oven with the oven light on (raises the cavity to about 85°F / 29°C), on top of a refrigerator, near a radiator, or in an Instant Pot set to yogurt mode for 8 hours. Most kitchens take 10 to 12 hours; a cold winter kitchen can take 14 to 16. The batter is ready when it has doubled, the surface is domed with small bubbles, and the smell is pleasantly yeasty.
Step 6: Salt and Adjust
Stir in 1 1/2 teaspoons fine sea salt and check the consistency one more time. Fermented batter thickens slightly; you may need a few tablespoons of cool water to bring it back to a spreadable consistency, like thin yogurt. The first dosa always tells you what to adjust: if it tears, the batter is too thick; if it spreads into a soup, too thin; if it sticks, the tava is too cool; if it browns before the surface dries, the tava is too hot.
Step-by-Step: Cooking the Dosa
Step 1: Heat the Tava
Place your cast iron tava on a medium-high burner and heat for 5 to 7 minutes. A correctly heated tava reads 400 to 425°F (205 to 220°C) on an infrared thermometer. To test without a thermometer, flick a few drops of water onto the surface: they should sizzle, bead up, and dance across the pan before evaporating. If they evaporate instantly with a hiss, the tava is too hot; if they pool and sit, too cool.
Step 2: Season the Surface
Take a half-cut onion (cut side down) and rub it across the hot tava in tight circles for 5 to 10 seconds. The released moisture and onion sugars create a microscopic non-stick layer. Then dip a folded paper towel or cotton cloth into neutral oil—gingelly (Indian sesame) or coconut for tradition, sunflower for neutrality—and wipe a thin film across the surface. The tava is now ready.
Step 3: Cool the Tava Before the First Pour
This is the most counterintuitive step. A super-hot tava sets the batter the instant it lands, which prevents you from spreading it thin. Sprinkle a tablespoon of water on the tava and wipe it off with a cloth—this drops the surface temperature by 30 to 50°F. Your tava is now in the sweet spot for spreading, around 350°F (175°C). After the dosa is on, the burner reheats it back to crisping temperature.
Step 4: Pour and Spread
Hold a flat-bottomed ladle of batter (about 1/3 cup) over the center of the tava and pour in one steady stream. Immediately use the back of the ladle to spread the batter outward in a tight, continuous spiral, working from center toward the edge. Keep gentle pressure—too hard and you tear the dosa, too light and you leave thick spots. A practiced spread takes 3 to 4 seconds. The thinner your spread, the crispier the dosa; aim for the diameter of a dinner plate on the first try and reduce thickness with practice.
Step 5: Oil and Cook
Drizzle 1/2 teaspoon of ghee or oil around the edges and a few drops in the center. Cook undisturbed for 60 to 90 seconds. The surface will lose its sheen, small holes will open, and the edges will start to lift off the tava on their own. Lift a corner with a spatula to check: the underside should be evenly bronze. If it is pale, give it another 20 seconds; if it is dark brown, lift the heat slightly for the next round.
Step 6: Fold and Serve
For a plain dosa, fold in half and slide onto a warm plate. For masala dosa, place a line of potato filling along the center, fold both sides over the filling, and serve seam-side down. A properly cooked dosa is crisp on the outer surface and tender just under the skin; it should crack audibly when you tear into it. Serve immediately with sambar and chutney—dosas wait for no one.
Common Mistakes and How to Fix Them
Most dosa problems are diagnosable from a single attempt. The table below pairs symptom with cause and a concrete fix. Print it and tape it inside a kitchen cabinet for your first month of practice—it will spare you a lot of guesswork.
| Problem | Likely Cause | Fix |
|---|---|---|
| Batter didn’t rise | Cold kitchen or stale urad dal | Move to warmer spot (oven with light on); buy fresh dal next time |
| Batter smells like nail polish | Over-fermented | Discard 1/3, refresh with new ground batter, rest 1 hour |
| Dosa sticks to tava | Tava too cool or not seasoned | Heat longer, rub with onion, oil lightly between dosas |
| Dosa tears when spreading | Batter too thick or tava too hot | Thin batter with water; cool tava with water wipe |
| No lacy holes | Under-aerated dal or insufficient fermentation | Grind dal longer until it floats in water; ferment 2 more hours |
| Dosa is pale, not golden | Tava not hot enough during cooking phase | Increase burner to medium-high after pouring |
| Dosa is dark and burnt | Tava too hot or batter too thin | Reduce burner, slightly thicker spread |
| Dosa is rubbery, not crisp | Insufficient cooking time | Cook 30 more seconds; drizzle oil around edges to crisp |
| Dosa is sour beyond pleasant | Over-fermented at warm temp | Reduce ferment time by 2 hours; refrigerate excess batter |
| Batter foams over the bowl | Container too small | Move to 1.5x size container next round |
| First dosa always fails | Normal; the tava is still settling | Sacrifice the first one to the gods, keep cooking |
The single most universal beginner fix is patience with the tava. New dosa cooks tend to want the pan ready in three minutes; experienced cooks heat it 7 to 10 minutes and let temperature stabilize. The pan is doing the work, not the burner.
Practice Exercises to Build Skill
Dosa technique is built through structured repetition, not occasional weekend attempts. The exercises below will compress months of natural learning into about ten focused practice sessions. Schedule them on consecutive weekends if possible—it lets you carry forward muscle memory from one session to the next.
Exercise 1: The Five-Dosa Tava Check
Make five plain dosas back to back without changing anything. Observe how the tava temperature drifts. The second is usually best; the fourth is often when you have stopped watering the surface between rounds. Keep notes for the next session.
Exercise 2: The Spread Drill
Use a flat-bottomed measuring cup instead of a ladle. Pour 1/3 cup of batter and spread in a tight, deliberate spiral. The first ten times will feel awkward. By the twentieth, your spirals will compress on their own and the dosa will reach the edge of a 12-inch tava in 4 seconds.
Exercise 3: Three Ratios in One Day
Soak three separate batters at 2:1, 3:1, and 4:1 rice to dal. Cook each side by side after fermenting. You will physically taste the difference between a tender Tamil dosa and a crisp restaurant-style one. Pick the ratio you prefer and standardize.
Exercise 4: Cold Kitchen Mastery
Ferment one batch on the counter, one in the oven with the light on, and one in an Instant Pot on yogurt setting. Cook a dosa from each. You will learn how temperature affects rise and tang, and you will own that knowledge for any kitchen.
Exercise 5: Masala Dosa Assembly
Make a batch of potato palya (the spiced potato filling), set it in a warm bowl, and practice placing, folding, and serving. The dosa cools fast, so the assembly window is 8 to 10 seconds. Five reps and your hands will know the move.
Advanced Techniques and Variations
Once you can make a clean plain dosa, the advanced variations layer on textural and flavor complexity. None of them require new gear, only refined control of the same variables.
Crispy Restaurant-Style Lace
Restaurant dosas are crisper than home dosas because tava chefs use rice flour to thin the batter, ghee instead of oil, and a slightly hotter tava. To replicate at home: take 1 cup of fermented batter, whisk in 2 tablespoons rice flour and a tablespoon of water until smooth, then cook on a tava held at 425°F (220°C). The added rice flour crisps faster than the wet starch in the batter and produces the audible crack.
Ghee Roast
The ghee roast is a Karnataka-Tamil specialty where a thin dosa is cooked entirely in ghee and finished with a smear of red chili-garlic paste before folding. Use clarified ghee, not regular butter—the milk solids in butter burn at dosa temperature. Brush 2 teaspoons of ghee around the edge after spreading and add another teaspoon to the center. The dosa darkens to deep mahogany and tastes of toasted nuts.
Cone Dosa and Paper Dosa
These are presentation variations of a thin crispy dosa. After the dosa releases from the tava, roll it into a long cone (cone dosa) or leave it flat and stack high on a plate (paper dosa, sometimes a yard long). Both require a very thin spread and full crispness so the structure holds.
Adding Color and Flavor
Mysore masala dosa is finished with a smear of red chutney (Byadgi chilies, garlic, tamarind) before folding. Beetroot dosa adds blended beet for color. Spinach dosa uses palak puree. Carrot dosa stirs grated carrot into the spread. The base batter stays the same; only the topping or the colorant changes. For technique consistency, keep the colorant additions under 1/4 cup per cup of batter so the fermentation structure does not collapse.
Recipe: Classic Masala Dosa with Potato Filling
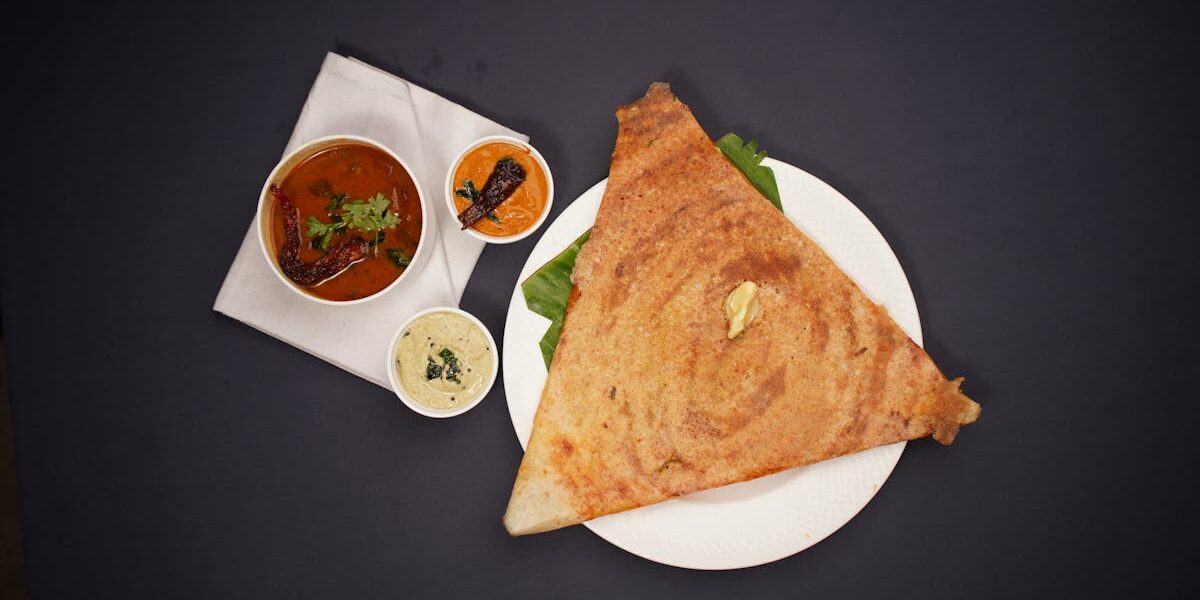
The masala dosa is the dosa that converted the world. It marries a crisp golden crepe with a soft, mildly spiced potato palya and serves with sambar and coconut chutney on the side. The version below is the Karnataka-style masala dosa popularized by Bengaluru’s tiffin rooms.
For the Potato Filling (Palya)
- 4 medium yellow potatoes, boiled and roughly mashed
- 1 large onion, sliced thin
- 2 green chilies, slit
- 1 inch fresh ginger, grated
- 1 sprig curry leaves
- 1/4 tsp turmeric
- 1/2 tsp mustard seeds
- 1 tsp split chana dal
- 1 tsp split urad dal
- 2 tbsp oil
- Salt to taste
- 2 tbsp cilantro, chopped
- Juice of 1/2 lemon
Heat oil in a wide pan. Add mustard seeds and let them pop. Add chana and urad dal and toast until golden. Add curry leaves, sliced onion, green chili, ginger, and turmeric. Sauté until onions are translucent, about 5 minutes. Add mashed potato, salt, and 2 to 3 tablespoons water. Stir gently until the mixture comes together as a soft, almost wet mash. Finish with cilantro and lemon juice. Keep warm.
Assembling the Masala Dosa
Make a crisp dosa using the technique above. While it is still on the tava, smear a thin layer of red chutney across the surface if you have it. Place a heaping 1/2 cup of potato filling along the center third of the dosa. Quickly fold the right side over the filling, then the left, forming a long tube or a folded rectangle. Slide onto a plate and serve immediately with sambar and coconut chutney. For the full Karnataka experience, pair with a small bowl of tadka-tempered coconut chutney.
Recipe Variations: Three More Dosas to Try
Rava Dosa (Instant, No Fermentation)
When you want dosa tonight, rava dosa is the answer. Whisk 1 cup fine semolina, 1/2 cup rice flour, and 1/4 cup all-purpose flour with 1/4 cup yogurt, 2 cups water, 1 chopped green chili, 1 tablespoon chopped ginger, 1 teaspoon cumin, and salt. Rest 30 minutes. The batter should be very thin, almost like buttermilk. Heat the tava as before. Instead of spreading, you pour the batter from height in concentric splatters that create natural lace as they hit the hot surface. Drizzle with oil and cook until crisp. Rava dosa is lacier than fermented dosa and pairs beautifully with coconut chutney.
Pesarattu (Green Gram Dosa)
Pesarattu is the Andhra answer to dosa, made from whole green moong beans rather than rice and urad. Soak 1 cup whole green moong beans for 6 hours. Drain and grind with 1 inch ginger, 2 green chilies, 1 teaspoon cumin, and just enough water to make a thick pancake batter. No fermentation needed. Cook on a hot tava the same way as a regular dosa but slightly thicker—pesarattu is denser by design. Sprinkle finely chopped onion and cilantro on the wet surface before flipping. Serve with ginger chutney.
Neer Dosa (Coastal Karnataka Rice Crepe)
Neer dosa means water dosa and is the gentlest dosa in the family. Soak 2 cups raw rice for 4 hours. Grind with 1/4 cup grated fresh coconut and enough water to make a thin, pourable batter, the consistency of whole milk. Add salt and use immediately—no fermentation. Heat a nonstick or well-seasoned tava. Pour a ladle of batter and tilt the pan to spread (do not use the ladle to spread). Cover for 30 seconds. The dosa is done when the edges lift; do not flip. Neer dosa is soft, lacy, and pairs with coconut milk and jaggery for a sweet finish or with spicy chicken curry for a Mangalore-style meal.
Storing and Reviving Dosa Batter
Fermented dosa batter keeps in the refrigerator for 4 to 5 days. Refrigeration slows but does not stop fermentation, so the batter will continue to develop tang. After day three, the dosas you make from it will be noticeably sour—delicious for some, off-putting for others. Reverse the trend by adding a quarter cup of fresh ground rice (no need to ferment) and mixing in well; this dilutes the tang and adds fresh sugars for the next round.
You can freeze dosa batter for up to a month. Portion into freezer-safe containers with headroom, label, and freeze. Thaw overnight in the refrigerator and let come to room temperature before cooking. Frozen batter loses some of its airiness, so add 1/4 teaspoon baking soda to a cup of thawed batter to compensate. The dosa will still cook beautifully but will not have quite the same lace as fresh ferment.
For year-round dosa habit, many South Indian households keep a mother batter running. They cook from the bottom of the bowl, then refresh the top with new ground rice and dal weekly. The microbial population stabilizes, fermentation gets faster (sometimes 6 hours instead of 12), and the flavor develops a depth that fresh batter cannot match. It is the South Indian sourdough.
What to Serve with Dosa
A dosa eaten alone is a missed opportunity. The South Indian tiffin trinity—sambar, coconut chutney, and tomato chutney—is the canonical accompaniment, and each component balances something the dosa does not.
Sambar is a thin lentil-vegetable stew built on a base of toor dal, tamarind, and sambar powder. It contributes acid, body, and umami. A good sambar is brothy enough to drip off the dosa but not so watery that it pools.
Coconut chutney is the cooling counterweight. Blend 1 cup grated fresh coconut, 2 tablespoons roasted chana dal, a small piece of ginger, a green chili, and salt with enough water to make a thick paste. Temper with mustard seeds, urad dal, curry leaves, and asafoetida in hot oil. Pour the tadka over the chutney just before serving.
Tomato chutney or onion chutney adds sweetness and heat. Sauté chopped tomato or onion with garlic and dried chilies until soft, blend, and finish with tempered mustard seeds. The third chutney rotates seasonally—coriander chutney, peanut chutney, and mint chutney are all welcome.
For a full South Indian breakfast spread, add a small glass of filter coffee (the foamy stovetop kind made with chicory) or a tumbler of buttermilk seasoned with curry leaves and ginger. If you are exploring the regional context, our Tamil food guide and Kerala food guide map out the broader breakfast cultures these dosas emerged from.
Nutrition, Substitutions, and Dietary Adaptations
A plain dosa contains roughly 130 to 170 calories, 3 to 4 grams of protein, 25 to 30 grams of carbohydrate, and minimal fat. Fermentation increases B-vitamin content (especially B12 from the bacteria), reduces phytic acid by up to 60 percent, and improves digestibility of both the rice starches and dal proteins. Dosa is naturally gluten-free, dairy-free in its base, and vegan when cooked in oil rather than ghee.
For a higher-protein variation, replace 1/4 cup of the rice with 1/4 cup soaked moong dal or chana dal. The dosa will be slightly thicker but adds 4 to 5 grams of protein per serving. For a brown rice dosa, swap parboiled rice for brown parboiled rice; expect a 2-hour longer fermentation and a nuttier flavor. For a millet dosa, use foxtail millet or ragi flour for 1/3 of the rice. Millet dosas are slightly more delicate but lower-glycemic.
If you are sensitive to fermentation, an instant rava dosa or neer dosa eliminates the ferment step entirely. The texture is different but the dish still feels authentically South Indian. For a low-sodium version, skip salt in the batter and salt the filling instead—the perceived saltiness on the palate is similar.
Dosa in Context: Regional Origins and Cultural Significance
The earliest written mention of dosa appears in 6th-century Tamil Sangam literature, where it is described as a thin, soft preparation eaten by laborers. By the 12th century, the Karnataka Hoysala-era text Manasollasa includes a recipe that resembles modern dosa, complete with the rice-dal ratio and fermentation. The dish migrated outward from Karnataka and Tamil Nadu through traveling Brahmin cooks, Udupi temple cuisine, and the famous Mavalli Tiffin Room (MTR) in Bengaluru, which is credited with formalizing the crisp masala dosa as we know it in 1924.
Today, dosa is a near-universal South Indian breakfast and a global street food. There are dosa carts in Singapore, dedicated dosa cafes in London, fusion dosa joints in San Francisco (Korean BBQ dosa, anyone?), and Tamil tiffin chains across the Indian diaspora. The technique has stayed remarkably consistent across geographies—a measure of how well-engineered the original method is.
Within India, dosa marks regional identity. A Tamil household serves smaller, slightly thicker dosas with podi (gunpowder spice mix) and ghee. A Karnataka household serves the long, crisp Mysore masala. An Andhra household ferments longer for that signature tang and serves with allam pachadi (ginger chutney). A Kerala household sometimes adds coconut milk to the batter for a richer dosa called an appam-dosa hybrid. Each variation is a window into the cuisine; if you cook all four, you essentially learn South Indian breakfast culture from the inside out.
Frequently Asked Questions
Why didn’t my dosa batter ferment?
The two most common causes are kitchen temperature below 75°F (24°C) and stale urad dal. Move the batter to an oven with the light on, an Instant Pot on yogurt mode, or above the refrigerator. If still no rise after 16 hours, your dal is the culprit—buy fresh.
Can I use regular long-grain rice instead of parboiled?
Yes, but the dosa will be less crisp and the batter will not structure as well. If you must, use a 1:1 blend of long-grain raw rice and parboiled rice. Pure raw rice batter ferments faster but produces a softer dosa closer to oothappam.
Can I make dosa batter in a regular blender?
Yes, but use ice water to keep the motor cool, work in small batches, and grind in 30-second pulses. A wet grinder is gentler and produces fluffier dal, but a high-power blender (Vitamix, Ninja) is perfectly serviceable. Avoid bullet-style blenders—they cannot run long enough to aerate the dal properly.
How do I know when the tava is the right temperature?
Sprinkle a few drops of water on the surface. They should sizzle and dance for 2 to 3 seconds before evaporating. If they vanish instantly, the tava is too hot—wipe with a wet cloth. If they pool and sit, heat longer. An infrared thermometer reading of 400 to 425°F (205 to 220°C) is the precise answer.
Why do restaurant dosas look so much crispier than mine?
Restaurants use slightly thinner batter, a hotter and larger tava that holds heat, ghee instead of oil, and a thinner spread. They also throw away the first few minutes of cooking on a new tava each morning. Add 2 tablespoons of rice flour per cup of fermented batter at home and you will close most of the gap.
Can I make dosa without a tava?
Yes. A 12-inch carbon steel pan or a well-seasoned cast iron skillet does the job. Nonstick pans work too but produce a paler dosa because the surface releases the batter too easily for it to crisp.
What is the difference between dosa and uttapam?
Same batter, different cooking. Uttapam is poured thicker (about 1/2 inch) and topped with chopped onion, tomato, and chili while the surface is still wet. It cooks slower, covered, and produces a soft, savory pancake rather than a crisp crepe. If your dosa batter has gotten too thick to spread, switch to uttapam—it is the natural fallback.
How long does dosa batter last?
Four to five days in the refrigerator, one month in the freezer. The tanginess increases with time, so use earlier batches for plain dosa and later batches for uttapam where the tang complements toppings.
Can I make dosa batter without urad dal?
Not the classical fermented dosa—urad dal provides the proteins that capture fermentation gas. You can substitute soaked moong dal for a different style (this becomes pesarattu) or use rice flour with semolina for instant rava dosa. The crisp, lacy texture of a proper masala dosa depends on urad.
What is the best oil for cooking dosa?
Traditionally gingelly (Indian sesame) oil for Tamil dosa, coconut oil for Kerala, and ghee for restaurant-style ghee roast. For neutral flavor, sunflower or grapeseed oil works. Avoid olive oil, which burns at the tava temperature and contributes a bitter note.
Final Thoughts: Building a Dosa Practice
The dosa is one of the highest-skill, lowest-cost dishes in the South Indian repertoire. A cup of rice and a quarter cup of dal yields breakfast for a family of four, and the technique scales endlessly—double the batch and you have lunchboxes; triple it and you can host a weekend brunch. The compounding benefit of practicing dosa is that it teaches you fermentation, batter rheology, tava temperature management, and crepe spreading—skills that transfer to appam, idli, idiyappam, paniyaram, dhokla, and even European crepes and Korean jeon.
Build a weekly habit. Soak Friday night, ferment Saturday, cook Sunday morning. Keep a mother batter going in the fridge. Try a new variation each month. After six months you will not just be making dosas; you will be reading the batter, feeling the tava, and adjusting in real time the way South Indian grandmothers do without thinking about it. That is the real reward of the technique.
For more South Indian and broader South Asian cooking foundations, explore our guide to naan technique, the regional context in our Indian food guide, and the spice-tempering technique behind nearly every accompaniment in our tadka guide. The dosa is a centerpiece, but it lives inside a much larger culinary system worth learning end-to-end.

Mei Lin Chen
Mei Lin Chen is an Asian food writer and recipe developer. Melbourne-raised and London-based, she has spent over a decade exploring the rice paddies, hawker stalls, and home kitchens of South-East and East Asia. Her recipes balance traditional technique with everyday practicality.