Last updated: March 18, 2026
Sashimi is one of the purest expressions of Japanese cuisine — raw fish, cut with precision, served with nothing more than soy sauce and wasabi. There are no sauces to hide behind, no cooking processes to forgive mistakes. The quality of every slice depends entirely on two things: the freshness of the fish and the skill of the knife. Learning how to make sashimi at home is not just about cutting raw fish. It is about understanding grain direction, mastering blade angles, selecting the right fish, and presenting each piece with intention.
This guide covers everything you need to make restaurant-quality sashimi at home, from choosing sashimi-grade fish to mastering the five essential cutting techniques that Japanese chefs train years to perfect. Whether you are working with salmon, tuna, yellowtail, or sea bream, the principles remain the same — and they are entirely learnable in your own kitchen.
What Is Sashimi and Why Technique Matters
Sashimi (刺身, literally ”pierced body”) refers to thinly sliced raw fish or seafood served without rice. Unlike sushi, which pairs fish with vinegared rice, sashimi puts the fish itself at center stage. The word dates back to the Muromachi period (1336–1573), when fishermen would pierce the tail fin through a slice of fish to identify the species being served.
Technique matters more in sashimi than in almost any other form of cooking because there is no heat, no seasoning, and no second chances. A dull knife tears muscle fibers and creates a ragged texture. An incorrect angle releases too many oils or compresses the flesh. The wrong cutting direction turns a buttery slice into a chewy one. Japanese sushi chefs (itamae) spend years on knife work alone before they are allowed to cut fish for customers — and the core principles they learn are the same ones you will master in this guide.
Essential Equipment for Making Sashimi
You do not need a full sushi bar setup to make sashimi at home, but certain tools make a significant difference in quality. Here is what you need and why each item matters.
The Sashimi Knife (Yanagiba)
The yanagiba (柳刃, ”willow blade”) is the traditional sashimi knife. It features a long, narrow, single-bevel blade typically between 240mm and 330mm. The single bevel — sharpened only on the right side for right-handed knives — allows for extremely clean cuts that preserve the cellular structure of the fish. When you pull a yanagiba through a piece of fish in one smooth stroke, the cut surface stays glossy and clean rather than torn and matte.
If you do not have a yanagiba, a sharp chef’s knife with a blade of at least 8 inches can work. The key requirement is that the blade must be genuinely sharp. A sharp knife glides through fish without pressure. If you find yourself pressing down or sawing, the knife needs sharpening.
Cutting Board
Use a large wooden or high-density polyethylene cutting board. Japanese chefs prefer hinoki (cypress) boards because they are soft enough to protect the knife edge, antimicrobial, and do not absorb fish odors. Whatever board you choose, it must be large enough to lay out a full fillet — at least 18 by 12 inches. A board that is too small forces awkward angles and inconsistent cuts.
Additional Tools
A pair of fish tweezers (or clean needle-nose pliers) for removing pin bones. Paper towels for keeping surfaces dry. A damp cloth (shibori) to wipe the knife between cuts. A sharp flexible fillet knife for breaking down whole fish. And a whetstone (1000/3000 grit combination) for maintaining your edge.
How to Choose Sashimi-Grade Fish
The term ”sashimi-grade” or ”sushi-grade” is not regulated by the FDA in the United States. It is a marketing label that vendors use to indicate fish they consider safe and suitable for raw consumption. That means the responsibility for choosing safe fish falls on you. Here is how to select fish confidently.
Freshness Indicators
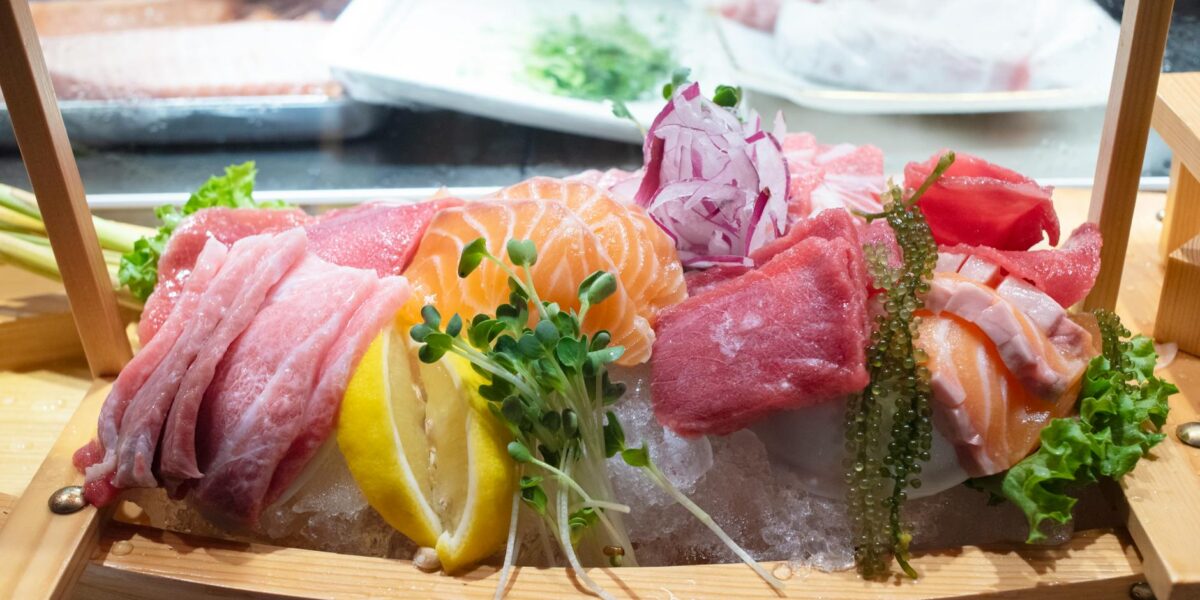
Fresh sashimi-grade fish should smell like the ocean — clean, briny, and slightly sweet. It should never smell ”fishy.” The flesh should be firm and spring back when pressed lightly. The color should be vibrant: deep red for tuna, bright coral for salmon, translucent pink for sea bream. Avoid fish with dull color, brown edges, or a slimy surface.
Freezing and Safety
The FDA recommends that fish intended for raw consumption be frozen to kill parasites. The guidelines specify freezing at -4°F (-20°C) for 7 days, or at -31°F (-35°C) for 15 hours. Most commercially sold ”sashimi-grade” fish has already been flash-frozen to meet these standards. When buying from a fishmonger, ask whether the fish has been previously frozen for parasite destruction. Farm-raised salmon is generally considered lower-risk for parasites than wild-caught, but freezing is still recommended as a precaution.
Best Fish for Beginners
Start with fish that are forgiving to cut and widely available. Salmon (sake) has a soft, fatty texture that is easy to slice. Tuna (maguro) has a firm, uniform grain that teaches clean cutting. Yellowtail (hamachi) offers a buttery texture with moderate firmness. These three varieties are the foundation of home sashimi practice, and all are readily available at Japanese grocery stores and well-stocked fish counters.
How to Prepare Fish for Sashimi Cutting
Before you make a single sashimi cut, the fish needs to be properly prepared. This step is just as important as the cutting itself.
Step 1: Thaw Properly
If your fish is frozen, thaw it slowly in the refrigerator overnight. For faster thawing, seal the fish in a zip-lock bag and submerge it in cold water for 30 to 60 minutes. Never thaw fish at room temperature or in warm water — this promotes bacterial growth and degrades texture.
Step 2: Pat Dry
Remove the fish from packaging and pat it thoroughly dry with paper towels. Excess moisture on the surface makes the fish slippery and causes the knife to slide rather than cut cleanly. Dry fish, dry board, dry hands — this is the rule.
Step 3: Remove Pin Bones
Run your fingers along the fillet against the grain to feel for pin bones. Use fish tweezers to pull them out at the angle they sit in the flesh, pulling toward the head end. Salmon typically has a row of pin bones running through the thickest part of the fillet. Tuna blocks (saku) are usually boneless.
Step 4: Remove Skin (If Needed)
Lay the fillet skin-side down. Starting at the tail end, slide a sharp flexible knife between the flesh and skin at a slight downward angle. Hold the skin taut with your other hand (a paper towel helps with grip) and use long, smooth strokes to separate the flesh. Some fish, like salmon, are also served skin-on after torching (aburi style).
Step 5: Trim and Portion into Blocks
Trim away any dark bloodline meat, sinew, or uneven edges. Cut the fillet into rectangular blocks (saku blocks) roughly 3 inches wide and 6 inches long. These uniform blocks are the starting point for consistent sashimi slices. Keep the blocks rectangular — wedge-shaped pieces produce uneven slices.
The Five Essential Sashimi Cutting Techniques
Japanese cuisine uses five primary cutting techniques for sashimi. Each produces a different thickness, texture, and presentation. Mastering even two or three of these will dramatically elevate your sashimi game.
1. Hira-zukuri (Flat Cut / Standard Slice)
This is the most common sashimi cut and the one you should learn first. Place the saku block with the grain running left to right. Starting from the right side of the block (left side if left-handed), angle your knife at roughly 15 to 20 degrees to the right. In one smooth pull from heel to tip of the blade, draw the knife through the fish toward you. Each slice should be about 10mm (⅜ inch) thick. Let the weight of the knife do the work — do not press down. After each cut, gently slide the slice to the right with the flat of the blade. Hira-zukuri is used for tuna, salmon, yellowtail, and most firm-fleshed fish.
2. Usu-zukuri (Thin Cut / Paper-Thin Slice)
Used for firm white fish like sea bream (tai), fluke (hirame), and blowfish (fugu). The slices are cut so thin — 1 to 2mm — that they become translucent. Place the block on the board and hold the knife at an extreme angle, nearly parallel to the cutting surface. Pull the blade through in one motion, cutting slices thin enough to see the plate pattern through them. Usu-zukuri slices are typically fanned in a circle on the plate (a pattern called chrysanthemum arrangement) and eaten with ponzu sauce rather than soy sauce. This cut requires the sharpest possible knife.
3. Sogi-zukuri (Angled Cut / Diagonal Slice)
Similar to hira-zukuri but with a more pronounced angle. Tilt the knife to about 30 to 45 degrees and slice diagonally across the grain. This creates wider, thinner slices with more surface area, which enhances the fish’s interaction with soy sauce. Sogi-zukuri is commonly used for salmon sashimi and for fish with a softer texture that benefits from a thinner presentation. The increased surface area also releases more aroma.
4. Kaku-zukuri (Cube Cut)
The fish is cut into cubes roughly 15mm (½ inch) on each side. First cut the saku block into strips, then cross-cut the strips into cubes. Kaku-zukuri is used for tuna poke bowls, chirashi sushi, and tartare preparations. This cut works best with firm fish like tuna and is a good entry point for beginners because precision matters less than with thin slicing.
5. Ito-zukuri (Thread Cut)
Used for squid, cuttlefish, and some firm white fish. The fish is cut into thin matchstick-sized strips, about 3mm wide. First, cut the block into thin sheets, then stack the sheets and cut them into fine strips. Ito-zukuri is served in small mounds and often paired with ginger and shiso leaves. The thin strips maximize the textural contrast between the firm fish and any accompanying sauce.
Step-by-Step: Making Salmon Sashimi (Hira-zukuri)
Salmon is the most popular sashimi fish in the United States and the best fish to start practicing with. Here is the complete process from block to plate.
Step 1: Start with a trimmed, skin-off, boneless salmon saku block, roughly 3 inches wide and 6 inches long. The block should be cold but not frozen — slightly chilled fish is firmer and easier to cut cleanly.
Step 2: Position the block with the grain running left to right in front of you. Identify the grain direction by looking at the white fat lines — they run parallel to the grain.
Step 3: Wet your knife blade with a damp cloth. This reduces friction and helps the blade glide through the fish without tearing.
Step 4: Place the heel of the knife (the part closest to the handle) at the far right end of the block. Angle the knife slightly to the right, about 15 to 20 degrees from vertical.
Step 5: In one continuous motion, draw the knife toward you from heel to tip, letting the full length of the blade do the cutting. Do not push down and do not saw back and forth. One smooth pull. The slice should fall gently to the right.
Step 6: Use the flat of the blade to slide the slice to the right, laying it at a slight angle against the previous slice. Continue cutting, maintaining consistent thickness of about 10mm.
Step 7: When you have 5 to 7 slices, use the flat of the knife to transfer them to a chilled serving plate. Arrange them in a shingled row, each slice overlapping the previous one by about one-third. Serve immediately with soy sauce, wasabi, and pickled ginger.
Common Sashimi Mistakes and How to Fix Them
Even experienced home cooks make these errors when starting with sashimi. This table identifies the most frequent problems, their causes, and the fixes.
| Mistake | Cause | Fix |
|---|---|---|
| Ragged, torn edges on slices | Dull knife or sawing motion | Sharpen knife on a 1000-grit whetstone; use a single pull stroke from heel to tip |
| Slices stick to the blade | Dry blade or too much pressure | Wipe blade with a damp cloth between cuts; reduce downward pressure |
| Uneven thickness | Inconsistent angle or speed | Maintain a fixed wrist angle; practice with a consistent pull speed |
| Fish crumbles or falls apart | Fish is too warm or over-thawed | Return fish to the refrigerator for 15 minutes; work with partially chilled fish |
| Mushy, soft texture | Fish was thawed at room temperature | Always thaw in the refrigerator overnight or in cold water |
| Fishy smell | Poor quality or improperly stored fish | Buy from trusted sources; check for freshness indicators before purchasing |
| Slices curl up | Cutting with the grain instead of against it | Identify grain direction and cut perpendicular or at an angle to it |
| Brown discoloration on tuna | Oxidation from air exposure | Cut tuna just before serving; cover blocks with damp paper towels while working |
| Slices are too thick | Knife angle too steep | Lower the angle of the blade closer to parallel with the board |
| Skin tears during removal | Knife not flexible enough or wrong angle | Use a flexible fillet knife; keep the blade angled slightly toward the skin |
How to Present and Serve Sashimi
Sashimi presentation follows the Japanese aesthetic principle of moritsuke — the art of arranging food on a plate. Proper presentation is not just decorative; it enhances the dining experience and reflects respect for the ingredients.
Plate Selection
Use chilled plates or platters. Traditional sashimi plates are flat or slightly concave, often in neutral colors (white, slate, dark glazes) that contrast with the vibrant colors of the fish. Rectangular plates work particularly well for linear arrangements. Chill plates in the refrigerator for at least 30 minutes before serving.
Garnishes (Tsuma and Ken)
Traditional sashimi garnishes serve functional purposes beyond decoration. Daikon radish (ken) is cut into fine threads and placed as a bed for the fish — it cleanses the palate between bites and has mild antibacterial properties. Shiso leaves (ooba) add a herbal freshness and provide a visual divider between different types of fish. A small mound of freshly grated wasabi is placed on the plate rather than pre-mixed into soy sauce. Pickled ginger (gari) is served alongside to cleanse the palate between fish varieties.
Arrangement Styles
The three most common sashimi arrangements are: Nagashi-mori (flowing arrangement), where slices are shingled in a row, leaning against each other. Kasane-mori (layered arrangement), where slices are stacked at varying angles for height. Yosemori (gathered arrangement), used for mixed sashimi platters where different fish are grouped in clusters around a central garnish. For home serving, nagashi-mori is the most practical and visually effective.
Sashimi Condiments and Dipping Sauces
The traditional accompaniment is simply soy sauce and wasabi, but there are several variations worth knowing.
Classic soy sauce dip: Pour a small amount of high-quality Japanese soy sauce (koikuchi) into a dipping dish. Place a pea-sized amount of wasabi on the sashimi slice directly, then dip the edge — not the whole slice — into the soy sauce. Mixing wasabi into soy sauce (wasabi-joyu) is common in casual settings but considered improper in traditional dining because it masks the wasabi’s volatile aromatics.
Ponzu dip: A citrus-soy sauce that pairs exceptionally well with white fish sashimi and usu-zukuri thin slices. The acidity of yuzu or other citrus brightens delicate fish flavors. Add grated daikon and a pinch of shichimi togarashi for depth.
Sesame dipping sauce: Blend toasted sesame oil, soy sauce, mirin, and a touch of rice vinegar. This richer sauce works well with fattier fish like salmon belly (harasu) and toro.
Korean-style (hoe): Korean raw fish (hoe) is traditionally served with a spicy sauce made from gochujang, sesame oil, rice vinegar, garlic, and sugar. This preparation highlights the crossover between Japanese sashimi and Korean raw fish traditions.
Fish-by-Fish Sashimi Guide
Different fish require different handling. This table breaks down the best practices for the most popular sashimi varieties.
| Fish | Japanese Name | Best Cut | Thickness | Best Condiment | Notes |
|---|---|---|---|---|---|
| Salmon | Sake | Hira-zukuri or sogi-zukuri | 8–10mm | Soy sauce + wasabi | Most forgiving for beginners; look for bright orange color |
| Tuna (lean) | Akami | Hira-zukuri | 10–12mm | Soy sauce + wasabi | Cut thicker to appreciate the clean, meaty texture |
| Tuna (fatty) | Toro | Sogi-zukuri | 6–8mm | Light soy + wasabi | Cut thinner to prevent overwhelmingly rich bites |
| Yellowtail | Hamachi | Hira-zukuri | 8–10mm | Soy sauce + wasabi | Buttery and mild; excellent for first-timers |
| Sea bream | Tai | Usu-zukuri | 1–2mm | Ponzu + momiji oroshi | Must be paper-thin; traditionally served for celebrations |
| Fluke | Hirame | Usu-zukuri | 1–2mm | Ponzu + scallion | Delicate flavor shines with thin cuts; chewy if too thick |
| Squid | Ika | Ito-zukuri | 3mm strips | Soy + ginger | Score the surface lightly for tenderness |
| Scallop | Hotate | Hira-zukuri (horizontal) | 5–6mm | Ponzu or soy + yuzu | Cut horizontally through the disc for maximum sweetness |
| Octopus | Tako | Usu-zukuri | 2–3mm | Ponzu + wasabi | Usually served pre-boiled; slice thin against the curl |
| Mackerel | Saba | Hira-zukuri | 8mm | Ginger + soy | Cure with salt and vinegar (shimesaba) before serving raw |
Practice Exercises for Developing Sashimi Skills
Sashimi cutting improves with deliberate practice. Here are structured exercises to build your skills progressively.
Exercise 1: Daikon Sheet Practice
Before cutting any fish, practice your pull stroke on a daikon radish. Peel a large daikon and cut it into a rectangular block. Using the katsuramuki technique, rotate the daikon against your blade while pulling the knife toward you, peeling off a continuous paper-thin sheet. This builds the single-stroke muscle memory needed for sashimi. Practice until you can produce a sheet thin enough to read newspaper print through.
Exercise 2: Consistency Drill with Salmon
Buy a 200g salmon saku block and cut it into hira-zukuri slices. Line up all your slices side by side and evaluate their consistency. Are they the same thickness? Do the edges look clean or ragged? Are the angles consistent? Aim to produce 10 slices that are indistinguishable in thickness. Repeat this exercise three times over a week, comparing your results each session.
Exercise 3: Speed and Rhythm
Once your consistency improves, focus on developing a smooth rhythm. Set a timer and cut a full saku block, aiming for one slice every 3 to 4 seconds. The goal is not speed for its own sake but developing a flowing, consistent motion where each cut feels identical to the last. Japanese chefs describe this as finding your ”breath” — each pull synchronized with a steady exhale.
Exercise 4: Multi-Fish Platter
When you are comfortable with standard cuts, challenge yourself with a three-fish sashimi platter (moriawase). Buy salmon, tuna, and yellowtail. Cut each fish using the appropriate technique and thickness from the table above. Arrange them on a single platter using the yosemori (gathered) arrangement. This exercise tests your ability to switch between textures and adapt your cutting to different fish densities.
Exercise 5: Usu-zukuri Challenge
Buy a small block of sea bream or fluke and practice paper-thin cutting. The target is slices so thin they become translucent. Arrange them in a chrysanthemum pattern (kiku-mori) on a plate, overlapping each slice in a circular fan. This is the most difficult sashimi technique and the one that separates advanced home cooks from beginners.
Advanced Sashimi Tips and Techniques
Once you have the basics down, these advanced techniques will bring your sashimi closer to professional quality.
Temperature Control
Fish should be between 35°F and 40°F (2°C–4°C) when you cut it. Too cold and the texture becomes hard and the flavors muted. Too warm and the flesh becomes soft and difficult to slice cleanly. Take the fish out of the refrigerator 5 minutes before cutting. If the fish softens during cutting, return it to the refrigerator for 10 minutes before continuing.
Grain Reading
Every piece of fish has a visible grain direction, similar to wood. The grain runs along the muscle fibers, and you can see it as parallel lines in the flesh. For most sashimi cuts, you want to cut across the grain (perpendicular or at an angle to the fibers). Cutting against the grain shortens the muscle fibers in each bite, creating a tender, melt-in-your-mouth texture. Cutting with the grain results in chewy, stringy slices.
Knife Maintenance Between Cuts
After every 3 to 5 slices, wipe the blade with a damp towel. Fish oils and proteins build up on the blade and create friction, which leads to tearing instead of clean cutting. Some chefs dip the blade in a mixture of water and a splash of vinegar, which helps prevent oxidation and keeps the cuts pristine.
Aburi (Torch) Sashimi
Aburi sashimi involves lightly torching the surface of sliced fish with a kitchen torch. The brief exposure to high heat caramelizes the surface fats while leaving the interior completely raw. This technique works beautifully with salmon (especially belly cuts), mackerel, and wagyu beef sashimi. After torching, immediately season with a pinch of sea salt and a squeeze of lemon or yuzu juice.
Kobujime (Kelp Curing)
Kobujime is a traditional technique where fish is sandwiched between sheets of kombu (kelp) and refrigerated for several hours or overnight. The kombu draws out excess moisture while infusing the fish with umami-rich glutamates. This technique transforms mild white fish into something deeply savory and firms the texture for easier cutting. It is particularly effective with sea bream, fluke, and snapper.
Aging (Jukusei)
Aged sashimi (jukusei sashimi) is an advanced technique practiced by high-end sushi chefs. Fish is carefully aged in a controlled environment for days or even weeks, during which enzymes break down proteins into amino acids, intensifying the umami flavor. This is not the same as fish ”going bad” — proper aging requires precise temperature and humidity control. For home cooks, a simple 24 to 48 hour dry-aging in the refrigerator on a wire rack (wrapped in paper towels, changed twice daily) can noticeably improve flavor in tuna and yellowtail.
Three Sashimi Recipe Ideas
Once you have mastered the cutting techniques, try these preparations that go beyond the classic slice-and-serve.
Salmon Tataki
Sear a whole salmon saku block in a screaming-hot pan with a tablespoon of neutral oil for 10 to 15 seconds per side. Immediately plunge it into ice water to stop the cooking. Pat dry and slice into 8mm hira-zukuri cuts. The exterior will have a thin cooked layer while the interior stays completely raw. Serve with ponzu, thinly sliced scallions, grated daikon, and a drizzle of sesame oil.
Tuna Poke Bowl
Cut fresh ahi tuna into 15mm kaku-zukuri cubes. Toss with soy sauce, sesame oil, rice vinegar, thinly sliced scallion, and a pinch of red pepper flakes. Let it marinate for 10 minutes. Serve over warm sushi rice with sliced avocado, edamame, cucumber, and a sprinkle of furikake. This is where your cube-cutting practice pays off — uniform cubes mean even seasoning and a professional presentation.
Usuzukuri of Sea Bream with Ponzu
Slice sea bream paper-thin using the usu-zukuri technique. Fan the translucent slices in a circle on a chilled plate. Scatter with very finely sliced scallion, thin rings of fresh chili, and tiny shiso leaf chiffonade. Just before serving, drizzle with chilled ponzu sauce and finish with a light sprinkle of flaky sea salt. The fish should be so thin that the ponzu instantly seasons each bite.
Safety and Storage
Raw fish requires careful handling to ensure food safety.
Time limits: Sashimi should be consumed within 30 minutes of cutting for the best texture and flavor. Cut fish oxidizes quickly and loses its glossy sheen. If you need to prepare in advance, cut the saku blocks to size but do not slice them until just before serving. Wrapped saku blocks keep in the refrigerator for 1 to 2 days.
Cross-contamination: Use separate cutting boards for raw fish and other ingredients. Wash your knife and board with hot soapy water after handling raw fish. Never place raw fish on a surface that has been used for cooked food without thorough cleaning.
At-risk groups: Pregnant women, young children, elderly individuals, and immunocompromised people should avoid raw fish. The CDC and FDA advise these groups to eat only fully cooked seafood.
Leftover sashimi: If you have leftover sliced sashimi, do not re-serve it the next day as raw sashimi. Instead, use it in cooked preparations: sear it for tataki, add it to miso soup at the end of cooking, or toss it into a quick stir-fry. Alternatively, cure leftovers with salt, sugar, and vinegar to make shimesaba-style cured fish.
Frequently Asked Questions About Making Sashimi
Can I use regular grocery store fish for sashimi?
It depends on the source. Fish labeled ”sashimi-grade” or ”sushi-grade” at reputable fishmongers or Japanese grocery stores has typically been frozen to FDA parasite-destruction standards. Regular grocery store fish sold for cooking has not necessarily undergone this process. If you cannot find sashimi-grade fish locally, buy from trusted online suppliers who specialize in sushi-grade seafood and ship flash-frozen with dry ice.
Do I need a yanagiba knife to make sashimi?
No, but it helps significantly. A yanagiba’s long, single-bevel blade is designed specifically for the pulling cut that sashimi requires. You can use any sharp chef’s knife with a blade of at least 8 inches. The critical factor is sharpness — a sharp Western chef’s knife will outperform a dull yanagiba every time. If you plan to make sashimi regularly, investing in a yanagiba is worthwhile. Entry-level models from brands like Tojiro and Fujiwara start around $50 to $80.
How thick should sashimi slices be?
Standard hira-zukuri slices are 8 to 12mm (about ⅜ inch) thick. Thin-cut usu-zukuri slices are 1 to 2mm. The appropriate thickness depends on the type of fish: fattier, richer fish (like toro) is cut thinner to avoid overwhelming richness, while leaner fish (like akami tuna) is cut thicker so the texture and flavor can be fully appreciated. When in doubt, aim for 10mm — it works for most varieties.
What is the difference between sashimi and sushi?
Sashimi is sliced raw fish served without rice. Sushi is any dish made with vinegared rice (shari) — it may or may not include raw fish. Nigiri sushi is a slice of fish draped over a small mound of rice. Maki sushi is fish and rice rolled in seaweed. Sashimi predates sushi and is considered the purer expression of the fish itself. At a traditional Japanese meal, sashimi is typically served as an early course, before sushi.
Can I make sashimi from frozen fish?
Yes — in fact, most sashimi-grade fish has been frozen at some point. The key is proper thawing. Transfer the fish from the freezer to the refrigerator and let it thaw slowly overnight. Quick-thawing in cold water (sealed in a bag) is acceptable but less ideal. Never microwave or use warm water to thaw fish for sashimi. Properly thawed sashimi-grade fish is virtually indistinguishable from fresh in both texture and flavor.
How do I know if raw fish has gone bad?
Trust your senses. Fresh sashimi fish smells clean and oceanic. If the fish smells sour, ammonia-like, or strongly ”fishy,” it is not safe to eat raw. The flesh should be firm and spring back when pressed — if it stays indented or feels mushy, the fish has deteriorated. Look for bright, consistent color; brown spots, dull appearance, or a milky film are signs of age. When in doubt, do not serve it raw — cook it instead.
What is the best fish for sashimi beginners?
Salmon is the best starting point. It has a soft, forgiving texture that is easy to slice, a mild flavor that most people enjoy, and it is widely available in sashimi-grade quality. After salmon, try yellowtail (hamachi) for its buttery texture, then move to tuna (maguro) for practice with firmer-fleshed fish. Save white fish like sea bream and fluke for when you are comfortable with the usu-zukuri thin-cut technique.
Building Your Sashimi Practice
Making sashimi at home is one of the most rewarding skills you can develop in the kitchen. It requires minimal equipment, no cooking at all, and produces results that feel truly special. The gap between a beginner’s first attempt and genuinely beautiful sashimi is smaller than you might think — it is mostly a matter of keeping your knife sharp, your fish cold, and your strokes smooth and confident.
Start with salmon. Practice hira-zukuri until your slices are consistent. Then branch out to other fish and techniques. Within a few weeks of regular practice, you will be producing sashimi platters that rival what you find at quality Japanese restaurants — and you will understand, on a tactile level, why Japanese chefs consider knife work the soul of their craft.
For more Japanese cooking techniques, explore our guides to making dashi, perfecting sushi rice, and mastering tempura batter. And if you are shopping for sashimi-grade fish and Japanese pantry staples, check out our full selection at Umami Cart.

Mei Lin Chen
Mei Lin Chen is an Asian food writer and recipe developer. Melbourne-raised and London-based, she has spent over a decade exploring the rice paddies, hawker stalls, and home kitchens of South-East and East Asia. Her recipes balance traditional technique with everyday practicality.