Last Updated: March 2026
Velveting chicken is the secret behind the tender, silky bite you find in Chinese restaurant dishes. We will show why the method works and how to apply it at home.
Key Takeaways
- Baking soda raises surface pH, preventing tight protein bonds.
- Egg white + cornstarch creates a moisture-locking coating.
- Rinsing after a soda soak eliminates a soapy, bitter aftertaste.
- Oil blanching locks in texture; water blanching adds a light sheen.
- The same principles work for beef, pork, and shrimp with minor tweaks.
What Is Velveting?
The Science Behind the Technique
Velveting is a two-step process that changes the way muscle fibers behave during high-heat cooking. An alkaline bath (baking soda) raises the pH of the surface, keeping protein strands from tightening. At the same time, a thin coating of egg white and cornstarch forms a barrier that traps moisture. The result is a piece of meat that stays tender, juicy, and glossy when it hits a scorching wok.
The chemistry at work is straightforward: baking soda (sodium bicarbonate) creates an alkaline environment at the meat’s surface, typically raising the local pH by around 0.5 units. At higher pH levels, actin and myosin — the two main muscle proteins in chicken — are less able to contract and squeeze out moisture during cooking. That is precisely why restaurant chicken tastes so different from the dry, rubbery pieces many of us have accidentally produced at home.
Understanding this chemistry also explains why rinsing is so important. The alkaline reaction needs time to work on the protein, but it should not continue indefinitely. After the rest period, rinsing stops the process and removes the residual sodium bicarbonate before it can impart any off-flavor.
Baking Soda Method vs. Egg White Method: Two Paths, One Goal
Both methods aim for the same texture, but they travel different routes. Baking soda works from the inside out, altering the chemistry of the protein. Egg white works from the outside in, building a protective film. Think of the former as softening a rope from within, the latter as wrapping the rope in a soft sheath. The contrast is clear, yet the destination — silky, tender chicken — is identical.
This distinction matters in practice. If you skip the rinse after a baking soda soak, you will notice a faint soapy bitterness the moment the alkaline residue reacts with your saliva. That reaction has nothing to do with the flavors in your dish; it is purely a chemical response to residual sodium bicarbonate. The egg white method carries no such risk — you apply the coating and cook without any rinse step at all.
| Feature | Baking Soda Method | Egg White Method |
|---|---|---|
| Mechanism | Raises surface pH, breaks down protein bonds | Forms a protective protein-starch coating |
| Rest time | 20–30 min (max 1 hour) | 15 minutes |
| Rinse required? | Yes — mandatory | No |
| Best for | Chicken breast, beef, pork | Chicken, shrimp, delicate proteins |
| Risk | Mushy texture if over-soaked | Slight egg flavor if coating is too thick |
| Texture result | Deeply tender throughout | Light, silky coating on exterior |
Why Chinese Restaurants Use Velveting
In a busy kitchen, a single batch of chicken must survive a rapid stir-fry without turning rubbery. Velveting gives chefs a reliable safety net: the meat stays tender even when the wok temperature exceeds 250°C. The technique also helps the chicken absorb the final sauce evenly, delivering the glossy finish that diners associate with authentic Chinese cooking.
Commercial kitchens typically use oil blanching — passing the coated chicken through hot oil — rather than water blanching. The hot oil creates an immediate seal and imparts the characteristic sheen. At home, water blanching is a practical and lower-fat alternative that still produces excellent results, and it is the method favored by Woks of Life in their step-by-step guide.
The technique dates back to Chinese culinary tradition where it is known as 上浆 (shàng jiāng) — literally ”coating with paste” — and is considered a foundational skill in Cantonese and Northern Chinese cooking alike. Its presence in every regional Chinese cuisine is a testament to how universally effective the method is.
Baking Soda Velveting Method
Exact Ratios and Timing
Getting the baking soda ratio right is the most important variable in this technique. Too little and you will not notice a difference in texture. Too much and the chicken turns spongy. The standard we recommend — and the one verified by RecipeTin Eats through extensive testing — is 3/4 teaspoon of baking soda per 250g (8oz) of chicken breast slices.
Rest times matter just as much as the ratio. Thin slices (around 5mm) need 20 minutes. Bite-sized cubes or thicker pieces need 30 minutes. Under no circumstances should you exceed one hour: beyond that point, the alkaline environment begins to break down the protein structure so aggressively that the meat loses its structural integrity entirely.
A useful way to remember the limits: velveting is tenderizing, not dissolving. The goal is a gentle relaxation of protein bonds, not a full chemical breakdown. Keep a timer nearby and treat the timing as seriously as you would a recipe’s cooking time.
Step-by-Step Process
- Slice the chicken against the grain into strips roughly 5mm thick and 4–5cm long. Slicing against the grain shortens muscle fibers, which makes the final texture noticeably more tender.
- Dissolve the baking soda in a small amount of cold water — about 1 tablespoon of water per 250g of chicken — before adding the chicken. This prevents uneven distribution.
- Tumble the strips in the solution until every piece is lightly coated. There should be no pooling liquid at the bottom of the bowl.
- Cover and rest at room temperature for 20 minutes (slices) or 30 minutes (chunks). Do not refrigerate during this window — cold temperatures slow the alkaline reaction.
- Rinse thoroughly under cold running water for a full 30 seconds, turning the pieces with your hand to expose all surfaces.
- Pat completely dry with paper towels. Surface moisture creates steam in the wok, which defeats the purpose of blanching.
- Add a light cornstarch coating (1 teaspoon per 250g) before the blanching step if you are combining both methods.
The Rinse Step — Why It Matters
Rinsing is not optional, and it is not just about taste. Any baking soda left on the surface reacts with the saliva in your mouth when you eat, producing a faint but recognizable soapy sensation. This is the same chemical reaction that makes baking soda useful as a cleaning agent: sodium bicarbonate is mildly alkaline and neutralizes acids, including those in your mouth. In a savory dish, this reaction is entirely unwelcome.
Beyond flavor, the rinse also matters for texture. Excess baking soda on the surface of the chicken can create a slightly gummy layer when combined with cornstarch during the stir-fry. A clean rinse followed by thorough drying gives you a surface that takes on the sauce evenly and browns properly when needed.
Do not rush the rinse. Thirty seconds under cold running water while turning the pieces by hand is the minimum. If you are rinsing a large batch — 500g or more — rinse in two stages, or use a colander and run water through it for a full minute.
Egg White Velveting Method
How the Egg White Coating Works
Egg white is roughly 90% water and 10% protein. When you coat raw chicken in egg white and cornstarch, you are creating a thin, flexible layer of undenatured protein. The moment that layer hits hot oil or hot water, the protein denatures rapidly and sets into a smooth, semi-elastic film. This film acts as a physical barrier between the hot cooking medium and the meat’s moisture.
The cornstarch plays a supporting role: it absorbs some of the surface moisture from the raw chicken, helping the egg white adhere more evenly. It also contributes a slight sheen and a faintly glossy finish once cooked. Research on egg white coatings in Chinese cooking suggests the combination retains around 10% more moisture after cooking compared to uncoated chicken.
Unlike baking soda, which changes the chemistry of the meat itself, the egg white coating leaves the chicken’s flavor entirely unchanged. What you taste in the final dish is pure chicken flavor and sauce — nothing from the velveting process at all.
When to Choose Egg White Over Baking Soda
Three situations call for the egg white method over baking soda. First, any delicate protein — shrimp, scallops, thin-cut fish fillets — where even a short alkaline soak risks over-tenderizing into mush. Second, dishes with a very light, clean sauce where the faintest hint of bitterness would be noticeable. Third, when you are short on time: 15 minutes versus 20–30 is a real difference during a weeknight dinner.
For dishes like Kung Pao Chicken or any recipe with a strong, assertive sauce, baking soda is the better choice because the deep tenderizing effect holds up against bold flavors. For delicate dishes like a light ginger and scallion stir-fry, egg white preserves a more subtle, clean flavor profile.
Some cooks use both together — a brief baking soda soak (10 minutes, not the full 20–30) followed by an egg white and cornstarch coating after rinsing. This hybrid approach is common in professional Chinese kitchens and produces the best of both: tenderized meat with a protective coating.
Step-by-Step for Egg White Velveting
- Separate one egg white into a bowl and whisk lightly until just frothy — not stiff. Over-beaten egg white creates bubbles that give the coating an uneven texture.
- Add cornstarch at 2 teaspoons per 250g of chicken. Add a small splash of Shaoxing wine (or dry sherry) for depth.
- Toss the sliced chicken in the mixture, coating every piece evenly. The mixture should be thick enough to cling but not so thick it forms clumps.
- Rest for 15 minutes at room temperature. This allows the coating to penetrate slightly and set before cooking.
- Proceed directly to blanching — no rinse required.
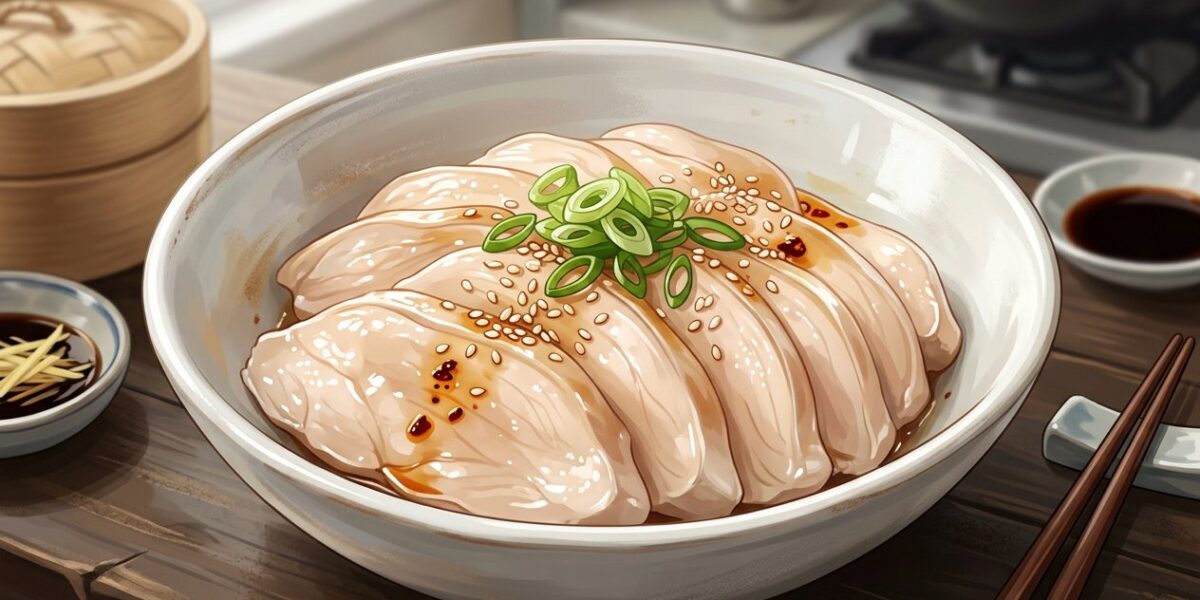
How to Velvet Chicken for Stir-Fry
Preparing Your Chicken Before Velveting
Start with cold chicken straight from the refrigerator. Cold meat firms up slightly, making slicing against the grain easier and more precise. Use a sharp knife — a dull blade tears muscle fibers rather than cutting cleanly through them, and torn fibers produce a rougher surface that the coating adheres to unevenly.
Pat the chicken dry before any velveting step. Surface moisture dilutes both the baking soda solution and the egg white coating, reducing their effectiveness. If you are using chicken thighs rather than breast, trim any large fat deposits — they do not velvet in the same way and can create uneven texture in the final dish.
A quick toss with a pinch of salt and a teaspoon of Shaoxing rice wine before velveting adds a base layer of flavor that carries through the entire dish. This small step is often skipped by home cooks but makes a genuine difference in the final result — the seasoning penetrates alongside the velveting agents rather than sitting only on the surface.
Oil Blanching vs. Water Blanching
Oil blanching involves passing the coated chicken through oil heated to around 180°C for 30 seconds. The oil creates an immediate seal on the surface of the coating, locking in moisture and delivering the characteristic glossy finish used in Chinese restaurant kitchens. It requires a larger volume of oil and attention to temperature control, but the result is the richest, most restaurant-accurate texture.
Water blanching — the method detailed by Woks of Life — uses briskly simmering water. The coated chicken goes in for approximately 45 seconds, just until the exterior turns opaque. Adding 2 teaspoons of cornstarch to the water helps maintain the coating’s integrity during blanching. This method uses no additional fat, produces a lighter coating, and is easier to manage at home.
Both methods work. The choice comes down to the dish: oil blanching for richer stir-fries and dishes where a glossy, restaurant-style finish is the goal; water blanching for lighter or brothier preparations where a heavy oil coating would feel out of place.
Timing the Velvet Step in a Full Stir-Fry
The velvet step should be the last preparation step before you start cooking — not something you set up an hour in advance. This keeps the coating intact and the chicken at the right temperature. Have all your aromatics chopped, all your sauces measured, and all your vegetables prepped before you begin blanching.
Once the chicken is blanched, it takes only 1–2 minutes of wok time to finish. This brevity is the real payoff: vegetables stay crisp, the wok stays hot enough to develop that smoky wok hei, and the chicken never has time to tighten up. The sequence — prep everything, blanch, then immediately stir-fry — is the same logic behind every great Chinese restaurant kitchen, scaled down for a home wok.
If you need to hold the blanched chicken before the stir-fry (in a multi-dish meal, for example), rest it in a warm bowl covered with foil for no more than 10 minutes. Beyond that, the coating can become sticky and the texture begins to change.
Velveting Other Proteins
Beef
Beef responds well to baking soda velveting, but the tougher muscle fibers in cuts like flank steak or sirloin benefit from a longer alkaline exposure. Use the same ratio (3/4 tsp per 250g) but extend the rest time to 30–45 minutes. Slicing thinly against the grain is even more important for beef than for chicken — look for the striations in the raw meat and cut perpendicular to them.
The result is a texture that rivals the silky beef found in a well-made Beef and Broccoli stir-fry. Without velveting, even the most carefully cooked thin-sliced beef will tighten and turn chewy the moment it hits the wok. With it, the beef stays tender throughout, absorbs the sauce evenly, and keeps a supple, almost glossy surface.
One note on beef: darker, more marbled cuts like ribeye have enough intramuscular fat to stay relatively tender without velveting. The technique matters most for leaner cuts — flank, sirloin, and eye of round — where the muscle fibers have less natural moisture protection.
Pork
Pork shoulder or loin responds best to a hybrid approach: a 20-minute baking soda soak at the standard ratio, followed by an egg white and cornstarch coating applied after rinsing. The combination of deep tenderizing and surface coating produces a juicy, slightly chewy bite that holds up well against strong sauces like black bean or oyster sauce.
Pork belly is too fatty for baking soda velveting. The alkaline treatment does not penetrate fat tissue the same way it works on muscle, and it can produce an unpleasant soapy residue on the fat layer if not rinsed away completely. Stick to leaner cuts for velveting and reserve belly for slow-braise preparations.
Pork tenderloin, being very lean and fine-grained, responds similarly to chicken breast — the standard ratio and timing apply exactly, and the egg white method alone (without baking soda) is often enough given the cut’s natural tenderness.
Shrimp
Use the egg white method only for shrimp. Shrimp have a very different protein structure from chicken or beef — the muscle fibers are short and dense, and they respond to alkaline treatment much faster. Even a 15-minute baking soda soak can push shrimp from perfectly plump to unpleasantly soft. An egg white and cornstarch coating applied for no more than 10–15 minutes gives shrimp that characteristic snap-and-slide texture without any risk of over-tenderizing.
To get the coating to adhere well to shrimp, pat them extremely dry first. Shrimp release water quickly, and any surface moisture will prevent the egg white from clinging. After the coating rests, the shrimp go directly into the wok — water blanching works here, but oil blanching at a high temperature is even better for achieving the golden, slightly caramelized exterior that makes shrimp in Chinese stir-fries so satisfying.
The same egg white method applies to scallops and firm white fish fillets. For fish, reduce the rest time to 10 minutes — the protein structure is more delicate than shrimp and responds faster.
Common Velveting Mistakes to Avoid
Too Much Baking Soda or Too Long a Soak
The two most common mistakes share the same root cause: the assumption that more is better. Using double the recommended baking soda does not produce twice the tenderness — it produces a gelatinous, slightly translucent texture that feels nothing like restaurant chicken. The same outcome results from leaving chicken in even the correct amount of baking soda for longer than one hour. Set a timer. The 20-minute mark for slices is not a suggestion.
If you have over-velveted chicken by accident, there is no recovery step. The protein damage is done. The chicken will still be edible after cooking — just softer than ideal. Adjust your timing next time and remember: velveting tenderizes, it does not transform. The goal is chicken that stays tender under heat, not chicken that dissolves on the fork.
Some recipes online call for very small amounts — 1/4 tsp per 300g — while others suggest up to 1 tsp per 250g. The range that produces reliable results without risk of off-texture or off-flavor sits at 3/4 tsp per 250g. Treat this as your anchor point and you will get consistent results every time.
Skipping the Rinse
Skipping the rinse is the most reliably unpleasant mistake in this entire process. The soapy aftertaste from residual baking soda is distinctive and difficult to mask, even with a heavily seasoned sauce. If you are short on time, run the chicken under cold water for at least 20 seconds and pat dry. A partial rinse is far better than none.
The rinse has zero negative effect on the final texture, so there is no trade-off involved. The tenderizing is already complete before the rinse begins — you are simply removing a substance that has already done its job and now needs to leave the dish.
After rinsing, drying thoroughly is equally non-negotiable. A wet surface prevents browning in the wok and creates excess steam that lowers the wok’s temperature during stir-frying. Paper towels, pressed firmly, are the right tool here — not a gentle blot but an actual press to remove as much surface water as possible.
Wrong Cut or Wrong Slice Direction
Cutting with the grain leaves long, unbroken muscle fibers. Under heat, those fibers contract and the meat becomes chewy regardless of how well it was velveted. Slicing against the grain is a non-negotiable first step. Look at the raw chicken breast and identify the direction the muscle lines run — cut perpendicular to those lines, not parallel to them.
Uniform thickness matters too. A mix of thin slices and thick chunks in the same batch produces inconsistent results: thin pieces will be perfectly done when thick ones are still underdone, or thick pieces will be right when thin ones have already tightened. Aim for uniform 5mm strips across every piece in the batch.
The direction of the cut and the uniformity of the thickness are the two variables entirely within your control — no special equipment, no unusual ingredients. Getting both right costs nothing but attention, and both have a larger impact on the final texture than most people expect.
FAQ
What is the velveting method for chicken?
Velveting is a Chinese technique that tenderizes chicken before stir-frying. It involves either an alkaline baking soda soak or an egg white and cornstarch coating, followed by brief blanching in oil or water. The result is meat that stays silky and tender even when cooked at very high heat. The baking soda method works by altering the surface pH of the chicken; the egg white method works by forming a protective coating.
Is baking soda or cornstarch better for velveting chicken?
They do different jobs and are not interchangeable. Baking soda is a tenderizer — it alters the protein chemistry of the meat from the inside. Cornstarch is a coating agent — it creates a moisture-locking barrier on the surface. Most recipes use both together: baking soda (rinsed off after doing its work) to tenderize, then cornstarch as part of the final coating before blanching. Neither is ”better” — they are complementary parts of the same process.
Do you rinse chicken after velveting it?
Yes, always, when using the baking soda method. Rinsing removes residual alkaline from the surface and prevents a soapy aftertaste. It also clears excess starch that could clump during cooking. A 30-second rinse under cold running water is the standard, followed by thorough patting dry. The egg white method requires no rinse — the coating goes straight from the bowl to the wok.
How much baking soda for velveting chicken?
The standard ratio is 3/4 teaspoon per 250g (8oz) of sliced chicken breast — the amount verified by RecipeTin Eats and consistent with what Chinese restaurant kitchens use. Rest for 20 minutes for thin slices or 30 minutes for chunks. Do not exceed this ratio, and do not soak for longer than one hour. Beyond an hour, the texture becomes mushy and there is no way to recover it.
Can you velvet chicken thighs as well as breast?
Yes. Thighs are naturally fattier and more forgiving than breast, but the same ratio applies. Because thighs have more intramuscular fat, you can shorten the rest time to 15 minutes — the fat provides some natural moisture protection that breast meat lacks. Thighs also have a slightly more robust flavor that stands up well to the stronger sauces typically used in velveting recipes.
Does velveting change the taste of chicken?
The technique itself does not add any flavor — when done correctly (including the rinse), velveted chicken tastes like chicken. What changes is the texture and the way the meat accepts sauce. Velveted chicken absorbs flavors more evenly and holds onto them better during stir-frying, which is why the final dish tastes more cohesive. The slight alkaline taste that can occur is entirely eliminated by the rinse step.
For more dishes to practice this technique on, visit our Asian Recipes collection and our step-by-step guide to making Fried Rice. For ingredient guidance including where to find Shaoxing wine, cornstarch, and sesame oil, see our Asian Cooking Ingredients guide.