Last updated: March 12, 2026
Crispy roast pork belly — known across the Cantonese-speaking world as siu yuk (燒肉), sio bak in Hokkien-speaking Southeast Asia, and simply “crackling pork” in many English kitchens — is one of the most rewarding techniques in the entire Chinese roasting repertoire. The result is a slab of belly with skin that shatters like glass over layered ribbons of seasoned fat and tender, perfumed meat. It is the centerpiece of Hong Kong’s siu mei (燒味) roast shops, a staple at Cantonese banquets, and increasingly the kind of weekend project that home cooks with a regular oven can absolutely pull off.
This guide walks through the technique end to end: how the skin actually crisps, what dry-brining and pricking really do, the right oven choreography from low-and-slow render to high-heat blast, the common failure modes, and a working home-kitchen recipe you can rely on. By the time you finish, you should understand why each step exists — which is what separates a glassy, even crackling from sad, blistered patches.
What Is Siu Yuk? A Quick Overview of Cantonese Crispy Pork Belly
Siu yuk is one of the four pillars of Cantonese siu mei, alongside char siu (barbecued pork), roast duck, and soy-sauce chicken. It is made from a slab of skin-on pork belly that has been salted and seasoned on the meat side, dried thoroughly on the skin side, then roasted in two distinct stages. The first stage cooks the meat through and renders fat at a moderate temperature. The second stage uses very high heat to puff and crisp the skin into a pebbled, crystalline crust.
Three things define great siu yuk:
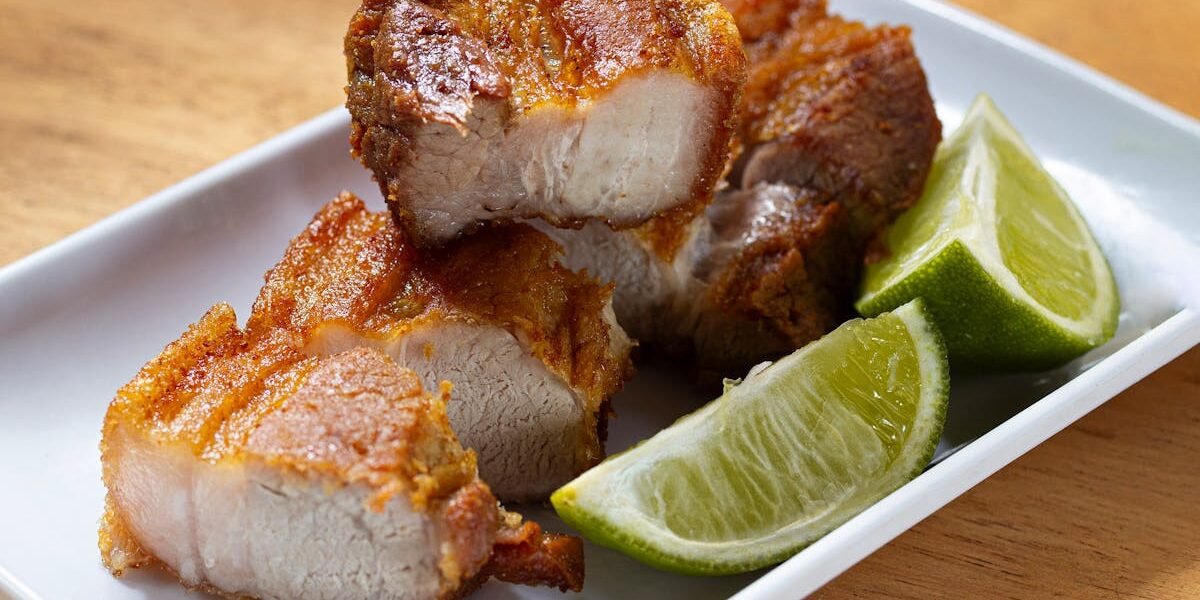
- Crackling — The skin must be uniformly pebbled and audibly crunchy, with no rubbery patches and no blackened spots. It should shatter under a knife rather than tear.
- Layering — You should see clear stripes: skin, fat, lean, fat, lean. The fat should be rendered but still moist, not melted away.
- Seasoning balance — The meat side is seasoned with a mix of salt, sugar, five-spice powder, white pepper, and a touch of fermented bean curd or Shaoxing wine. The flavor should be savory and warmly spiced — never sweet, never aggressive.
If you want to place siu yuk within its broader culinary context, our guide to Cantonese cuisine and our Hong Kong food guide both cover the siu mei tradition in detail.
The Science: Why Pork Skin Crackles (and Why It Often Doesn’t)
Pork skin is mostly collagen with a thin layer of subcutaneous fat. When you heat it, three things must happen in order:
- Water leaves the skin. Skin contains 60–70% water. Until that water is largely gone, the skin will stew rather than crisp. Dry-brining and air-drying before cooking are the single biggest drivers of crackling.
- Collagen contracts and gelatinizes. Around 60–70°C (140–158°F), collagen begins to denature. Heated past 90°C (194°F), it softens enough to puff.
- Fat renders, steam expands. When the skin hits roughly 200–230°C (392–446°F), residual moisture flashes to steam, the collagen scaffolding inflates into thousands of tiny bubbles, and the surface dehydrates into a brittle, foamed crust.
The reason crackling fails for most home cooks is not technique exotica — it is moisture. Skin that has not been thoroughly dried (24–48 hours uncovered in the fridge is the gold standard) will release water under heat, soak the surface, and prevent puffing. Salt above the skin draws water out; salt below the skin seasons the meat. The dry-cure step on top is doing physics, not flavor work.
Choosing the Right Cut of Pork Belly
Not every pork belly slab is suitable for siu yuk. You want:
- Skin on. Non-negotiable. The skin is the entire point. Ask your butcher for “skin-on pork belly, square cut, ribs removed.”
- Even thickness. 3.5–5 cm (1.5–2 inches) thick. Anything thinner cooks unevenly; thicker pieces struggle to render fully in home ovens.
- Visible layers. You want roughly 4–6 alternating fat-and-lean layers when viewed from the side. Pure-fat belly will collapse; pure-lean belly will dry out.
- A flat skin surface. Look for unbroken skin with no deep nicks. Cuts in the skin become valleys where the crackling won’t puff evenly.
- Around 1–1.5 kg (2.2–3.3 lb). Smaller than this and the meat dries out before the skin sets. Larger and the roasting time becomes unwieldy in a home oven.
Heritage or pasture-raised pork (Berkshire, Duroc, Mangalitsa) produces excellent results because the fat is firmer and the skin thicker. Commodity pork works fine if it is fresh and well-handled — just expect a slightly thinner skin layer.
Equipment Checklist
You do not need a commercial siu mei oven to make excellent siu yuk at home. You do need a small kit of specific tools.
| Tool | Purpose | Substitute |
|---|---|---|
| Conventional oven with a broiler | Two-stage roasting and final blast | Convection oven on high heat |
| Wire rack over a sheet pan | Airflow under the belly | Foil-lined pan with crumpled foil supports |
| Heavy-duty foil | Forms a “wall” around the meat to shield it | Parchment is not a substitute — you need foil |
| Metal skewer or skin pricker | Pierces the skin to release steam | A sharp paring knife tip, used at a steep angle |
| Coarse sea salt or kosher salt | Top-side dry cure and crust | Avoid fine table salt — it draws water unevenly |
| Sharp cleaver | Slicing the finished roast without shattering the crust | A serrated bread knife works as a backup |
| Instant-read thermometer | Confirming the meat hits 71–74°C (160–165°F) | Highly recommended — no substitute |
A dedicated “skin pricker” (a stainless tool with dozens of fine needles) costs about $15 online and makes pricking much faster — but a sturdy metal skewer is perfectly serviceable for one or two slabs.
The Master Seasoning Mix
Cantonese roast shops each have their own seasoning rub, but the structural ingredients are remarkably consistent. The seasoning goes only on the meat side and the cut edges — never on the skin.
- Salt — about 1.5% of the meat weight (e.g., 15 g per 1 kg). The base of flavor.
- Sugar — 1–1.5%. Balances and aids browning on cut edges.
- Chinese five-spice powder — 1 teaspoon per kilo. Defines the aroma. See our guide to Chinese five spice.
- White pepper — 1 teaspoon per kilo. Provides clean, mid-palate heat.
- Fermented bean curd (nam yu or fu yu) — 1 cube mashed per kilo, optional but traditional. Adds umami depth and a faint pink color.
- Shaoxing wine — 1 tablespoon per kilo, optional. Adds complexity. See our Shaoxing wine guide.
- Garlic and ginger powder — ½ teaspoon each, optional.
Avoid soy sauce in the meat-side rub — it will turn the cut edges almost black at high temperatures and tilts the flavor away from classic siu yuk and toward char siu. If you want a sweeter, redder pork, our char siu recipe is a better starting point.
Step-by-Step: The Two-Day Method
This is the home-kitchen technique, broken into clear stages. Total active work is under 45 minutes; the rest is dry-aging and roasting.
Day 1, Step 1: Blanch the Belly (5 minutes)
Place the belly skin-side down in a pot of boiling water with a splash of Shaoxing wine and a few slices of ginger. Boil for 5 minutes. This tightens the skin, removes surface impurities, and reduces the “hog” aroma. Lift out and pat completely dry with paper towels.
Day 1, Step 2: Score and Prick
Flip the belly skin-side up. Using a sharp knife, score the meat side (not the skin) in a crosshatch pattern about 1 cm deep. This allows the rub to penetrate.
Now flip skin-side up again. Working systematically, prick the skin with a metal skewer or skin pricker. You are aiming for 200–400 holes on a 1 kg slab — densely and evenly distributed. The skewer must penetrate the skin but should not push into the fat layer. Each tiny hole becomes a steam-release valve and a future puffing point during roasting.
Day 1, Step 3: Cure the Meat, Salt the Skin
Combine the seasoning mix and rub it firmly into the meat side, working into the crosshatch cuts and along the four cut edges. Be generous and methodical — this is the only flavoring step.
Stand the belly skin-side up on a wire rack over a tray. Wipe the skin completely dry. Sprinkle the top of the skin with a thin, even layer of coarse salt — just enough to cover. This salt is sacrificial: it pulls moisture out overnight and will be brushed off before roasting.
Day 1, Step 4: The Long Air-Dry
Refrigerate the belly uncovered, skin-side up, on the rack, for at least 12 hours and ideally 24–48. The skin should look matte, chalky, and slightly leathery before you roast. If it still looks shiny or feels tacky, dry it longer. This is the single most important technique step.
Day 2, Step 1: Build the Foil Wall
Pull the belly from the fridge 30 minutes before roasting. Brush off all of the curing salt from the skin. Pat the skin dry one more time.
Tear a sheet of heavy-duty foil large enough to fold up the four sides of the belly. Place the belly skin-side up in the foil and crimp the foil tightly against the meat sides, all the way up to (but not over) the skin line. The skin should be the only thing exposed; the meat is in a foil “bowl.” This shields the meat from drying out and prevents juices from soaking the skin during the long render.
Day 2, Step 2: First Roast — Slow Render
Preheat the oven to 160°C / 320°F (conventional). Place the foil-wrapped belly on a rack over a baking sheet, on the middle rack. Roast for 60–75 minutes, until an instant-read thermometer plunged into the thickest part of the meat reads 70–72°C (158–162°F). The skin will look pale and may still be soft — that is expected. The fat is rendering and the meat is reaching safe doneness.
Day 2, Step 3: The Salt Crust (Optional Insurance)
Some cooks skip this; others swear by it. Remove the belly from the oven. Spread a 5–7 mm layer of coarse salt over the entire skin surface, packed firmly to form a continuous crust. The salt absorbs any remaining surface moisture and protects the skin during the heat ramp. You will crack this off before the final blast.
If your air-drying step was thorough, you can skip the salt crust and proceed straight to the broiler. The salt crust is a forgiveness mechanism, not a flavoring step.
Day 2, Step 4: The High-Heat Blast
Crank the oven to 245–260°C / 475–500°F, or switch to the broiler on high with the rack about 20 cm (8 inches) below the element. If you used a salt crust, crack it off completely with the back of a spoon, brush away every grain, and check that the skin underneath looks dry and chalky.
Return the belly to the oven uncovered. Watch it. In 10–20 minutes the skin should puff, blister, and turn deep amber. Rotate the pan halfway through if your oven has hot spots. The moment the entire surface is uniformly pebbled and crackling, pull it out. If a corner browns faster than the rest, shield that corner with a small piece of foil.
Day 2, Step 5: Rest, Then Slice
Rest the belly skin-side up on a board for 10–15 minutes. Do not cover — covering traps steam and softens the crackling. Slice in two passes: first cleave straight down through the skin with a sharp, heavy knife (a Chinese cleaver is ideal — see our guide to Chinese cleaver knife skills). Then portion into bite-sized rectangles roughly 2 cm by 4 cm. Serve immediately with hot mustard and white sugar, or with hoisin and pickled mustard greens.
Temperature and Timing Reference Table
| Stage | Temperature | Time | Goal |
|---|---|---|---|
| Blanch | 100°C / 212°F (boiling) | 5 min | Tighten skin, clean surface |
| Air-dry (fridge) | 2–4°C / 36–39°F | 12–48 hr | Dehydrate skin |
| First roast | 160°C / 320°F | 60–75 min | Render fat, cook meat to 70–72°C |
| High-heat blast | 245–260°C / 475–500°F | 10–20 min | Puff and crisp skin |
| Rest | Room temp | 10–15 min | Redistribute juices, set crackling |
Common Mistakes and How to Fix Them
Most crispy pork belly failures trace back to one of a small number of recurring errors. This table is worth re-reading the night before you cook.
| Mistake | Symptom | Fix |
|---|---|---|
| Skipping the air-dry | Rubbery, leathery skin that won’t puff | Air-dry uncovered in the fridge for at least 12 hours, ideally 24–48 |
| Pricking too deep | Fat oozes up through holes; skin fries unevenly | Prick only the skin layer; angle the skewer almost parallel to the surface |
| Seasoning the skin | Sticky, burnt skin patches | Season the meat side only; keep the skin dry and bare |
| Soy sauce in the rub | Black, bitter crust on cut edges | Use salt, sugar, and five-spice. Save soy for char siu |
| Uneven foil wall | One edge of skin scorches before the rest crackles | Build a level foil wall flush with the skin line on all four sides |
| Going straight to high heat | Burnt skin over undercooked meat | Always use the two-stage method — render first, blast second |
| Forgetting to brush off salt | Salt particles fuse to skin; salty bites | Brush thoroughly with a pastry brush before the final blast |
| Slicing too soon | Soggy crackling; juices flood the board | Rest 10–15 minutes uncovered before slicing |
| Covering during rest | Steam softens the crust | Rest uncovered on a wire rack |
| Storing wrong | Crackling turns chewy overnight | Re-crisp leftovers under the broiler for 3–4 minutes from cold |
Practice Exercises to Build the Skill
Reading is not the same as doing. These four exercises will take you from a first nervous attempt to consistent, dinner-party-worthy crackling in under a month.
Exercise 1: The Half-Slab Test
Buy 500 g of pork belly. Cut it in half. Air-dry one piece for 6 hours, the other for 24. Roast both at the same time using the same method. Compare crackling side by side. This is the most convincing demonstration of why air-drying matters — you will never skip the step again.
Exercise 2: The Prick Density Test
Take a single 1 kg slab. Divide the skin visually into thirds. Lightly prick one third (about 30 holes), prick the middle moderately (about 100), and prick the final third densely (about 300). Roast as normal. The densely-pricked area will puff most evenly; the sparsely-pricked area will form large blisters that often collapse. This trains your sense of how many holes are “enough.”
Exercise 3: The Salt Crust vs. No Salt Crust
On your second or third attempt, run two small slabs side by side — one with the salt-crust step, one without — and judge which method your oven prefers. Convection ovens with strong top heat often don’t need the salt crust; older conventional ovens almost always benefit from it.
Exercise 4: The Reheat Drill
Roast a slab on a Sunday. Slice and refrigerate half. The next day, place the cold pieces skin-up under the broiler for 3–4 minutes without thawing. The crackling will re-puff almost completely. This skill alone makes siu yuk a viable weeknight protein, not just a special-occasion roast.
Advanced Tips From the Siu Mei Pros
Once the basic two-stage method becomes automatic, these refinements push the result from “great home cooking” into “Hong Kong siu mei shop” territory.
- Vinegar wipe. After air-drying, wipe the skin with white vinegar or rice vinegar 30 minutes before roasting. The acid breaks down a thin layer of skin protein, encouraging finer, more uniform crackling. Let the vinegar fully evaporate before the oven.
- The double prick. Prick once after blanching, then prick again after the first roast (carefully — the skin will be hotter). This second pricking re-opens any holes that closed during the render stage.
- Steam-free oven. If your oven has a vent or door-prop function, use it during the high-heat blast. Reducing humidity in the chamber speeds the puff.
- Rotate every 3–4 minutes during the blast. Even “even” ovens have hot spots. Spinning the pan keeps the crackle uniform.
- Use a sheet of foil as a heat shield. If one corner darkens too fast, lay a piece of foil over it for the rest of the blast. Crackling can finish at slightly different speeds across one piece.
- Skin level matters. The skin should be roughly horizontal. If your belly is wedge-shaped, prop the thin end with a folded foil shim so heat reaches the whole skin surface equally.
- Brine instead of dry-cure. Some Hong Kong shops brine the meat in salt water for 1–2 hours instead of dry-rubbing. This produces a more uniformly seasoned interior but requires patting the meat very dry afterward.
- Time it backward from service. Crackling peaks 10–30 minutes after roasting. Plan to finish the high-heat blast no more than 20 minutes before serving, otherwise residual humidity from the meat slowly softens the skin.
The Recipe: Home-Kitchen Crispy Pork Belly
This recipe consolidates the technique above into a single workable plan. It serves 4–6 as part of a multi-dish Cantonese meal, or 3 as a main with rice and a green vegetable.
Ingredients
- 1 kg (2.2 lb) skin-on pork belly, even thickness, ribs removed
- 2 slices ginger
- 1 tablespoon Shaoxing wine, plus 1 tablespoon for the rub
- For the rub: 1 tablespoon kosher salt (~15 g), 1 teaspoon sugar, 1 teaspoon Chinese five-spice, 1 teaspoon white pepper, 1 cube fermented bean curd (mashed), ½ teaspoon garlic powder
- 2 tablespoons rice vinegar (for skin wipe, optional)
- 1 cup coarse sea salt (for top-side cure and optional salt-crust)
Method
- Bring a pot of water to a boil with ginger and 1 tablespoon Shaoxing wine. Blanch the belly skin-side down for 5 minutes. Drain and pat completely dry.
- Score the meat side in a 1 cm crosshatch. Flip skin-side up. Prick the skin densely with a metal skewer — 200–400 holes, evenly distributed, penetrating the skin but not the fat.
- Combine the rub ingredients with the remaining 1 tablespoon Shaoxing wine. Massage into the meat side and the cut edges only.
- Set the belly skin-side up on a rack over a tray. Wipe the skin dry. Sprinkle a thin even layer of coarse salt over the top of the skin. Refrigerate uncovered for 24–48 hours.
- 30 minutes before cooking, brush all salt off the skin. Optionally wipe the skin with rice vinegar; let it air-dry.
- Preheat oven to 160°C (320°F). Wrap a heavy-duty foil wall around the meat sides of the belly, flush with the skin line. Place on a rack over a baking sheet.
- Roast for 60–75 minutes, until the internal temperature reaches 70–72°C (158–162°F).
- Optional salt-crust: spread a 5–7 mm layer of coarse salt across the entire skin. Return to the oven for 10 minutes at 160°C, then remove and crack off the salt completely with the back of a spoon. Brush every grain away.
- Raise the oven to 260°C (500°F) or switch to high broil. Return the belly to the oven uncovered. Roast 10–20 minutes, rotating every 3–4 minutes, until the entire skin is puffed, pebbled, and deep amber. Shield any corner that browns too fast with a small foil square.
- Rest skin-up, uncovered, on a wire rack for 10–15 minutes. Slice with a heavy cleaver, first straight down through the skin, then into bite-sized rectangles.
- Serve immediately with hot mustard and white sugar, or with hoisin sauce on the side. Optionally garnish with pickled mustard greens or sliced cucumber.
Three Variations Worth Trying
1. Sio Bak (Hokkien/Indonesian Style)
Replace the fermented bean curd with 1 teaspoon ground coriander seed and a pinch of grated palm sugar. Serve with sambal — either commercial sambal oelek or a small bowl of chili-vinegar. The base technique is identical; only the rub adjusts.
2. Lechon Cebu-Style at Home
The Filipino approach replaces five-spice with lemongrass, garlic, and pepper, and the skin is brushed with coconut milk during the high-heat blast. It is a different flavor world, but the moisture-removal logic is identical.
3. Master-Stock Crispy Belly
Cook the belly first in a Chinese master stock (see our master stock guide) for 30–40 minutes until the meat is just tender, cool completely uncovered to dry the skin, then proceed with the high-heat blast only. This hybrid produces an exceptionally deep flavor in the meat and a crackling that still puffs cleanly.
What to Serve With Crispy Pork Belly
Siu yuk is rich. The traditional Cantonese accompaniments are designed to cut through that richness:
- Hot mustard and white sugar — the classic combination. Dip first in the sugar, then in the mustard.
- Hoisin sauce — sweeter, mellower; serve in a small dish for dipping.
- Pickled mustard greens (haam choi) — brighten and lengthen each bite.
- Plain steamed jasmine rice — the workhorse partner.
- Steamed greens with oyster sauce — gai lan, choy sum, or yu choy.
- Clear winter melon soup — the traditional palate cleanser at a Cantonese banquet.
The leftovers also make superb fried rice the next day, or a banh mi if you have Vietnamese bread and pickled carrots on hand.
Storing and Reheating
Store leftover crispy pork belly uncovered in the refrigerator for up to 3 days. Yes — uncovered. Wrapping it in plastic or foil traps moisture and turns the crackling soft within hours. If your fridge runs dry, an open container or a loose paper towel cover is fine.
To reheat, place pieces skin-up on a wire rack and put them under a hot broiler for 3–4 minutes straight from cold. Do not microwave — the crackling will turn chewy and never recover. Freezing is technically possible but degrades the skin; eat siu yuk fresh whenever you can.
Frequently Asked Questions
Can I make crispy pork belly without an oven?
Yes, but with caveats. An air fryer of at least 6 liters can produce excellent results — run the first stage at 160°C for 35–40 minutes, then crank to maximum (typically 200–220°C) for the final blast. The crackling will be more uneven than in an oven because air-fryer baskets have limited surface area. A grill or kamado works if you can hold a steady low temperature for the render stage, but most home grills lack the temperature control. Stovetop methods (frying skin-down in oil) work for small pieces but cannot match the puffed skin from a true oven blast.
Why is my pork belly skin bubbling but not crackling?
Big blisters and small, pebbled crackling are different things. Blisters form when there is residual moisture under the skin that flashes to steam in pockets. Even, dense crackling forms when the skin is uniformly dried and densely pricked, so the steam escapes through hundreds of tiny channels rather than a few big ones. The fix is more drying time and more pricking.
Why is my crackling chewy in some spots?
Chewy patches usually correspond to areas that were either under-dried, under-pricked, or shielded from the heat (often by the edge of the pan or by uneven oven heat). Solutions: longer fridge drying, more pricking, and rotating the pan during the blast.
Do I need fermented bean curd?
No — it’s optional but traditional. Fermented bean curd (also called fu yu or nam yu) adds a savory, slightly funky depth that’s recognizably Cantonese. If you skip it, increase the salt by a pinch and add a teaspoon of light soy sauce to the meat-side rub for a similar umami boost — just keep it off the skin.
Is the salt-crust method better than the no-salt method?
It depends on your oven and your air-drying discipline. The salt-crust is an insurance policy: it shields the skin from charring during the heat ramp and absorbs any remaining surface moisture. If your oven runs hot and your skin is bone-dry from a 48-hour fridge dry, you don’t need it. If your oven is older or you only had time for an overnight dry, the salt crust will rescue you.
Can I use boneless or skinless pork belly?
Boneless yes — bones make no functional difference here (the slab should be ribs-removed anyway). Skinless, no — you cannot make siu yuk without skin. If your butcher only has skinless, ask whether they have a piece of fresh pork skin you can buy separately, but trying to reattach it is generally not worth the trouble. Find skin-on belly elsewhere.
How thick should the pork belly be?
3.5–5 cm (1.5–2 inches). Thinner belly cooks faster than the skin can dry; thicker belly takes so long that the skin over-bakes before the interior is done. If your slab is uneven, prop the thin end with crumpled foil to level the skin surface.
Can I roast crispy pork belly the day before?
You can, but for a dinner party we would recommend doing the first roast (render stage) up to 24 hours ahead, refrigerating skin-up uncovered, and then doing only the high-heat blast just before serving. Crackling is at its peak within 30 minutes of the blast.
What is the difference between siu yuk and char siu?
Both are part of the Cantonese siu mei family, but they are fundamentally different. Char siu is marinated boneless pork (usually shoulder) in a sweet, soy-and-honey glaze, then roasted on hooks. Siu yuk is skin-on belly, seasoned only with salt and spice, roasted flat to crisp the skin. Char siu is red, glossy, and sweet; siu yuk is mahogany, crisp, and savory. Our char siu recipe is the right starting point if sweet, sticky pork is what you are after.
Why blanch the belly first?
Blanching does three things: it tightens the skin so it pricks more cleanly, it removes blood and surface impurities (reducing the “pork” smell), and it begins the moisture-removal process. Some cooks skip it; in our experience the results are noticeably better with the 5-minute blanch.
How do I prevent the meat from drying out?
The foil wall is your friend. Wrapping the four meat sides tightly in heavy-duty foil during the first roast keeps moisture from escaping while the skin dehydrates on top. Pulling the meat off heat at 70–72°C (rather than overshooting to 80°C and beyond) is equally important. Pork belly is forgiving because of the fat, but it is not bulletproof.
Can I use this technique on a whole suckling pig?
The principles scale, but the execution is very different — whole-pig roasting requires a much larger heat source, a longer render, and a rotation system. Treat this guide as the foundation, then study traditional lechon or Cantonese roasted-pig methods separately. Starting with a 1 kg slab will teach you the science you need.
The Bottom Line
Crispy pork belly looks intimidating because the photos are dramatic and the failure modes are visible. The technique itself is almost embarrassingly straightforward: choose a good slab, dry the skin until it is chalky, prick it densely, season the meat side only, render slow, then blast hot. Everything else is finesse.
If you are building out the rest of your Chinese roasting and stir-frying skills, our guides on red braising, steaming fish, and mastering the wok sit naturally alongside this one — together, they cover the four main cooking methods of the Cantonese home kitchen. Master siu yuk first; once you can produce reliable crackling on a Sunday afternoon, the rest of the repertoire opens up.

Mei Lin Chen
Mei Lin Chen is an Asian food writer and recipe developer. Melbourne-raised and London-based, she has spent over a decade exploring the rice paddies, hawker stalls, and home kitchens of South-East and East Asia. Her recipes balance traditional technique with everyday practicality.