Last updated: March 18, 2026
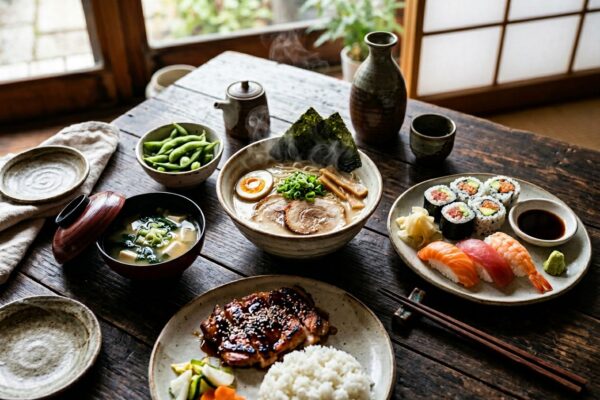
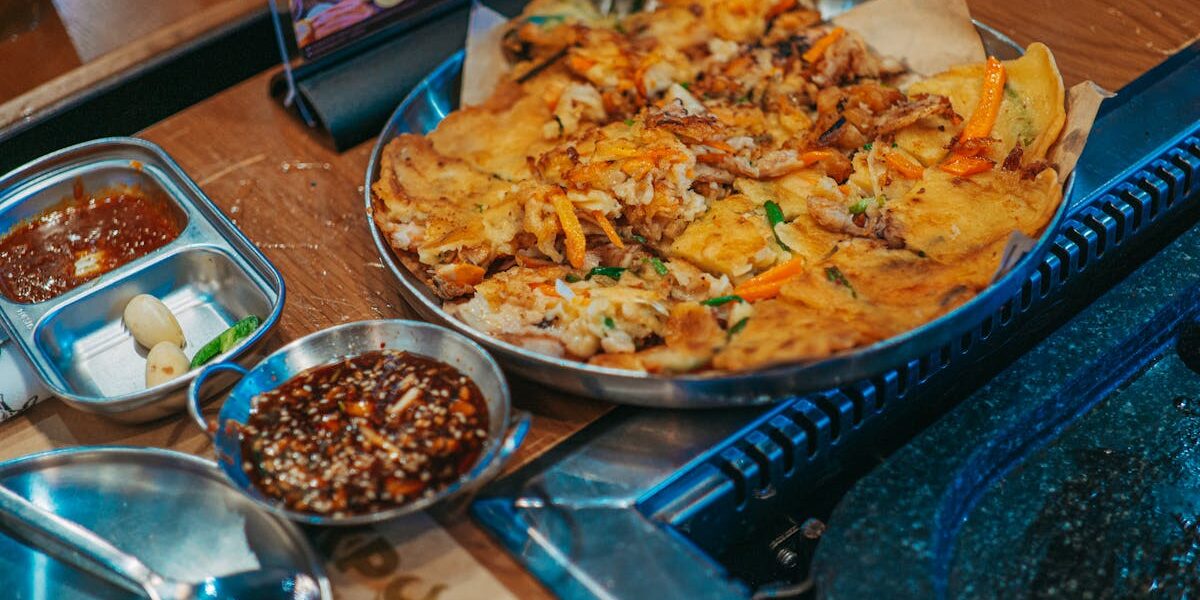
Korean jeon (전) is one of the most beloved and accessible cooking techniques in Korean cuisine, yet it remains misunderstood outside Korea. To Western cooks it often gets translated as ”Korean pancake,” but that label undersells the craft. Jeon is a precise pan-frying method that produces crisp, lacy edges and a tender, custardy interior in vegetables, meat, seafood, kimchi, tofu, and even individual leaves and flowers. It is a technique built on three pillars: thin batter, generous oil, and patient medium heat. Master those three, and you unlock dozens of dishes — from the iconic seafood-and-scallion haemul pajeon to the rainy-day favorite kimchijeon, the festive modeumjeon platter, and the delicate nokdujeon mung-bean pancakes that anchor royal court cuisine.
This guide walks you through the full technique: the equipment that matters (and what doesn’t), the batter ratios and flour blends that produce crispy versus tender textures, the temperature control that separates a soggy disappointment from a golden, shatter-crisp surface, and the step-by-step movement of the pan. You’ll also find a detailed troubleshooting table, practice exercises to build muscle memory, advanced restaurant tricks, and a complete FAQ. Whether your goal is a home weeknight side dish or a stack of glossy banquet-quality pancakes, the technique below scales with you.
What Is Jeon? An Overview of the Korean Pan-Frying Technique
Jeon is the Korean technique of coating an ingredient in a light flour-and-egg batter and pan-frying it in shallow oil until both sides are golden brown and crisp on the outside while the interior stays moist. The word ”jeon” simply means ”pan-fried,” and it covers a vast family of dishes that share this batter-and-fry approach. Unlike Western pancakes, which rely on a leavener and a thick pourable batter, jeon batter is loose, unleavened, and acts more as a binder and texture-builder than as a dough.
The technique appears throughout Korean cuisine. On Korean ancestral memorial tables (jesa), neatly cut rectangles of fish jeon and meat jeon are arranged with ceremonial precision. At pojangmacha (street tents), thick kimchijeon are sliced with scissors and served sizzling. In Jeolla Province, the seafood pajeon is famously enormous, with whole scallions splayed across the surface like the spokes of a wheel. In every regional expression, the technique remains essentially the same: thin batter, hot oil, careful flipping.
What makes jeon distinct from Western pan-frying or Japanese tempura is the relationship between batter and ingredient. In tempura, the batter is the star and the vegetable inside is almost incidental. In a jeon, the batter is a delivery system: it holds the ingredients together, conducts heat evenly, and produces the lacy crisp edges that Koreans pull off and eat first. The ingredient itself — be it kimchi, oysters, zucchini slices, or shredded mung beans — still leads the flavor.
The Cultural Context: Why Koreans Eat Jeon When It Rains
If you spend any time in Korea, you’ll quickly learn that rainy days call for jeon and makgeolli (rice wine). There are several theories for this beloved pairing. Some attribute it to the sizzling sound of batter hitting hot oil, which echoes the patter of rain. Others point to the practical reality that humid weather makes outdoor work impossible, so families gather at home and cook indoor comfort food. Linguistically, the Korean word for the sizzle (지글지글, jigeul jigeul) mirrors the sound of falling rain. Whatever the origin, the association is so strong that supermarket sales of pajeon ingredients spike on rainy weekends.
Jeon also plays a serious ceremonial role. During major holidays such as Chuseok (autumn harvest) and Seollal (lunar new year), entire days are dedicated to frying batches of modeumjeon — an assortment that includes saengseonjeon (fish), gogijeon (meat patties), hobakjeon (zucchini rounds), and donggeurangttaeng (small meat-and-vegetable patties). The technique is so embedded in Korean family life that learning to flip jeon properly is a rite of passage often handed down from grandmother to grandchild.
The Major Types of Jeon You Should Know
Before diving into technique, it helps to understand the categories you’ll be working with. Each type has slight adjustments to batter, oil quantity, and heat, but the core method holds.
| Type of Jeon | Korean Name | Key Ingredient | Texture Goal |
|---|---|---|---|
| Scallion pancake | Pajeon (파전) | Whole green onions | Crisp edges, soft center |
| Seafood scallion pancake | Haemul pajeon (해물파전) | Shrimp, squid, oyster, scallion | Thick, juicy, crisp bottom |
| Kimchi pancake | Kimchijeon (김치전) | Aged napa kimchi | Tangy, lacy, slightly chewy |
| Mung bean pancake | Bindaetteok / Nokdujeon (빈대떡) | Ground soaked mung beans | Thick, hearty, deeply crisp |
| Zucchini round | Hobakjeon (호박전) | Sliced Korean zucchini | Tender, light golden coating |
| Fish fillet | Saengseonjeon (생선전) | White-fleshed fish | Delicate, custardy interior |
| Meat patty | Gogijeon (고기전) | Ground beef or pork | Juicy, eggy surface |
| Potato pancake | Gamjajeon (감자전) | Grated potato | Crispy outside, sticky inside |
| Stuffed pepper | Gochujeon (고추전) | Mild green peppers stuffed with meat | Tender pepper, savory filling |
| Mixed platter | Modeumjeon (모듬전) | Assortment of above | Variety, color contrast |
Essential Equipment for Making Jeon
You do not need specialized Korean cookware to master jeon. The technique was designed for everyday home pans, and overinvesting in gear can actually distract from skill-building. Here is what genuinely matters and why.
The Pan
A flat-bottomed, heavy nonstick or well-seasoned carbon-steel pan is ideal. Cast iron works beautifully for thicker jeon like bindaetteok because it holds heat steadily, but it requires a generous oil slick to keep batter from sticking. A 10- to 12-inch pan is the sweet spot for home cooking — large enough for a generous pajeon, small enough to flip in one motion. Avoid pans with curved sides; you want batter to spread evenly and edges to crisp uniformly.
Oil and Oil Delivery
Jeon needs more oil than most Western cooks use in pan-frying. Think of it as halfway between sautéing and shallow-frying. A neutral oil with a high smoke point — grapeseed, canola, rice bran, or refined sunflower — is the standard. Some cooks add a small amount of toasted sesame oil at the end for aroma, but never as the primary cooking fat (it burns and turns bitter). A long-handled silicone or wooden brush is helpful for pushing oil under the edges of a pancake mid-cook, a technique called ”tucking” that’s essential for the signature lacy crisp border.
Mixing Bowls and Whisk
You’ll want two medium bowls — one for dry ingredients and one for combining wet. A small whisk or even a pair of chopsticks works for mixing. Overmixing develops gluten and makes the batter tough, so chopsticks are actually preferable to a whisk for the final blend.
Spatula and Flipping Tools
A wide, thin metal or silicone spatula is essential. For larger pajeon, two spatulas (one in each hand) help you flip in a single confident motion. Some Korean cooks use the plate-flip method: cover the pan with a wide plate, invert the pan, then slide the pancake back. It takes practice but produces unbroken golden circles.
Kitchen Shears
Koreans almost universally cut jeon with scissors at the table rather than a knife. A pair of clean kitchen shears delivers more control on a hot, slightly flexible pancake and is essential to the serving ritual.
Building the Perfect Jeon Batter
Batter is where most home cooks go wrong. The instinct is to make it thick like American pancake batter, but jeon batter should be loose, almost like heavy cream. It pours from a spoon in a steady ribbon and self-levels when it hits the pan. Here is the foundation ratio that works as a starting point for almost any jeon you make.
The Base Ratio
For roughly 4 servings, combine: 1 cup all-purpose flour, ¼ cup potato or sweet rice (mochiko) flour, 1 teaspoon salt, 1 large beaten egg, and 1 to 1¼ cups ice-cold water. Whisk just until combined. The starch from the secondary flour is what produces those signature crisp, lacy edges. All-purpose flour alone makes a tender pancake; adding a potato or rice starch component gives the surface its shatter-crisp bite.
Why Cold Water Matters
Cold water (some Korean cooks use sparkling water or even cold dashi) inhibits gluten development. Gluten makes batter chewy and bready — the opposite of what you want. Ice-cold liquid also creates a more dramatic temperature contrast with the hot oil, encouraging the steam-driven craters that build the lacy crust.
Using Pre-Blended Korean Pancake Mix
Korean grocery stores sell two products: buchimgaru (general jeon mix) and twigimgaru (tempura-style mix). Buchimgaru already contains seasonings and starches calibrated for crispness, and it’s a legitimate shortcut even among Korean home cooks. Twigimgaru is lighter and crisper. You can use a 70/30 blend of buchimgaru and twigimgaru to mimic the texture of restaurant pajeon at home.
Optional Flavor Boosters
A pinch of garlic powder, a splash of soy sauce, a half-teaspoon of fish sauce, or a tablespoon of gochujang can be whisked into the batter for added depth. For seafood jeon, some cooks add a tablespoon of strained kimchi brine, which deepens umami without adding much chili heat.
Step-by-Step: How to Make Jeon
The technique below applies to almost any jeon you’ll make. The two variables that change between dishes are the filling and the thickness. Master these steps with one type first — pajeon is the recommended starter — then branch out.
Step 1: Prep the Filling Completely Before Mixing Batter
Wash, cut, and pat dry every ingredient before you touch the batter. Wet ingredients dilute the batter and prevent crisping. For pajeon, trim scallions into 5-inch pieces and halve any thick whites lengthwise. For kimchijeon, squeeze out excess kimchi liquid and chop into bite-size pieces (reserve the strained liquid — it goes into the batter). For seafood, blot shrimp and squid thoroughly with paper towels.
Step 2: Mix the Batter Just Before Cooking
Whisk dry ingredients first, then make a well, add the egg and ice water, and stir with chopsticks just until no dry pockets remain. A few lumps are fine. The batter should fall from a spoon in a steady, thin ribbon. If it pools and stacks on itself, add water one tablespoon at a time. If it runs off like milk, add a tablespoon of flour.
Step 3: Heat the Pan Until Oil Shimmers
Set your pan over medium heat (not medium-high — patience pays here). Add 3 to 4 tablespoons of neutral oil and swirl to coat the entire bottom. Wait until the oil shimmers but does not smoke. A test droplet of batter should sizzle vigorously on contact but not turn brown within 3 seconds. If it browns instantly, the oil is too hot and the batter will burn before the interior cooks.
Step 4: Build the Pancake in Layers (for pajeon)
For traditional pajeon, do not stir the filling into the batter. Instead, ladle a thin layer of batter into the pan, immediately arrange scallions in a single fan-like layer on top, then drizzle more batter to fill the gaps. This produces the distinctive cross-section: scallions sandwiched between two crisp batter layers. For kimchijeon and gamjajeon, the filling is mixed into the batter and ladled in as a single mixture.
Step 5: Don’t Touch It
Once the batter hits the pan, leave it alone for 3 to 4 minutes. Moving or pressing too soon tears the developing crust. The edges should turn golden and slightly lacy, and the surface should look set with small bubbles forming and popping.
Step 6: Add Oil at the Edges Before Flipping
Before you flip, lift the pancake gently with a spatula and pour about a tablespoon of fresh oil around the edge so it runs underneath. This ”tucking” step is the single most important move for restaurant-quality crispness. The fresh oil rebrowns the underside and produces that audible crackle when you bite in.
Step 7: Flip Confidently
Slide your spatula completely under the pancake, lift, and turn in one motion. Hesitation tears it. For very large pajeon, use the plate-flip method: cover the pan with a plate, invert, then slide back. Once flipped, press down gently with the spatula and add another tablespoon of oil at the edges. Cook for another 2 to 3 minutes until the second side is golden and crisp.
Step 8: Final Crisp and Rest
Many Korean cooks flip the pancake one more time and crank heat to medium-high for the last 30 seconds on each side to lock in the crisp. Transfer to a wire rack — not paper towels — so steam doesn’t soften the bottom. Cut with shears and serve immediately.
The Dipping Sauce: Yangnyeomjang
No jeon is complete without dipping sauce. The standard is yangnyeomjang, a soy-vinegar mixture that cuts through the richness of the pancake. Combine 3 tablespoons soy sauce, 1 tablespoon rice vinegar, 1 teaspoon toasted sesame oil, ½ teaspoon sugar, 1 teaspoon toasted sesame seeds, ½ teaspoon gochugaru, and 1 finely chopped scallion. Some cooks add a splash of water or dashi to lighten the sauce. For kimchijeon, scale back the vinegar — the kimchi already brings acidity.
Common Mistakes and How to Fix Them
Almost every jeon failure traces back to one of the issues below. Use this table as a diagnostic tool the next time something doesn’t turn out the way you wanted.
| Problem | Likely Cause | Fix |
|---|---|---|
| Soggy pancake center | Batter too thick; oil not hot enough; pancake too thick | Thin batter with cold water; preheat pan longer; spread thinner |
| Burned outside, raw inside | Heat too high; batter too thick | Reduce to medium; thin batter; cover pan briefly to steam interior |
| Pale, no crisp edges | Not enough oil; pan not hot enough; no tucking step | Use more oil; add fresh oil around edges before flipping |
| Pancake tears when flipped | Flipped too early; spatula not fully under it | Wait until edges set and lift cleanly; commit to the flip |
| Tough, chewy texture | Overmixed batter; gluten developed | Mix with chopsticks just until combined; use cold water |
| Pancake sticks to pan | Not enough oil; pan not preheated | Use generous oil layer; preheat 2+ minutes |
| Soggy bottom after sitting | Drained on paper towels; stacked while hot | Cool on wire rack; serve immediately |
| Off-flavor or bitter notes | Sesame oil used as primary fat; oil burned | Use neutral oil; add toasted sesame oil at end only |
| Filling falls out | Not enough batter binding; uneven distribution | Layer batter under and over fillings; press gently after flipping |
| Greasy mouthfeel | Oil temp dropped during cooking; absorbed too much oil | Maintain steady medium heat; don’t crowd pan |
Practice Exercises to Build Jeon Skills
Like any technique, jeon improves with deliberate practice. Rather than jumping straight into a banquet-sized seafood pajeon, work through these progressive exercises. Each isolates one variable and builds a skill you’ll need for more complex versions.
Exercise 1: The Blank Pancake
Make jeon with batter only — no filling. The goal is to develop sensitivity to batter consistency, oil temperature, and timing. Aim for a thin disc with golden, lacy edges and an evenly browned surface. Repeat three times in a single session, adjusting one variable each time: more water, less water, hotter pan, cooler pan.
Exercise 2: Hobakjeon Single Rounds
Slice a Korean zucchini into ¼-inch rounds. Salt lightly, drain on paper towels for 10 minutes, then pat dry. Dust with flour, dip in beaten egg seasoned with salt, and pan-fry in oil over medium heat until golden on both sides. This is the simplest jeon and teaches you about coating, flipping small items, and oil management. Each round is its own miniature lesson.
Exercise 3: Classic Kimchijeon
Use well-aged kimchi (at least 3 weeks old) for the deepest flavor. Squeeze out brine, chop, and mix into the standard batter along with a tablespoon of the reserved brine. Make a single 8-inch pancake. This exercise teaches you how acidic ingredients interact with batter and how to manage a mixed-in (versus layered) jeon.
Exercise 4: Small Pajeon
Make a 6-inch pajeon with just a few scallions. The reduced size makes flipping forgiving and lets you focus on the layering technique — batter, scallions, batter — without the panic of managing a 12-inch pancake. Once you can produce three perfect small pajeon in a row, scale up.
Exercise 5: Full Haemul Pajeon
The graduation exercise. Use a 12-inch pan and incorporate shrimp, squid, and oysters. This is the technique at its most demanding: managing wet seafood, ensuring even cooking, and producing a crisp surface despite the moisture. If you can nail this, you’ve mastered jeon.
Advanced Tips from Korean Restaurant Kitchens
Once you can produce a competent home jeon, these professional techniques will push your results into restaurant territory. None require special equipment — just precision and attention.
The Double-Flip Method
Restaurant cooks often flip jeon two or even three times during cooking, each time adding a small amount of fresh oil at the edges. Each flip rebuilds the crust and prevents either side from becoming overly dark. This is especially valuable for thick pancakes like bindaetteok.
Sparkling Water Batter
Substituting cold sparkling water for plain ice water introduces tiny CO₂ bubbles into the batter that produce a noticeably lighter, crisper finish. The effect is similar to what makes good tempura batter so delicate. Use it 1:1 in place of water.
Pre-Salting Vegetables
Vegetables with high water content — zucchini, daikon, scallions, cabbage — should be lightly salted for 10 minutes and pressed dry before incorporating into batter. The salt draws out moisture that would otherwise dilute your batter and ruin the crisp.
The Two-Pan System for Banquets
If you’re making jeon for a crowd, run two pans simultaneously: one at medium heat for the initial cook, one at medium-high for the final crisp. Move pancakes between them rather than trying to manage both stages in one pan with changing heat. This is how Korean caterers produce 50+ jeon for memorial services in a single afternoon.
Rice Flour Crust Booster
Replacing 25% of the all-purpose flour with rice flour or sweet rice flour dramatically increases crispness and prevents the pancake from going soggy as it cools. Korean barbecue restaurants almost always use this trick for their banchan jeon.
Resting the Batter
Counterintuitively, batter for some jeon types — especially bindaetteok — benefits from a short 10-minute rest in the refrigerator before cooking. The starches hydrate fully, and the batter behaves more predictably on the pan. For thin pajeon, skip the rest and use the batter immediately.
Recipe Example 1: Classic Haemul Pajeon
This is the rainy-day pancake every Korean home cook should master. Yields one 12-inch pancake, serves 2 to 4.
- 1 cup all-purpose flour
- ¼ cup potato starch or sweet rice flour
- 1 teaspoon salt
- 1 large egg, beaten
- 1¼ cups ice-cold water (or sparkling water)
- 1 bunch scallions, trimmed to 5-inch lengths
- 4 oz mixed seafood (shrimp, squid rings, shucked oysters), patted dry
- 1 small Korean red chili, sliced (optional)
- 4 to 5 tablespoons neutral oil, divided
- 1 extra egg, beaten (for drizzling)
Whisk dry ingredients, then stir in egg and cold water until just combined. Heat 3 tablespoons oil in a 12-inch nonstick pan over medium heat until shimmering. Ladle half the batter to coat the bottom. Quickly arrange scallions in a fan pattern, sprinkle seafood and chili evenly, then drizzle remaining batter over the top to fill gaps. Cook undisturbed for 3 to 4 minutes. Lift edges and add fresh oil around the rim. Drizzle the second beaten egg over the surface, then flip in one confident motion. Cook 2 to 3 more minutes, flip once more for a final 30-second crisp, and slide onto a wire rack. Cut with scissors and serve immediately with yangnyeomjang.
Recipe Example 2: Kimchijeon for One
The fastest jeon, perfect for a solo dinner with rice and a beer. Yields one 8-inch pancake.
- 1 cup well-aged napa kimchi, squeezed and chopped (reserve brine)
- ½ cup all-purpose flour
- 2 tablespoons sweet rice flour
- 1 large egg
- ½ cup ice water
- 2 tablespoons reserved kimchi brine
- 1 teaspoon gochujang
- 1 scallion, sliced
- 3 tablespoons neutral oil
Whisk flours, then add egg, water, brine, and gochujang. Stir in kimchi and scallion. Heat oil in an 8-inch pan over medium until shimmering. Pour batter and spread to a quarter-inch layer. Cook 3 to 4 minutes until edges crisp. Add oil at the edges, flip, and cook 2 to 3 more minutes. Flip once more for 30 seconds, transfer to a rack, cut with scissors. Serve hot, ideally with a glass of cold makgeolli.
Recipe Example 3: Hobakjeon (Zucchini Rounds)
The most delicate jeon and a staple of Korean memorial tables. Yields about 20 rounds.
- 1 medium Korean zucchini (or substitute Italian zucchini), sliced quarter-inch thick
- 1 teaspoon salt
- ½ cup all-purpose flour
- 2 large eggs, beaten with a pinch of salt
- 3 tablespoons neutral oil
Salt zucchini rounds and rest on paper towels 10 minutes. Pat dry thoroughly. Dust each round in flour, shake off excess, then dip in beaten egg to coat. Heat oil in a wide skillet over medium heat. Arrange coated rounds in a single layer without crowding. Cook 2 minutes per side until golden and tender. Transfer to a rack. Serve at room temperature with yangnyeomjang.
Storage, Reheating, and Make-Ahead Tips
Jeon is at its absolute peak within five minutes of leaving the pan, but life rarely cooperates with ideal timing. Here is how to manage leftovers and prep ahead without sacrificing too much quality.
Same-day storage: Keep cooked jeon on a wire rack at room temperature for up to 2 hours. Do not stack while warm or steam will soften the crust.
Refrigeration: Layer cooled jeon between sheets of parchment in an airtight container. Refrigerate up to 3 days. The texture will soften significantly, so plan to reheat.
Reheating: The best method is a dry nonstick or cast-iron pan over medium heat for 2 to 3 minutes per side with no added oil. The microwave is a last resort — it turns jeon rubbery. An air fryer at 350°F for 4 minutes also works surprisingly well.
Freezing: Freeze cooked jeon between parchment sheets in a zip-top bag for up to 2 months. Reheat directly from frozen in a pan over medium-low heat, covered for the first minute to allow the center to thaw.
Batter ahead: Batter holds in the refrigerator for up to 4 hours. Whisk briefly before using; you may need to thin with a tablespoon of cold water. Do not batter ingredients more than 30 minutes ahead.
Pairings: What to Serve with Jeon
In a traditional Korean meal, jeon is one component of a larger spread that includes rice, soup, and several banchan (side dishes). At a casual table, however, jeon often becomes the centerpiece — especially when paired with a drink.
- Makgeolli: Korean unfiltered rice wine. The classic pairing, especially on rainy days. The mild sweetness cuts through the oil.
- Soju: Korean distilled grain spirit. Crisp and clean, balances the richness.
- Korean lager (Cass, Hite, Terra): The bubbles refresh the palate between bites.
- Rice and a clear soup: For a full meal, jeon works beautifully with steamed short-grain rice and a clear seaweed or radish soup.
- Banchan: Quick-pickled radish (chicken-mu style), oi muchim cucumber salad, or simple kimchi.
Regional Variations of Jeon Across Korea
Each Korean region has put its stamp on the technique. Understanding these variations gives you a richer vocabulary to play with at home.
Dongnae (Busan area): Famous for dongnae pajeon, a thick, almost pillowy version made with a higher proportion of glutinous rice flour and an abundance of seafood. The batter ratio is more like 1 cup flour to 1 cup brine-rich liquid.
Jeolla Province: Known for elaborate, banquet-scale jeon platters, including kkaennipjeon (perilla leaf stuffed with seasoned meat) and various seafood interpretations. The batters here lean richer with extra egg.
Gangwon Province: Mountainous and traditionally poor in seafood, so the local specialty is gamjajeon made entirely from grated potato with minimal flour. The texture is dense, sticky-chewy, and deeply browned.
Seoul / Royal Court: Refined small jeon are the hallmark — perfectly square saengseonjeon, neat little hobakjeon, and the highly prized nokdujeon (mung bean pancake) traditionally served during palace banquets.
Jeju Island: Uses local seafood like abalone and small octopus, often producing thicker, chunkier pancakes that lean toward fritters.
Jeon vs. Other Asian Pan-Fried Pancakes
Korean jeon belongs to a broader family of Asian pan-fried savory pancakes, but it has distinct characteristics worth understanding in context.
| Pancake | Origin | Batter Style | Cooking Method | Texture |
|---|---|---|---|---|
| Jeon (전) | Korea | Loose flour-egg-water | Shallow pan-fry, medium heat | Crisp edges, tender center |
| Okonomiyaki | Japan | Thick with cabbage and yam | Griddle, medium-low | Hearty, cake-like |
| Cong you bing | China | No batter; layered dough | Pan-fry, medium-high | Flaky, chewy |
| Bánh xèo | Vietnam | Rice flour, coconut, turmeric | Pan-fry, high heat | Shatter-crisp, lacy |
| Apam balik | Malaysia | Yeasted | Covered griddle | Pillowy, sweet |
If you’re already comfortable with one of these — say, the Vietnamese bánh xèo or the Japanese okonomiyaki — many of the heat-management skills transfer directly to jeon. The key adjustment is recognizing that jeon batter is thinner and the role of the filling more prominent.
Frequently Asked Questions
Can I make jeon gluten-free?
Yes, and quite successfully. Replace all-purpose flour with a 70/30 blend of rice flour and sweet rice flour, or use a 1:1 gluten-free flour blend. The texture will be slightly more delicate, but the crisp factor remains excellent — arguably better, since rice flour is naturally crispier than wheat flour.
What is the difference between jeon and buchimgae?
The terms overlap and are often used interchangeably. Buchimgae tends to refer to thicker, more substantial pancakes like pajeon and kimchijeon, while jeon is the broader category that includes small, delicate items like hobakjeon and saengseonjeon. In practical Korean home use, you’ll hear both.
Can I bake jeon instead of pan-frying?
You can, but the texture suffers significantly. Without the contact with hot oil, you lose the lacy crisp edges that define jeon. If you must, brush with oil generously and bake on a preheated sheet pan at 425°F until golden, flipping halfway. The air-fryer is a better compromise for individual rounds.
Why does my jeon turn out greasy?
Greasy jeon is almost always the result of oil temperature dropping too low during cooking, which causes the batter to absorb oil instead of being sealed by it. Use a generous oil layer and keep the pan steadily at medium heat. Don’t crowd the pan, and don’t let multiple uncooked items sit in the oil at once.
Is there an egg-free version?
Yes. Replace the egg with 1 tablespoon flax meal mixed with 3 tablespoons water (let it gel for 5 minutes), or use 2 extra tablespoons of potato starch dissolved in water. Pajeon, kimchijeon, and bindaetteok all work without egg. The texture loses a bit of richness but remains delicious.
How thick should my pajeon be?
For traditional pajeon, aim for a quarter to a third of an inch thick — about the thickness of a pencil. For the thicker Busan-style dongnae pajeon, go up to half an inch. Anything thicker risks an undercooked center, and you’ll need to lower the heat or cover the pan briefly to steam the interior through.
Why is my batter not crispy even with potato starch?
The most common cause is overmixing, which develops gluten and turns the surface tough rather than crisp. The second is insufficient oil — jeon requires more oil than most home cooks instinctively use. Aim for a visible oil layer in the pan, not just a film.
Can I prepare jeon for a party in advance?
Yes, with the right strategy. Cook all the jeon up to an hour before guests arrive and hold them on a wire rack in a 200°F oven. Just before serving, re-crisp each one for 30 seconds per side in a dry hot pan. This is exactly how Korean restaurants serve banquet jeon platters at correct temperature.
What is the right type of kimchi for kimchijeon?
Aged napa cabbage kimchi (at least 2 to 3 weeks old) is ideal. Fresh kimchi lacks the depth and tang you want, and the texture stays too crisp. Sour, slightly funky kimchi melts into the batter and creates the signature flavor.
Can I make a jumbo jeon to feed a crowd from one pan?
You can scale up to about 14 inches on a large skillet, but anything bigger becomes structurally unstable. For a crowd, it’s smarter to make several smaller pajeon in sequence — they cook faster, flip easier, and stay crispier when cut and served fresh.
Final Thoughts: Make Jeon a Regular Part of Your Cooking
Jeon is one of the most generous techniques in Korean cooking. It transforms whatever you have in the refrigerator — a lonely zucchini, leftover kimchi, a handful of scallions, a few oysters — into something hot, crisp, and deeply satisfying. The skill curve is forgiving: your first attempt will be edible, your fifth will be good, and your twentieth will be the kind of pancake your friends ask you to make again. Practice the foundation — thin batter, generous oil, patient medium heat, confident flip — and the variations will come naturally.
If you’d like to pair your jeon study with related techniques, our guides to kimchi fermentation, Korean BBQ at home, and japchae round out a full Korean home-cooking repertoire. Stock your pantry with quality toasted sesame oil, gochujang, and good Korean soy sauce, and you’re set for months of delicious cooking.

Mei Lin Chen
Mei Lin Chen is an Asian food writer and recipe developer. Melbourne-raised and London-based, she has spent over a decade exploring the rice paddies, hawker stalls, and home kitchens of South-East and East Asia. Her recipes balance traditional technique with everyday practicality.