Last updated: March 12, 2026
Mochi — the pillowy, chewy, utterly addictive Japanese rice cake — has captivated eaters around the world. Whether filled with ice cream, wrapped around sweet red bean paste, or served in a steaming bowl of ozoni soup, mochi’s signature stretch and bounce come from one thing: the transformation of glutinous rice flour into a smooth, elastic dough. Learning how to make mochi at home is one of the most rewarding Japanese cooking techniques you can master, and it is far simpler than most people think.
In this complete guide, we cover every method for making mochi from scratch — from the traditional pounding technique (mochitsuki) to the quick microwave shortcut that takes under 10 minutes. You will learn about the essential ingredients, the equipment you need, step-by-step instructions for each method, common mistakes to avoid, and recipes that put your freshly made mochi to delicious use. By the end, you will have the confidence to make soft, stretchy mochi any time the craving strikes.
What Is Mochi?
Mochi (餅) is a Japanese rice cake made from mochigome, a short-grain glutinous rice. The word ”glutinous” refers to the rice’s sticky, glue-like texture when cooked — it contains no gluten in the wheat sense. When mochigome is steamed and pounded (or its flour is cooked with water), the starches gelatinize and the proteins align, creating mochi’s characteristic stretch.
Mochi has been a staple of Japanese cuisine for over 1,000 years. It plays a central role in New Year celebrations (oshogatsu), where families gather for mochitsuki — the traditional rice-pounding ceremony using a large wooden mortar (usu) and mallet (kine). Beyond Japan, similar sticky rice cakes appear across Asia: Chinese nian gao, Korean tteok, Filipino palitaw, and Southeast Asian kuih all share the same fundamental principle of transforming glutinous rice into something wonderfully chewy.
Today, mochi has evolved into dozens of forms. There are plain rounds eaten in savory soups, grilled mochi brushed with soy sauce, daifuku stuffed with sweetened fillings, and the globally popular mochi ice cream. Understanding the base technique opens the door to all of these variations.
Essential Mochi Ingredients
Making mochi requires surprisingly few ingredients. The quality and type of each one matters, however, so let us break them down.
Glutinous Rice Flour (Mochiko or Shiratamako)
This is the core ingredient. Two main types are available:
- Mochiko — Finely milled glutinous rice flour. It produces a slightly denser mochi and is widely available in US grocery stores. Koda Farms Blue Star brand is the most common.
- Shiratamako — Coarsely ground glutinous rice flour made by a wet-milling process. It yields a softer, smoother, and more elastic mochi. It is preferred by Japanese confectioners and is the gold standard for daifuku and wagashi.
Both are made from the same type of rice, but the milling process makes a real difference in texture. If you can find shiratamako, use it. If not, mochiko works well and is more forgiving for beginners. You can find both at Asian grocery stores or order online.
Sugar
Sugar does more than sweeten — it keeps mochi soft and pliable. Without sugar, mochi hardens quickly as it cools. For sweet mochi, white granulated sugar is standard. Some recipes use superfine sugar for faster dissolving or powdered sugar for a smoother texture. For savory mochi, sugar is reduced or omitted entirely.
Water
Plain water hydrates the flour and creates steam during cooking. The ratio of water to flour is the single most important variable in mochi making — too little and the dough is crumbly, too much and it becomes a sticky puddle. A general starting ratio is 1 cup glutinous rice flour to 3/4 cup water, but this varies by method and brand.
Cornstarch or Potato Starch
Starch is used generously as a dusting agent to prevent the cooked mochi from sticking to your hands, work surface, and everything else in the kitchen. Potato starch (katakuriko) is traditional in Japan, but cornstarch works just as well.
Mochi Ingredients Comparison Table
| Ingredient | Role | Substitution | Notes |
|---|---|---|---|
| Shiratamako | Primary flour — creates stretch and chew | Mochiko (slightly denser result) | Wet-milled; dissolves more smoothly |
| Mochiko | Primary flour — creates stretch and chew | Shiratamako (softer result) | Dry-milled; more widely available in US |
| Granulated sugar | Sweetens and keeps mochi soft | Superfine sugar, powdered sugar | Reduce or omit for savory applications |
| Water | Hydrates starch for gelatinization | Coconut milk, matcha-infused water, fruit juice | Ratio is critical — measure carefully |
| Cornstarch | Prevents sticking during shaping | Potato starch (katakuriko), rice flour | Dust generously on all surfaces |
| Food coloring (optional) | Adds color for presentation | Matcha powder, ube extract, beet juice | Natural colorings are traditional |
Equipment You Need to Make Mochi
The equipment depends on which method you choose. Here is what each approach requires:
Microwave Method (Easiest)
- Microwave-safe bowl (glass or ceramic)
- Plastic wrap or microwave-safe lid
- Rubber spatula or wet wooden spoon
- Parchment paper or cutting board dusted with starch
Stovetop Method
- Medium non-stick saucepan or heavy-bottomed pot
- Wooden spoon or rubber spatula with a strong handle
- Starch-dusted work surface
Steamer Method
- Bamboo steamer or metal steamer basket
- Cheesecloth or muslin to line the steamer
- Large pot with lid
- Mortar and pestle or stand mixer with dough hook (for pounding after steaming)
Traditional Mochitsuki Method
- Usu (large wooden or stone mortar)
- Kine (wooden mallet)
- Steamer for cooking whole glutinous rice
- A partner — traditional mochitsuki is a two-person job
For most home cooks, the microwave method is the best starting point. It requires no specialized equipment and produces excellent mochi in under 10 minutes.
How to Make Mochi: Step-by-Step (Microwave Method)
This is the fastest and most reliable method for homemade mochi. It uses glutinous rice flour, not whole rice, and delivers soft, stretchy mochi every time.
Ingredients
- 1 cup (160 g) mochiko or shiratamako
- 3/4 cup (180 ml) water
- 1/4 cup (50 g) granulated sugar
- Cornstarch or potato starch for dusting
Instructions
Step 1: Mix the dough. In a microwave-safe bowl, whisk together the glutinous rice flour and sugar. Add the water and stir until no lumps remain. The mixture will be thin and liquid — this is normal.
Step 2: Cover and microwave. Cover the bowl loosely with plastic wrap (leave a small vent) or a microwave-safe plate. Microwave on high for 2 minutes.
Step 3: Stir. Remove the bowl carefully — it will be hot. The edges will look cooked and translucent while the center may still be opaque. Stir vigorously with a wet rubber spatula, folding the cooked portions into the uncooked center.
Step 4: Microwave again. Cover and microwave for another 1 to 1.5 minutes. The dough should now look uniformly translucent and glossy. If any opaque patches remain, microwave in 30-second bursts until the entire mass is translucent.
Step 5: Knead briefly. While the dough is still very warm, use the wet spatula to fold and press it against the sides of the bowl about 10 to 15 times. This develops the elasticity. The dough should be extremely sticky, stretchy, and smooth.
Step 6: Dust and shape. Generously dust your work surface with cornstarch. Turn the hot mochi dough out onto the starch. Dust the top with more starch and dust your hands as well. Working quickly while the dough is warm, pinch off pieces (about 1.5 inches across for daifuku size) or roll the dough into a log and cut portions with a bench scraper.
Step 7: Fill or serve. Shape each piece into a ball, flatten it slightly, and fill it with your chosen filling (red bean paste, ice cream, strawberry, etc.), then pinch the edges closed. Alternatively, leave the mochi plain for grilling, soup, or kinako (roasted soybean flour) topping.
How to Make Mochi: Stovetop Method
The stovetop method gives you more control over the cooking process and works well if you do not have a microwave or prefer to watch the transformation happen in real time.
Step 1: Combine 1 cup mochiko, 1/4 cup sugar, and 3/4 cup water in a non-stick saucepan. Stir until smooth.
Step 2: Place the pan over medium-low heat. Stir constantly with a wooden spoon or sturdy rubber spatula. The mixture will begin to thicken after 3 to 4 minutes.
Step 3: Continue stirring as the dough pulls away from the sides of the pan and forms a cohesive mass. It will become increasingly difficult to stir — this is a good sign. The dough is ready when it is translucent, very sticky, and stretches when pulled.
Step 4: Total cooking time is roughly 8 to 12 minutes. Turn the dough out onto a starch-dusted surface and shape as described in the microwave method above.
The stovetop method requires more active attention than the microwave, but it produces identical results. The key is maintaining medium-low heat and stirring without stopping to prevent scorching on the bottom of the pan.
How to Make Mochi: Traditional Pounding Method (Mochitsuki)
For the most authentic texture, nothing beats freshly pounded mochi made from whole glutinous rice. This is how mochi was made for centuries in Japan and remains the method of choice for New Year celebrations.
Step 1: Soak the rice. Rinse 2 cups of mochigome (sweet glutinous rice) in several changes of water until the water runs clear. Soak the rice in cold water for 8 to 12 hours (overnight is ideal). This hydration step is essential — under-soaked rice will not steam evenly.
Step 2: Steam the rice. Drain the soaked rice and spread it in an even layer on a cheesecloth-lined steamer basket. Steam over high heat for 25 to 35 minutes, until every grain is fully cooked, tender, and translucent. There should be no chalky white centers. You can also use a bamboo steamer for this step.
Step 3: Pound the rice. Transfer the hot steamed rice immediately to a large mortar (usu) or a very sturdy bowl. Begin pounding with a wooden mallet (kine), wetting the mallet between strikes to prevent sticking. In traditional mochitsuki, one person pounds while another turns and folds the dough between strikes — a rhythmic, coordinated dance that requires trust and timing.
Step 4: Continue pounding. Pound for 10 to 20 minutes until no individual grains are visible and the mass is uniformly smooth, elastic, and very sticky. The mochi should stretch easily without tearing.
Step 5: Shape. Dust hands and surfaces with starch. Pinch or cut the mochi into portions and shape as desired.
Home kitchen alternative: If you do not own a mortar and mallet, you can replicate the pounding process with a stand mixer fitted with a dough hook. Place the steamed rice in the mixer bowl and run on medium speed for 8 to 10 minutes, scraping down the sides occasionally. The result is remarkably close to hand-pounded mochi.
Common Mochi-Making Mistakes (and How to Fix Them)
Even experienced cooks run into trouble with mochi. Here are the most common pitfalls and their solutions.
| Mistake | What Happens | How to Fix It |
|---|---|---|
| Too much water in the dough | Mochi is soupy and will not hold its shape | Microwave or cook longer in 30-second bursts until it firms up; next time reduce water by 1-2 tablespoons |
| Too little water in the dough | Mochi is crumbly, dry, and tears instead of stretching | Sprinkle in water 1 teaspoon at a time and re-microwave; next time increase water slightly |
| Under-cooking the dough | Opaque white patches remain; dough is gritty and does not stretch | Continue cooking in 30-second bursts until uniformly translucent |
| Over-cooking the dough | Mochi becomes rubbery and too firm to shape | Work very quickly while still warm; adding a tiny bit of water and re-microwaving can help |
| Not enough dusting starch | Mochi sticks to hands, surface, and itself | Use starch liberally — more than you think; keep a bowl of starch next to you at all times |
| Shaping after the dough cools | Mochi hardens and resists shaping; tears instead of stretching | Work quickly while warm; if it cools, microwave for 15-20 seconds to soften again |
| Skipping the sugar | Mochi hardens within an hour of cooling | Sugar keeps mochi soft; even for savory mochi, 1-2 tablespoons helps texture |
| Using regular rice flour | Dough does not stretch at all — crumbly and falls apart | You must use glutinous rice flour (mochiko or shiratamako); regular rice flour is a completely different product |
| Not soaking rice long enough (traditional method) | Steamed rice cooks unevenly with hard centers | Soak for the full 8-12 hours; there is no shortcut for this step |
| Burning the bottom (stovetop method) | Scorched flavor and brown bits in the dough | Use medium-low heat, never high; stir constantly; use a non-stick pan |
Practice Exercises for Beginners
If you are new to mochi making, these exercises will build your skills progressively. Complete them in order.
Exercise 1: Basic Microwave Mochi
Make a single batch of plain mochi using the microwave method above. Your goal is to achieve a fully translucent, stretchy dough with no opaque patches. Roll the finished mochi in kinako (roasted soybean flour mixed with a little sugar) and eat it warm. This teaches you the fundamental texture you are aiming for.
Exercise 2: Colored Mochi
Make a second batch, this time adding 1 teaspoon of matcha powder to the dry ingredients before mixing in the water. This teaches you how additions affect hydration — matcha absorbs moisture, so you may need an extra tablespoon of water. Observe the color distribution: even mixing before cooking means even color throughout.
Exercise 3: Daifuku (Filled Mochi)
Prepare small balls of sweetened red bean paste (anko) before you start — about 1 tablespoon each, rolled into spheres and chilled in the freezer for 15 minutes. Then make mochi, portion it, flatten each piece, wrap it around a frozen anko ball, and pinch closed. This exercise teaches you the critical skill of working quickly with warm mochi and shaping with starch-dusted hands.
Exercise 4: Mochi Ice Cream
Scoop small balls of ice cream onto a parchment-lined tray and freeze until very firm (at least 2 hours). Make mochi dough, let it cool slightly until it is still pliable but not scalding, then wrap each ice cream ball in a thin mochi shell. Work fast — the ice cream melts quickly. Return wrapped mochi ice cream to the freezer immediately. This exercise is the ultimate test of speed and dough handling.
Exercise 5: Stovetop Mochi
Repeat Exercise 1, but use the stovetop method. Compare the texture and ease of the two methods. Most home cooks find the microwave more convenient, but the stovetop gives you better visual feedback. Develop a preference for which method suits your kitchen workflow.
Advanced Mochi-Making Tips
Once you have mastered the basics, these techniques will elevate your mochi to the next level.
Controlling Softness with Sugar Ratios
The more sugar you add, the softer and more pliable your mochi stays over time. Professional Japanese confectioners making daifuku for retail sale use sugar ratios as high as 50% of the flour weight. For mochi you plan to eat within an hour or two, the standard 1/4 cup (50 g) sugar per cup (160 g) flour is sufficient. For mochi that needs to stay soft overnight or be stored in the refrigerator, increase to 1/3 cup (65 g) sugar.
Adding Fats for Extended Shelf Life
A small amount of oil or butter (1 to 2 teaspoons per batch) mixed into the dough before cooking slows starch retrogradation — the process that causes mochi to harden. This is a trick used by commercial mochi ice cream manufacturers. It does not significantly affect flavor but keeps the mochi wrapper soft even after hours in the freezer.
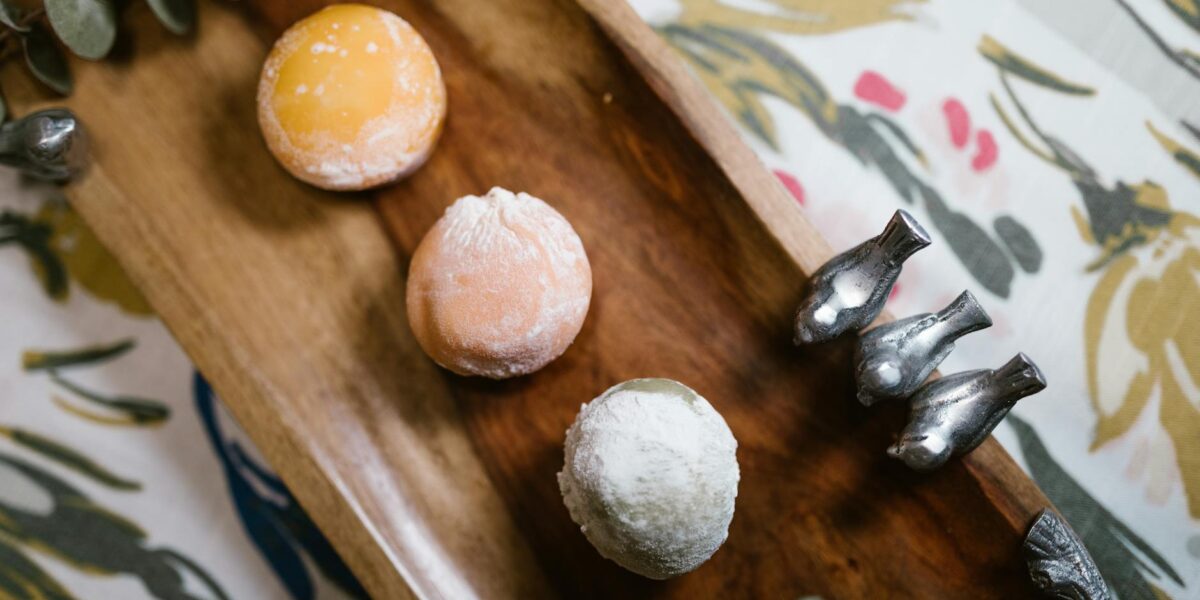
Natural Colorings and Flavorings
Japanese wagashi (confections) are famous for their beautiful colors, all achieved naturally. Mix into the dry ingredients before adding water:
- Green: Matcha powder (1-2 teaspoons)
- Purple: Ube extract or purple sweet potato powder (1-2 teaspoons)
- Pink: Beet powder or sakura extract (1/2 to 1 teaspoon)
- Yellow: Pumpkin puree (replace some water) or turmeric (1/2 teaspoon)
- Brown: Cocoa powder (1 tablespoon) or black sesame powder
Remember that any powder addition will absorb water, so increase your liquid slightly to compensate.
Working with Mochi Dough Temperature
Mochi is most pliable between 50 and 70 degrees Celsius (120 to 160 degrees Fahrenheit). Below this range, it stiffens. Above it, it can burn your hands. The sweet spot is ”warm to the touch but not painful.” If you need to pause during shaping, cover the remaining dough with plastic wrap to retain heat, and microwave in 15-second bursts if it starts to firm up.
Freezing and Storing Mochi
Freshly made mochi is best eaten the same day. However, you can freeze shaped mochi (filled or unfilled) for up to one month. Place individual pieces on a parchment-lined tray, freeze until solid, then transfer to an airtight container or zip-lock bag. To serve, thaw at room temperature for 15 to 20 minutes or microwave for 10 to 15 seconds. Avoid refrigerating unfrozen mochi — cold temperatures without freezing accelerate hardening.
Mochi Recipe Examples
Now that you know how to make the base mochi dough, here are five classic applications to try.
1. Strawberry Daifuku (Ichigo Daifuku)
The iconic Japanese springtime treat: a whole strawberry and a spoonful of smooth red bean paste (koshi-an) wrapped in a thin layer of pink mochi. Use smaller strawberries for the best proportion. The contrast of juicy, sweet-tart fruit against chewy mochi and creamy bean paste is extraordinary.
- Make one batch of mochi dough (tinted pink with beet powder if desired)
- Prepare 8-10 small balls of smooth anko (about 1 tablespoon each)
- Flatten the anko, place a strawberry in the center, and wrap the anko around the berry
- Wrap mochi around the anko-covered strawberry and pinch closed
- Dust with cornstarch and serve within a few hours
2. Mochi Ice Cream
The global sensation. Any ice cream flavor works — matcha, black sesame, mango, and red bean are classic Japanese choices. The key is pre-scooping and freezing the ice cream balls rock-hard before wrapping.
- Scoop 12 small ice cream balls and freeze for at least 2 hours
- Make one batch of mochi dough with slightly more sugar (1/3 cup) for freezer flexibility
- Roll dough thin on a starch-dusted surface, cut into 3-inch circles
- Wrap each frozen ice cream ball, pinch closed, and return to freezer immediately
- Freeze at least 1 hour before serving
3. Kinako Mochi
The simplest and perhaps most traditional way to enjoy mochi. Freshly made mochi pieces are rolled in kinako — roasted soybean flour mixed with sugar — for a nutty, toasty, subtly sweet coating. Drizzle with kuromitsu (black sugar syrup) for an extra layer of flavor. This is a quintessential Japanese New Year snack.
- Mix 1/4 cup kinako with 2 tablespoons sugar and a pinch of salt
- Cut warm mochi into bite-sized pieces
- Toss immediately in the kinako mixture
- Serve warm, drizzled with kuromitsu or honey
4. Yaki Mochi (Grilled Mochi)
Grilled mochi puffs up dramatically, developing a crispy, lightly charred exterior while the inside becomes molten and gooey. This is a common way to prepare the firm, unsweetened mochi blocks (kirimochi) sold in Japanese grocery stores, but freshly made mochi works too — just let it firm up first.
- Shape mochi into flat rectangles about 1/2 inch thick
- Let them firm up for 1-2 hours at room temperature (or use store-bought kirimochi)
- Grill on a wire rack over medium heat, in a toaster oven, or in a dry non-stick pan
- Cook until puffed, golden, and slightly charred — about 3-5 minutes per side
- Brush with soy sauce and wrap in a strip of nori, or add to miso soup
5. Ozoni (New Year Mochi Soup)
Every region of Japan has its own version of ozoni — the ceremonial New Year soup featuring mochi in a savory broth. The Kanto (Tokyo) style uses a clear dashi-based broth with soy sauce and chicken, while the Kansai (Osaka) style features a white miso broth. Both are delicious vehicles for chewy mochi.
- Prepare dashi broth (4 cups) and season with soy sauce and mirin
- Grill or toast mochi pieces until puffed
- Add sliced chicken, kamaboko (fish cake), carrots, and greens to the simmering broth
- Place grilled mochi in serving bowls and ladle hot soup over the top
- Garnish with mitsuba (Japanese parsley) or yuzu zest
Mochi Variations Across Asia
While mochi is quintessentially Japanese, the technique of transforming glutinous rice into chewy cakes is found throughout Asia. Understanding these cousins gives context to the broader tradition.
Tteok (Korea): Korean rice cakes come in hundreds of varieties. Tteokbokki uses cylinder-shaped garaetteok in a spicy gochujang sauce, while songpyeon are crescent-shaped rice cakes filled with sesame and steamed on pine needles during Chuseok. Korean tteok is typically steamed and pounded from whole rice, similar to the traditional mochitsuki method.
Nian Gao (China): Chinese New Year cake made from glutinous rice flour, often sweetened and steamed in layers. It can be eaten as-is or sliced and pan-fried until crispy on the outside and soft within. The name is a homophone for ”higher year,” symbolizing prosperity.
Kuih (Southeast Asia): Malaysian, Indonesian, and Thai cuisines feature many glutinous rice-based sweets. Kuih lapis is a layered steamed cake, onde-onde are pandan-flavored balls filled with palm sugar, and Thai khao niao mamuang (mango sticky rice) showcases glutinous rice in a different but related form.
Palitaw (Philippines): Filipino rice cakes made from glutinous rice flour, shaped into flat ovals, boiled until they float, and rolled in coconut and sesame. The texture is similar to mochi but slightly denser.
Frequently Asked Questions About Making Mochi
Is mochi gluten-free?
Yes. Despite the name ”glutinous rice flour,” mochi contains no wheat gluten. The term ”glutinous” refers to the sticky, glue-like texture of the rice. Mochi made from pure glutinous rice flour, sugar, and water is naturally gluten-free. Always check labels for cross-contamination if you have celiac disease.
Can I make mochi without glutinous rice flour?
No — glutinous rice flour is what gives mochi its characteristic stretch and chew. Regular rice flour, all-purpose flour, and other starches will not produce the same result. There is no adequate substitution. If you cannot find mochiko or shiratamako locally, they are widely available online.
How long does homemade mochi last?
At room temperature, freshly made sweet mochi stays soft for 1 to 2 days if stored in an airtight container. In the freezer, it lasts up to 1 month. Avoid refrigerating mochi — the cold temperature accelerates starch retrogradation, making it hard and crumbly without the preservation benefit of freezing.
Why is my mochi too sticky to handle?
Mochi is inherently sticky — that is part of what makes it mochi. The solution is more dusting starch, not less water. Keep a bowl of cornstarch or potato starch nearby and dust your hands, work surface, and the mochi itself frequently. Wet hands can also work for quick shaping without starch.
Can I use a food processor or blender instead of a mortar for the traditional method?
A food processor can partially work but tends to overheat the rice and create an uneven texture. A stand mixer with a dough hook is the best modern substitute — it replicates the kneading and pounding motion effectively. Run it on medium speed for 8 to 10 minutes.
Is mochi safe for young children?
Mochi’s extreme chewiness poses a choking hazard, particularly for young children and elderly individuals. In Japan, hospitals report mochi-related choking incidents every New Year. Cut mochi into very small pieces for children and always supervise them while eating. Never give large pieces of mochi to children under 5.
What is the difference between mochiko and sweet rice flour?
Mochiko is a brand name (from Koda Farms) that has become a generic term for glutinous rice flour in the US. Sweet rice flour is the generic name for the same product. They are interchangeable. Shiratamako, however, is a different grind of the same rice and produces a slightly different texture.
Can I make savory mochi?
Absolutely. Reduce or eliminate the sugar and add savory elements. Grilled mochi with soy sauce and nori is a classic Japanese snack. You can also add mochi to soups like ozoni, fold in shredded cheese for a fusion twist, or wrap mochi around savory fillings like seasoned ground pork.
Why does my mochi harden so quickly?
Starch retrogradation is the culprit — as mochi cools, the starch molecules re-crystallize and the texture firms up. Sugar, fat, and warmth all slow this process. To keep mochi soft longer, ensure your recipe includes enough sugar, consider adding a small amount of oil, and store at room temperature rather than in the refrigerator.
Essential Tips for Perfect Mochi Every Time
After making hundreds of batches, these are the principles that consistently produce the best results:
- Measure by weight, not volume. Glutinous rice flour packs differently depending on how you scoop. A kitchen scale removes the guesswork: 160 g flour, 50 g sugar, 180 ml water is the reliable baseline.
- Cook until fully translucent. Under-cooked mochi is the most common beginner mistake. When in doubt, cook 30 seconds longer. The dough should be uniformly glossy and translucent with no opaque white patches.
- Work warm, work fast. Mochi dough sets up as it cools. Have all your fillings, starch, and tools ready before you start shaping. Treat it like working with chocolate — speed matters.
- Use starch like it is free. There is no such thing as too much dusting starch when shaping mochi. You can always brush off the excess later.
- Prep fillings in advance. For daifuku and mochi ice cream, have your filling balls shaped, portioned, and chilled before you even start making the dough.
- Do not refrigerate — freeze or eat. Room temperature for same-day eating, freezer for longer storage. The refrigerator is the enemy of mochi texture.
- Invest in shiratamako when you can. The difference between mochiko and shiratamako is noticeable. Shiratamako yields a silkier, softer, more refined mochi that stays pliable longer.
Making mochi at home is one of the most satisfying Japanese cooking projects you can take on. The technique is simple — it is essentially cooking flour and water — but the results are endlessly versatile. From the first time you pull apart a piece of warm, freshly made mochi and feel that incredible stretch, you will understand why this humble rice cake has been loved across Asia for a millennium. Stock up on glutinous rice flour and other Japanese pantry essentials, and start stretching.

Mei Lin Chen
Mei Lin Chen is an Asian food writer and recipe developer. Melbourne-raised and London-based, she has spent over a decade exploring the rice paddies, hawker stalls, and home kitchens of South-East and East Asia. Her recipes balance traditional technique with everyday practicality.