Last updated: March 05, 2026
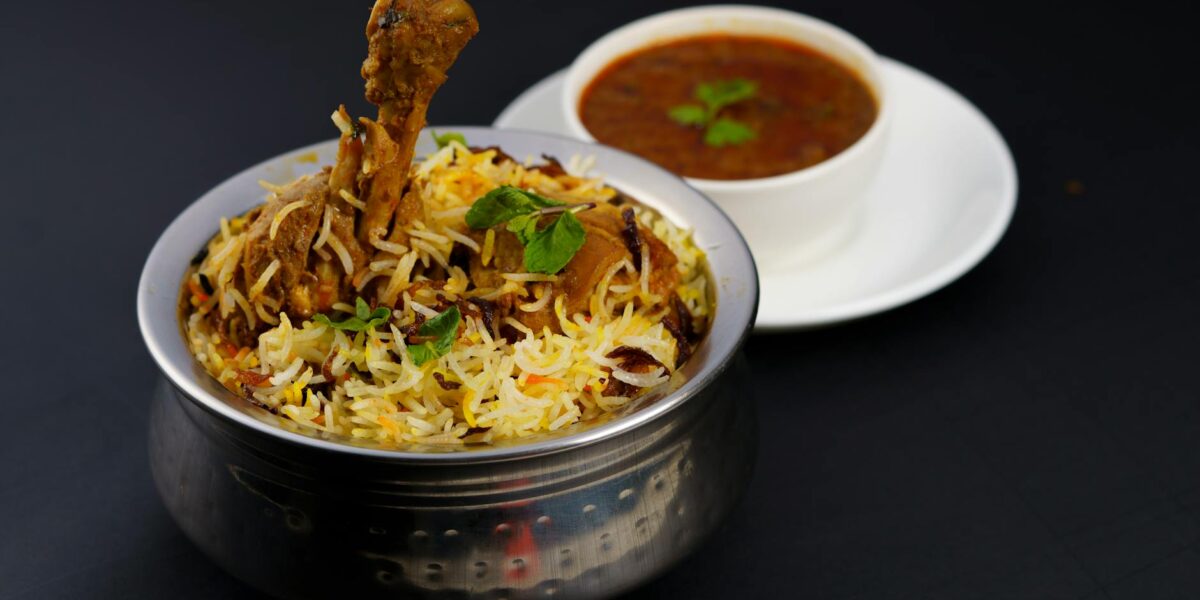
Chicken biryani is the crown jewel of Indian rice dishes — a fragrant, layered masterpiece of spiced chicken, basmati rice, caramelized onions, and saffron. Originating from the royal kitchens of the Mughal Empire, biryani has evolved into dozens of regional styles across India, Pakistan, and beyond. This recipe teaches you the authentic dum (slow-steam) method that locks in flavor, producing perfectly separated rice grains infused with aromatic spices in every bite.
Whether you have tasted the fiery Hyderabadi version, the delicate Lucknowi style, or the coconut-kissed Malabar biryani, this chicken biryani recipe gives you a reliable foundation you can customize to your taste. It is easier than you think — and the result is a one-pot feast worthy of any celebration.
What Is Chicken Biryani?
Biryani is a layered rice dish in which marinated meat and partially cooked basmati rice are stacked in a heavy pot, sealed, and slow-steamed until the flavors meld together. The word biryani likely derives from the Persian birian (fried before cooking) or birinj (rice). Chicken biryani is the most popular variation worldwide, prized for its balance of tender meat, aromatic rice, and complex spice layering.
What sets biryani apart from a simple chicken fried rice or pilaf is the dum pukht technique — sealing the pot with dough or a tight lid and cooking over very low heat. This traps the steam inside, allowing the rice to absorb the spiced juices from the chicken below. The result is a dish with distinct layers: some grains are golden with saffron, others white, and each forkful carries a different combination of flavors.
The History and Origins of Biryani
Biryani’s roots stretch back to the Mughal Empire (1526–1857), when Persian-influenced cooks in the royal courts of Delhi and Lucknow developed elaborate layered rice dishes. The Mughal emperor Shah Jahan’s kitchen is said to have served biryani as a complete meal for soldiers and royalty alike. However, some food historians trace proto-biryani dishes to even earlier Persian and Arab traders who brought spiced rice preparations to the Indian subcontinent.
Over centuries, biryani adapted to local tastes across the Indian subcontinent. Hyderabadi biryani became famous for its bold, spicy kacchi (raw marination) style. Lucknowi biryani (also called Awadhi biryani) developed a gentler, more aromatic pakki (cooked) approach. Kolkata biryani introduced potatoes alongside the meat — a legacy of cost-conscious Nawabi cooks. In southern India, Malabar biryani incorporated coconut milk and local spices. Today, biryani is arguably the most popular single dish across the entire Indian subcontinent, and it has a devoted following in the Middle East, Southeast Asia, and the West.
Why This Recipe Works
This chicken biryani recipe balances authenticity with home-cook practicality. Here is what makes it reliable:
- Yogurt marinade with whole spices: The yogurt tenderizes the chicken while acting as a carrier for spices, ginger, and garlic. Marinating for at least one hour (or overnight) builds deep flavor.
- Par-cooked rice: Cooking the basmati to 70% doneness before layering ensures each grain finishes perfectly during the dum stage — firm, separate, and never mushy.
- Caramelized onions (birista): Deeply fried onions add sweetness, color, and an irresistible savory backbone. They are layered throughout the biryani and scattered on top.
- Dum cooking with a sealed lid: Trapping steam lets the rice finish cooking in the aromatic chicken juices. A simple flour-dough seal or a heavy lid with a kitchen towel does the job.
- Saffron milk finish: Drizzling warm saffron-infused milk over the top layer creates those signature golden streaks and adds floral perfume.
Essential Ingredients for Chicken Biryani
Great biryani starts with quality ingredients. Here is what you need and why each component matters.
The Rice
Use aged basmati rice — the longer the grain, the better. Aged basmati (stored for 1-2 years) has less moisture, so the grains cook up fluffy and separate rather than sticky. Look for brands like Daawat, Tilda, or Royal. If you are new to choosing rice for Asian dishes, our guide to the best rice for Asian cooking can help you pick the right variety.
The Chicken
Bone-in, skin-on chicken pieces (thighs, drumsticks, and breast) are traditional. The bones add richness to the cooking juices, and the skin helps keep the meat moist during the long dum. You can use boneless thighs for convenience — just reduce the dum cooking time by about 5 minutes.
The Whole Spices (Garam Masala Base)
Biryani relies on whole spices rather than ground powders for most of its aroma. These are added to the rice water and the chicken marinade:
- Green cardamom pods — floral, citrusy
- Black cardamom pods — smoky, camphor-like
- Cinnamon sticks (cassia) — warm, sweet
- Whole cloves — pungent, warming
- Bay leaves (Indian tej patta) — herbal, slightly bitter
- Star anise — licorice sweetness
- Mace (javitri) — delicate, nutmeg-like
- Black peppercorns — sharp heat
Supporting Ingredients
Yogurt, fried onions, ginger-garlic paste, green chilies, saffron, ghee (or a mix of ghee and neutral oil), fresh mint, fresh cilantro, and a squeeze of lemon juice all play essential roles. If you enjoy the depth that fermented pastes bring to Asian cooking, you might also explore how miso or gochujang work in other cuisines — the principle of layered fermented flavor is universal.
Full Ingredient List with Quantities
This recipe serves 6 people generously.
For the Chicken Marinade
| Ingredient | Quantity | Notes |
|---|---|---|
| Chicken pieces (bone-in) | 2 lb (900 g) | Thighs and drumsticks preferred |
| Plain yogurt | 1 cup (240 g) | Full-fat for best results |
| Ginger-garlic paste | 2 tablespoons | Fresh preferred over jarred |
| Kashmiri red chili powder | 1 tablespoon | For color and mild heat |
| Turmeric powder | ½ teaspoon | |
| Garam masala powder | 1 teaspoon | |
| Biryani masala powder | 1 tablespoon | Optional; store-bought is fine |
| Salt | 1½ teaspoons | Adjust to taste |
| Lemon juice | 2 tablespoons | Fresh |
| Fresh mint leaves | ¼ cup | Roughly chopped |
| Fresh cilantro | ¼ cup | Roughly chopped |
| Green chilies | 2–3 | Slit lengthwise |
For the Rice
| Ingredient | Quantity | Notes |
|---|---|---|
| Basmati rice | 2 cups (400 g) | Soaked 30 minutes, drained |
| Water | 10 cups | For boiling |
| Salt | 1 tablespoon | Rice water should taste like sea water |
| Green cardamom pods | 4 | Lightly crushed |
| Black cardamom pod | 1 | Lightly crushed |
| Cinnamon stick | 1 (3-inch) | |
| Whole cloves | 4 | |
| Bay leaves | 2 | Indian bay leaves (tej patta) if available |
| Star anise | 1 | |
| Mace blade | 1 | Optional |
For Assembly and Dum
- Ghee — 4 tablespoons (60 g), plus extra for drizzling
- Neutral oil — 3 tablespoons (for frying onions)
- Large onions — 3, thinly sliced (for birista/fried onions)
- Saffron strands — generous pinch (about 25 strands), soaked in 3 tablespoons warm milk
- Fresh mint leaves — ¼ cup
- Fresh cilantro — ¼ cup
- Kewra water or rose water — 1 teaspoon (optional, for Lucknowi-style fragrance)
Equipment You Will Need
- A heavy-bottomed pot or Dutch oven (5-quart or larger) — essential for even dum cooking
- A large pot for boiling rice
- A deep skillet or pan for frying onions
- Aluminum foil or a clean kitchen towel (to seal the pot)
- A flat tawa or griddle (optional, to place under the pot for extra heat protection)
Step-by-Step Cooking Instructions
Step 1: Marinate the Chicken (1–12 Hours Ahead)
In a large bowl, combine the chicken pieces with yogurt, ginger-garlic paste, Kashmiri chili powder, turmeric, garam masala, biryani masala (if using), salt, lemon juice, chopped mint, cilantro, and slit green chilies. Mix thoroughly so every piece is well coated. Cover and refrigerate for at least 1 hour. For the best flavor, marinate overnight — the yogurt will tenderize the chicken beautifully.
Step 2: Make the Fried Onions (Birista)
Thinly slice 3 large onions into half-moon rings. Heat 3 tablespoons of oil plus 1 tablespoon of ghee in a deep skillet over medium-high heat. Add the onions and fry, stirring occasionally, for 15–20 minutes until they turn deep golden-brown and crispy. Watch carefully in the last few minutes — they go from golden to burnt quickly. Remove with a slotted spoon and drain on paper towels. These birista will shrink to about one-third of their original volume. Set aside — you will use them in multiple layers.
Reserve the onion-flavored oil in the skillet. You will use it to cook the chicken.
Step 3: Cook the Chicken Base
In the same skillet with the reserved onion oil, cook the marinated chicken over medium-high heat for 8–10 minutes, turning the pieces occasionally. The chicken does not need to cook through — you are searing it to build a flavorful base and reduce the marinade into a thick, spiced gravy. The chicken will finish cooking during the dum stage. Transfer the chicken and all its juices to your heavy-bottomed pot or Dutch oven, spreading it in an even layer on the bottom.
Step 4: Par-Cook the Rice
While the chicken cooks, bring 10 cups of water to a rolling boil in a large pot. Add 1 tablespoon of salt and all the whole spices (cardamom, cinnamon, cloves, bay leaves, star anise, mace). Add the soaked and drained basmati rice. Boil for exactly 5–6 minutes — the rice should be about 70% cooked. Test by pressing a grain between your fingers: the outer part should be soft, but you should feel a firm, slightly chalky core. Drain the rice immediately in a colander. Discard the whole spices or leave them in for extra flavor.
Getting the par-cook right is the single most important step. If you are unsure, err on the side of slightly underdone — overcooked rice cannot be rescued. For more on cooking rice to the right texture, check our guide to cooking rice perfectly.
Step 5: Layer the Biryani
Now comes the iconic layering process:
- Spread the seared chicken and its gravy evenly on the bottom of the heavy pot.
- Scatter half the fried onions (birista) over the chicken.
- Add a handful of fresh mint and cilantro leaves.
- Gently spoon half the par-cooked rice over the chicken layer, spreading it evenly. Do not press down.
- Scatter the remaining fried onions, more mint, and cilantro over the first rice layer.
- Add the remaining rice as the top layer.
- Drizzle the saffron milk in zigzag lines over the top. The golden streaks will create the signature biryani look.
- Dot 2–3 tablespoons of ghee over the surface.
- Optionally, sprinkle kewra water or rose water for a Lucknowi-style floral note.
Step 6: Dum (Slow Steam)
Cover the pot tightly. For the best seal, place a sheet of aluminum foil over the pot, then press the lid on firmly. Alternatively, make a simple dough with flour and water, roll it into a rope, and press it around the rim before placing the lid — this is the traditional dum seal.
Place the sealed pot over high heat for 3 minutes to build up steam. Then reduce to the lowest possible heat and cook for 25–30 minutes. If you have a flat tawa or griddle, place it between the burner and the pot to distribute heat evenly and prevent the bottom from scorching.
Do not open the lid during cooking. The trapped steam is doing all the work — each grain of rice is absorbing the aromatic juices from the chicken below.
Step 7: Rest, Open, and Serve
Turn off the heat and let the biryani rest, still sealed, for 5 minutes. Then remove the lid and use a large flat spoon or spatula to gently fold the layers from the bottom up, mixing the chicken with the rice. Be gentle — you want to see the distinct golden and white rice grains, not a homogeneous mash. Serve on a large platter and garnish with extra fried onions, fresh cilantro, and toasted cashews or almonds if desired.
Pro Tips for Perfect Biryani
- Salt the rice water generously. It should taste almost as salty as sea water. Most of the salt drains away — this is your only chance to season each grain.
- Do not skip soaking. Thirty minutes of soaking allows the rice to absorb water, which means it cooks faster and more evenly during boiling and dum.
- Use a heavy pot. Thin pots create hot spots that burn the bottom layer. A cast-iron Dutch oven or heavy aluminum pot is ideal. The Indian degchi (a heavy, straight-sided pot) is the gold standard.
- Fry onions in batches if needed. Crowding the pan creates steamed, soggy onions instead of crispy birista. Proper fried onions are deep mahogany, not pale gold.
- Control the heat. The high-heat burst at the beginning generates steam. The low-heat dum does the actual cooking. If your lowest burner setting is still too hot, use a heat diffuser or the tawa trick mentioned above.
- Use real saffron. A tiny pinch of genuine saffron (soaked in warm milk for 15 minutes) contributes aroma that food coloring cannot replicate. Good saffron threads should be deep red and release a golden-yellow color slowly.
- Marinate longer for better flavor. One hour is the minimum. Overnight is transformative. The yogurt and acid from the lemon juice break down the chicken fibers, making the meat incredibly succulent.
Biryani Variations
Once you master this base recipe, you can explore the rich world of biryani styles:
Hyderabadi Kacchi Biryani
In this style, raw marinated chicken is layered directly with par-cooked rice — no pre-cooking of the chicken. The dum time is longer (40–45 minutes), and the result is intensely flavorful. The marinade often includes raw papaya paste as a tenderizer, and the spice level is noticeably higher.
Lucknowi (Awadhi) Biryani
More delicate and subtly spiced than the Hyderabadi version. The chicken is cooked in a light korma-style gravy before layering. Kewra water and rose water are essential finishing touches, giving it a distinctive perfumed character.
Kolkata Biryani
Based on the Lucknowi style but includes whole boiled potatoes in the layers. The potatoes absorb the biryani juices and become the most fought-over piece on the plate. The spicing is gentler, with a hint of sweetness from nutmeg and mace.
Malabar (Kerala) Biryani
Uses short-grain kaima or jeerakasala rice instead of basmati. Coconut milk replaces some of the water, and the dish includes curry leaves and fennel seeds. The result is richer and more coconut-forward.
Vegetable Biryani
Replace the chicken with a mix of vegetables — cauliflower, potatoes, carrots, green beans, and paneer cubes work beautifully. Reduce the dum time to 20 minutes. The technique and layering remain identical.
Lamb or Goat Biryani
Substitute bone-in lamb or goat for the chicken. Increase the initial searing time to 15 minutes and extend the dum to 40 minutes, as red meat needs more time to become tender. Many biryani purists consider goat biryani the ultimate version.
What to Serve with Chicken Biryani
Biryani is a complete meal on its own, but traditional accompaniments elevate the experience:
- Raita: A cooling yogurt condiment with cucumber, onion, and a pinch of cumin. It balances the spice beautifully.
- Mirchi ka salan: A tangy, nutty Hyderabadi chili curry that is the classic pairing for biryani in southern India.
- Kachumber salad: A fresh salad of diced tomatoes, onions, cucumbers, and cilantro dressed with lemon juice and salt.
- Papadum (papad): Crispy lentil wafers that add crunch to each bite.
- Boiled eggs: Halved hard-boiled eggs are a common addition, placed between the layers or served on the side.
- Dal: A simple lentil dal on the side works surprisingly well with biryani, especially for a larger meal spread.
Nutritional Information
Approximate values per serving (recipe makes 6 servings):
| Nutrient | Per Serving |
|---|---|
| Calories | 520 kcal |
| Protein | 32 g |
| Total Fat | 18 g |
| Saturated Fat | 7 g |
| Carbohydrates | 58 g |
| Fiber | 2 g |
| Sugar | 4 g |
| Sodium | 680 mg |
| Cholesterol | 95 mg |
Values are estimates based on standard USDA data. Actual nutrition may vary depending on specific ingredients, chicken parts used, and the amount of ghee or oil.
Storage and Reheating Tips
Biryani stores and reheats remarkably well — many say it tastes even better the next day as the flavors continue to meld.
- Refrigerator: Store in an airtight container for up to 4 days. Let it cool to room temperature before refrigerating.
- Freezer: Freeze portions in sealed containers or zip-lock bags for up to 3 months. Thaw overnight in the fridge before reheating.
- Reheating (oven method — best results): Place the biryani in an oven-safe dish, sprinkle 2–3 tablespoons of water over the top, cover tightly with foil, and heat at 300°F (150°C) for 20 minutes.
- Reheating (stovetop): Place the biryani in a pot, sprinkle water over the top, cover with a tight lid, and warm over the lowest heat for 10–15 minutes. Do not stir — let the steam do the work, just as in the original dum.
- Reheating (microwave): Transfer to a microwave-safe bowl, sprinkle water on top, cover, and heat in 90-second intervals, fluffing gently between rounds. This method works but can dry out the rice slightly.
Common Mistakes and How to Avoid Them
- Overcooked rice: This is the number one biryani killer. If the rice is fully cooked before layering, it will turn to mush during the dum. Pull it at 70% — slightly firm with a chalky center.
- Not enough salt in the rice water: Under-salted rice cannot be fixed after draining. Taste the boiling water — it should be noticeably salty.
- Pale, soggy fried onions: Birista should be deep brown and crispy. If they are limp and golden, keep frying. They will darken slightly more as they cool.
- Too much liquid in the pot: If the chicken marinade is very watery, cook it down until it forms a thick coating before layering. Excess liquid will make the bottom rice gummy.
- Opening the lid during dum: Every peek releases steam and disrupts the cooking process. Trust the process — set a timer and walk away.
- Skipping the rest period: The 5-minute rest after cooking allows the moisture to redistribute. Skipping it can result in a wet bottom layer and dry top.
Essential Spices Glossary for Biryani
If you are new to Indian spices, here is a quick reference to the key players in biryani and where they contribute:
| Spice | Role in Biryani | Substitute |
|---|---|---|
| Green cardamom | Floral aroma in rice and marinade | ¼ tsp ground cardamom per 3 pods |
| Black cardamom | Smoky depth in rice | Omit or add a tiny pinch of smoked paprika |
| Cinnamon (cassia) | Warm sweetness | True Ceylon cinnamon (milder) |
| Cloves | Sharp, warming punch | Allspice (use half the quantity) |
| Bay leaf (tej patta) | Herbal background note | Western bay laurel (different flavor but works) |
| Star anise | Licorice sweetness | Fennel seeds (½ teaspoon) |
| Mace | Delicate, nutmeg-like warmth | A small grating of nutmeg |
| Saffron | Color, floral perfume | Turmeric for color (not the same aroma) |
| Kashmiri chili powder | Vibrant red color, mild heat | Paprika + pinch of cayenne |
Frequently Asked Questions
Can I make biryani in a rice cooker or Instant Pot?
Yes, but with adjustments. For a rice cooker, layer the seared chicken and par-cooked rice in the pot, drizzle saffron milk and ghee on top, and use the regular cook cycle. For an Instant Pot, use the pressure cook function on low for 6 minutes with a natural release of 10 minutes. The dum effect is less pronounced in pressure cookers, but the convenience is hard to beat for weeknight dinners.
What is the difference between biryani and pulao (pilaf)?
The key distinction is technique. Biryani uses separate layers of cooked meat and par-cooked rice, sealed and steamed together (dum). Pulao cooks meat and rice together in a measured amount of liquid from the start — an absorption method. Biryani also tends to have more complex spicing, fried onion layers, and a richer overall character.
How do I prevent the bottom layer from burning?
Three strategies work well: (1) Use a heavy-bottomed pot that distributes heat evenly. (2) Place a flat tawa, griddle, or heat diffuser between your burner and the pot. (3) Brush a thin layer of ghee on the bottom of the pot before adding the chicken. Some cooks even place a layer of sliced potatoes on the bottom — they form a crispy crust called tahdig and protect the rice.
Can I use boneless chicken?
Absolutely. Boneless thighs are the best substitute — they stay moist and flavorful. Cut them into 2-inch pieces. Reduce the dum cooking time by about 5 minutes since boneless chicken cooks faster. Bone-in pieces do produce a richer, more complex gravy, so use them when you have the time.
My biryani rice turned out mushy. What went wrong?
The most common causes are: (1) The rice was boiled too long before layering — it should be only 70% done, with a slightly firm core. (2) There was too much liquid from the chicken marinade — cook the chicken until the gravy is thick. (3) The dum heat was too high — use the absolute lowest setting. (4) The rice was not drained thoroughly after boiling.
Is biryani gluten-free?
Traditional biryani is naturally gluten-free, as it relies on rice, yogurt, spices, and meat. However, check any store-bought biryani masala or garam masala blends for wheat-based anti-caking agents. If you seal the pot with dough, the dough itself contains gluten but does not come into contact with the food — however, for strict gluten-free diets, use aluminum foil and a kitchen towel instead.
What is the best pot for making biryani?
A heavy-bottomed Dutch oven (like Le Creuset or Lodge) works perfectly. The thick walls distribute heat evenly and retain it during the dum. A traditional Indian degchi — a heavy, straight-sided aluminum or copper pot — is the gold standard. Avoid thin stainless steel pots, which create hot spots that burn the bottom layer.
How many people does this recipe serve?
This recipe serves 6 people as a main course. To scale up, increase all ingredients proportionally but keep the dum time the same — a larger volume of rice and chicken holds heat well. For a crowd of 10–12, double the recipe and use an 8-quart pot.
The Bottom Line
Chicken biryani is one of those rare dishes that feels like an event every time you make it. The layering process, the sealed pot, the anticipation of lifting the lid to reveal saffron-streaked rice and fall-off-the-bone chicken — it is culinary theater at its best. While the technique has a few critical steps (the rice par-cook, the fried onions, the proper dum), none of them are difficult. They just require attention.
Once you nail this recipe, you will have a foundation that opens the door to an entire world of biryani styles. Try the Hyderabadi kacchi method for extra intensity. Experiment with lamb for a richer version. Add potatoes for the Kolkata touch. Each variation is a new discovery built on the same beautiful technique.
If you love the idea of building complex flavors through layers and slow cooking, you might also enjoy butter chicken, palak paneer, or chicken tikka masala — all dishes where patience transforms simple ingredients into something extraordinary. And for more Indian cooking essentials, our naan bread recipe makes the perfect accompaniment when you want to scoop up every last grain of rice and drop of gravy.

Mei Lin Chen
Mei Lin Chen is an Asian food writer and recipe developer. Melbourne-raised and London-based, she has spent over a decade exploring the rice paddies, hawker stalls, and home kitchens of South-East and East Asia. Her recipes balance traditional technique with everyday practicality.