Last updated: March 30, 2026
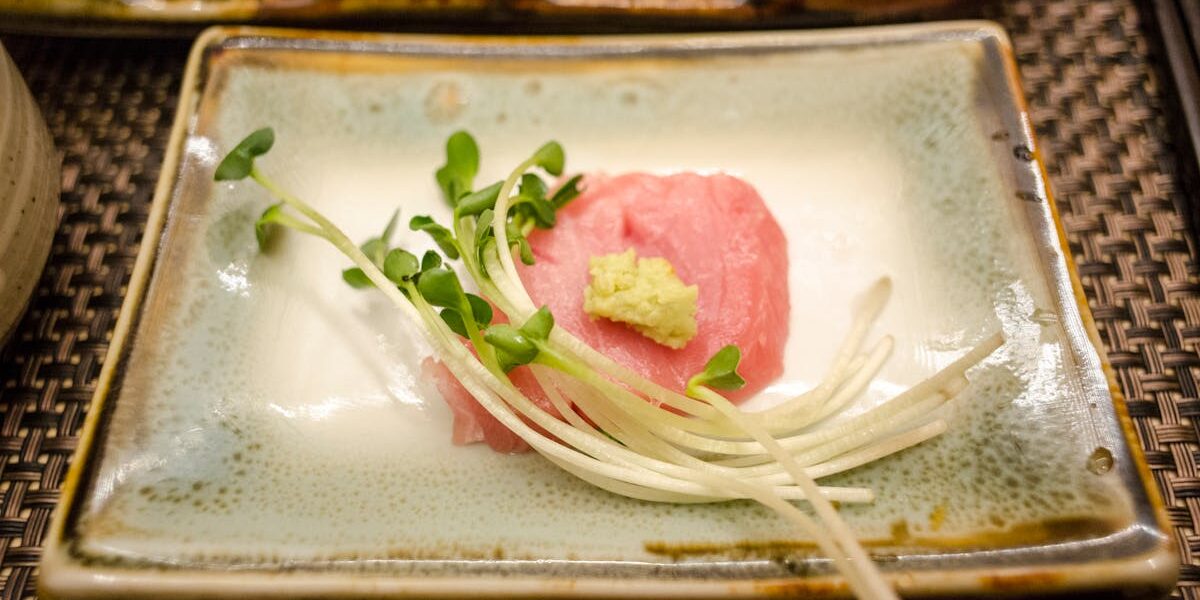
Tataki (たたき) is one of the most striking techniques in the Japanese kitchen — a flash-sear that browns the surface of a fish loin or beef cut in seconds, then plunges it into ice to halt the cooking dead in its tracks. The result is a thin slice with a deeply caramelized crust about two millimeters wide and a cool, ruby-red center that tastes almost raw. Done right, tataki gives you the savor of grilled meat and the silky texture of sashimi in a single bite, dressed with citrus ponzu, grated ginger, and a shower of sliced scallions.
This guide walks you through the complete tataki technique — what equipment you need, how to choose and prep the protein, the precise searing and chilling sequence, the slicing geometry that makes or breaks the dish, classic sauces, and the most common mistakes home cooks make on their first attempt. Whether you are working with bonito (the original katsuo no tataki from Kochi), beef tenderloin (gyu tataki), salmon, tuna, or mackerel, the underlying mechanics are the same: extreme surface heat, immediate chilling, and patient slicing. By the end you will be able to execute tataki at home with restaurant-grade precision.
What Is Tataki? A Quick Overview of the Technique
The word tataki comes from the Japanese verb tataku, meaning ”to pound” or ”to strike.” The name refers to two related practices. In the original Tosa-style preparation from Kochi prefecture on Shikoku island, a whole loin of skipjack bonito is skewered, seared rapidly over flaming rice straw, plunged into ice water, sliced, then ”struck” lightly with the flat of a knife to press the seasonings — sea salt, minced garlic, grated ginger, and citrus — into the flesh. In the broader modern usage, tataki refers to any protein that is briefly seared on the outside and left raw or rare inside, then sliced thinly and served chilled with a sharp dipping sauce.
Tataki sits in the same conceptual neighborhood as European seared carpaccio and Mexican aguachile but is older and more codified. The Tosa version traces back to the Edo period (1603–1868), when feudal lord Yamauchi Kazutoyo reportedly banned the consumption of raw bonito to protect his subjects from food poisoning. Local fishermen circumvented the ban by quickly searing the surface — technically ”cooked” but with the interior still essentially raw. The flame-sear over burning rice straw added a smoky note that became the defining flavor of katsuo no tataki and is still the gold standard in Kochi today.
Tataki is fundamentally a contrast technique. You are trying to create the maximum possible difference between the outer two millimeters (deeply browned, salty, smoky, firm) and the inner core (cool, soft, sweet, raw). Every step of the method — the dry surface, the screaming-hot pan, the immediate ice bath, the chilled resting time, the sharp slicing — serves that one goal of contrast. Once you understand that, every decision becomes obvious.
Tataki vs. Sashimi vs. Carpaccio vs. Seared Tuna
Home cooks frequently confuse tataki with neighboring techniques, but the distinctions matter both for execution and for ordering with confidence in a Japanese restaurant.
| Technique | Origin | Cooking | Slice Thickness | Serving Temperature | Typical Dressing |
|---|---|---|---|---|---|
| Tataki | Japan (Kochi) | Sear outside ~10–30 sec per face, ice-bath, raw inside | 5–8 mm | Cold (4°C / 39°F) | Ponzu, ginger, garlic, scallion, myoga |
| Sashimi | Japan | Completely raw, never heated | 3–10 mm (depends on cut) | Cold | Soy sauce + wasabi |
| Carpaccio | Italy (Venice) | Completely raw, pounded thin | 1–2 mm | Room temperature | Olive oil, lemon, parmesan, capers |
| Seared Tuna (Western) | French/American fusion | Sear outside but no ice-bath, served warm or room temp | 10–15 mm | Warm or room temp | Sesame seeds, soy-ginger glaze |
| Aburi Sushi | Japan | Torched on top only, served on rice | 3–5 mm (as nigiri) | Room temperature | Citrus salt, ponzu drizzle |
The single most important difference between tataki and Western-style seared tuna is the ice bath. Restaurant-style seared tuna, popularized in the United States in the 1990s, skips the chilling step entirely — chefs sear and slice immediately, which means the heat from the crust continues to cook inward and the slices come out warmish with a graying band between the crust and the center. Tataki forbids that gray band. The ice bath stops carryover cooking instantly so the cross-section shows a single sharp transition from brown crust to raw red interior with no intermediate cooked layer. If you see a gray band on your slice, the ice bath was too slow or too warm.
The Best Proteins for Tataki
Tataki demands fish or meat that is safe to eat raw or near-raw. That narrows the candidate list considerably. The classical proteins are skipjack bonito and lean beef, but the technique works with any firm-fleshed protein that holds together when sliced cold and tastes good below medium-rare.
- Katsuo (skipjack bonito): The original. Buy whole loin or large block, sushi-grade only. Best between April and October when bonito is fatty. The straw-flame sear is traditional but a hot cast-iron pan works at home.
- Maguro (tuna): Ahi/yellowfin or bluefin akami. Choose a uniformly colored loin without grain separation. The lean akami section is preferred — toro (fatty belly) is too soft and melts on the pan.
- Beef tenderloin or eye-of-round (gyu tataki): Lean, fine-grained cuts. Wagyu sirloin works for a richer version. Choose a center-cut piece roughly the diameter of a tennis ball can.
- Salmon: Sushi-grade, sashimi-rated. Atlantic farmed salmon is the safest choice for home cooks because it is consistently parasite-treated.
- Saba (mackerel): Strongly flavored, fatty, and brilliant with citrus. Must be previously frozen for parasite safety (Anisakis risk).
- Aji (Japanese horse mackerel): Premium choice but seasonal and harder to source outside Japan.
- Tofu: Yes — vegan tofu tataki using firm or extra-firm cotton tofu, surface seared in sesame oil, chilled, and sliced.
- Duck breast: Western-Japanese fusion. Score the fat cap, render, sear, ice-bath, slice across the grain.
For the fish options, the language to look for from your fishmonger is ”sushi-grade” or ”sashimi-grade.” There is no FDA-regulated definition of either term in the United States, so what you are really asking for is fish that has been frozen at –20°C (–4°F) for at least seven days, or –35°C (–31°F) for at least fifteen hours, which kills parasites per FDA guidelines. Whole-loin pieces are vastly preferable to pre-cut sashimi slices because tataki requires a single uniform cylinder of fish with all faces intact for searing.
Equipment Checklist
Tataki is not equipment-heavy compared with sushi or ramen, but a handful of specific tools dramatically improve consistency. You can get by with a Western chef setup, but the items below earn their counter space if you plan to make tataki regularly.
- Heavy cast-iron skillet or carbon-steel pan: Must hold high heat without dropping temperature when the cold protein lands. A 10-inch / 26 cm pan is the right size for most home loins.
- Kitchen blowtorch (optional but excellent): A propane or butane torch gives you the closest analog to the Tosa straw flame. Bernzomatic TS8000 is the industry standard; small butane crème brûlée torches work too but take longer.
- Large mixing bowl plus a second bowl of ice water: Roughly equal parts ice and cold water, salted to about a 1% solution to keep it under freezing without harming texture.
- Long-bladed slicing knife: A Japanese yanagiba (single-bevel, 240–270 mm) is ideal because tataki slices should be made in one long pull stroke without sawing. A sharp Western slicer or a sashimi-grade santoku also works. See our guide to Asian knife skills for sharpening fundamentals.
- Long bamboo or metal skewers (optional): Traditional bonito tataki is mounted on skewers like a kebab so it can be rotated over the flame quickly. Useful for stovetop torching too.
- Paper towels or a clean cotton kitchen towel: For thorough drying of the protein surface before searing. Moisture is the enemy of a fast crust.
- Cutting board with a juice gutter: Chilled fish weeps clear liquid as it sits. A board with a perimeter groove keeps your slicing surface dry.
- Instant-read thermometer: Useful for verifying that the interior temperature stays below 4°C (39°F) when chilled, and for testing beef doneness if you sear longer.
- Microplane or fine grater: For ginger, garlic, daikon, and yuzu zest — all classic tataki accents.
Step-by-Step: Classic Fish Tataki
This sequence describes the canonical method for a 250–350 g (½–¾ lb) sashimi-grade tuna or bonito loin. It scales linearly: a 500 g loin needs roughly 50% more searing time per face, never more.
Step 1: Prep the Protein (10 minutes)
Remove the loin from the refrigerator and pat it bone-dry with paper towels on all sides. The surface must be matte and slightly tacky to the touch — any visible moisture will instantly turn to steam and prevent direct surface contact with the pan, ruining the crust. Trim any silver skin or sinew with a sharp knife. Cut the loin into a rectangular block roughly 4 cm × 4 cm × 12 cm (1.5″ × 1.5″ × 5″) so it has four flat faces to sear plus two end faces.
Season generously with fine sea salt — about ½ teaspoon kosher salt per 250 g of fish, rubbed evenly into all surfaces. Salt is essential here both for flavor and to draw a tacky protein film to the surface that browns faster. Let the salted fish rest on a wire rack uncovered for 5 minutes while you set up the ice bath. Do not salt earlier than 10 minutes ahead or the surface will start to cure and weep moisture.
Step 2: Prepare the Ice Bath (2 minutes)
Fill a wide mixing bowl about three-quarters full with ice cubes, add cold water until the ice floats halfway, and stir in 1 teaspoon of salt. The salt depresses the freezing point slightly and discourages any cross-contamination off the seared surface. The bath needs to be ready before the pan hits searing temperature — there is no time to make it after the sear.
Step 3: Heat the Pan to Smoking (5 minutes)
Place a heavy cast-iron or carbon-steel skillet over your most powerful burner. Heat empty for at least 4 minutes on high. The pan is ready when a drop of water flicked onto the surface beads up into a dancing ball that skitters across the surface (the Leidenfrost effect, indicating roughly 200°C / 400°F surface temperature). Add 1 tablespoon of neutral high-smoke-point oil — rice bran, grapeseed, or refined peanut. Swirl quickly and let it just barely begin to smoke.
Step 4: Sear All Faces (45–60 seconds total)
Lay the loin down on its longest flat face. Do not move it — let it sit absolutely still for 12 to 15 seconds. You should hear an aggressive, continuous sizzle. Using tongs, rotate to the next flat face and sear for another 12 to 15 seconds. Repeat for the remaining two flat faces. For the two end faces, sear only 5 to 7 seconds each — these are smaller and you do not want heat to penetrate into the precious center. Total active searing time should be no more than 60 seconds for a 4 cm × 4 cm block.
For beef tenderloin you can extend each face slightly to 20–25 seconds because the muscle structure conducts heat more slowly than fish. Never sear longer than 30 seconds per face on any protein — the goal is exterior browning, not cooking the interior.
Step 5: Immediate Ice Bath (30–60 seconds)
Transfer the seared loin directly into the ice bath. Submerge fully. Hold under for 30 seconds for fish, up to 60 seconds for thicker beef cuts. This is the make-or-break moment of the technique — every second beyond what is needed to halt carryover cooking is washing flavor compounds off the crust, so do not over-do it. Lift out, place on paper towels, and pat completely dry on all sides. The surface should feel cool but not frozen and the inside should still be a vibrant raw color when you press it.
Step 6: Rest Chilled (15–30 minutes)
Wrap the dried loin tightly in plastic wrap, twisting the ends to form a cylinder. Place in the refrigerator for at least 15 minutes — up to 30 minutes for beef. This rest does two things: it allows residual surface heat to fully equalize so slices have a uniform temperature, and it firms the flesh enough that a clean knife cut produces a glassy, flat slice rather than a torn one. Cold proteins always slice cleaner than warm ones.
Step 7: Slice with One Pull Stroke (5 minutes)
Unwrap the loin and place on a chilled cutting board. Using a long, very sharp knife, slice at a 90-degree angle across the grain into 5 mm slices for fish, 3 mm for beef. The cut should be made in one smooth pull stroke from heel to tip — no sawing back and forth, which crushes flesh fibers and bleeds liquid. Wipe the blade with a damp towel between every two or three slices to keep it clean.
Step 8: Plate and Dress
Fan the slices across a chilled plate, slightly overlapping like roof tiles. Garnish with thinly sliced scallions, paper-thin slivers of garlic, a small pile of finely grated ginger, and a scattering of microgreens or shiso leaves. Just before serving, dress with ponzu — about 1 tablespoon per portion — drizzled over the slices, not pooled around them. Serve immediately with chopsticks. Tataki is meant to be eaten within ten minutes of slicing; longer and the surface oxidizes and the dressing breaks down the protein structure.
The Classic Ponzu Dressing
Ponzu — Japan’s tart citrus-soy dressing — is the default sauce for tataki and worth making from scratch the day before. The flavor improves with 24 hours of rest as the citrus oils marry the dashi and soy. Bottled supermarket ponzu works in a pinch but the difference is night and day. A traditional homemade ponzu uses yuzu juice when available, but a 50/50 mix of fresh lemon and lime juice produces a credible substitute for cooks outside Japan.
- 60 ml (¼ cup) soy sauce (use Japanese koikuchi shoyu)
- 60 ml (¼ cup) fresh yuzu juice OR equal parts lemon and lime
- 2 tablespoons mirin
- 2 tablespoons rice vinegar
- 5 g (one 2-inch square) kombu
- 3 g (one small handful) bonito flakes (katsuobushi)
Combine all ingredients in a clean jar. Refrigerate for at least 24 hours, ideally 48. Strain out the kombu and bonito flakes before serving. Keeps refrigerated for up to one month. For more on the building blocks, see our guides to soy sauce, mirin, and bonito flakes.
Common Mistakes and How to Fix Them
Almost every home tataki failure comes down to one of the following errors. Most are easy to fix once you know what to look for. Print this table and tape it inside a cupboard while you’re still learning.
| Mistake | What You’ll See | Root Cause | Fix |
|---|---|---|---|
| Gray band between crust and raw center | Slice shows a 3–5 mm cooked-looking layer under the crust | Ice bath too slow, too warm, or skipped entirely | Prepare ice bath BEFORE searing. Submerge within 5 seconds of pulling from pan. Hold under for full 30 seconds. |
| Pale, anemic crust | Surface is light brown or has bare patches | Pan not hot enough; wet surface caused steaming; oil dropped in temperature | Heat pan empty for 4+ minutes. Pat fish absolutely dry. Use high-smoke-point oil only and let it shimmer before adding fish. |
| Slices fall apart on the plate | Fish disintegrates as you lift it | Dull knife crushing fibers, or fish not chilled enough after sear | Sharpen knife to a 15-degree edge. Rest seared loin 20 minutes minimum in fridge before slicing. |
| Mushy interior | Center feels soft and pasty instead of firm-raw | Fish wasn’t properly frozen and thawed; or it’s been sitting refrigerated too long after the sear | Buy fish frozen-at-sea grade. Serve within 30 minutes of slicing. |
| Fishy or ”off” aftertaste | Strong ammonia or rotting smell on the slices | Fish was not actually sashimi-grade or has begun to spoil | Discard. Source only from trusted fishmongers and check smell before searing — fresh fish smells like clean ocean, never fishy. |
| Crust slides off the slice | Brown layer separates from raw flesh when you bite | Sear was too brief — proteins didn’t bond properly | Increase sear time by 5 seconds per face. Make sure pan stays smoking-hot the whole time. |
| Watery plate | Pool of pinkish liquid around slices within 2 minutes | Loin wasn’t dried after ice bath; slices weren’t chilled enough; dressing was added too far ahead | Pat dry after bath, rest wrapped, dress at the table. |
| Beef tataki is tough | Slices chew like rubber bands | Wrong cut (sirloin or strip instead of tenderloin); sliced with the grain | Use tenderloin or eye-of-round. Identify grain direction before slicing — cut perpendicular to it. |
| Garlic and ginger taste raw and harsh | Bitter, pungent overpowers the fish | Garnishes added in excess; raw garlic not soaked | Slice garlic paper-thin and soak in ice water 10 min to mellow. Grate ginger fresh, no more than ½ teaspoon per portion. |
| Bonito tastes muddy | Loss of the bright sea flavor | Cooked too far past raw; or used old fish | Use only freshly thawed bonito; sear 10 seconds per face max for this delicate fish. |
Practice Exercises: Building Tataki Skills Progressively
Tataki rewards practice because the windows are tight — seconds matter, and chilling speed matters even more. These three graduated exercises will build your reflexes before you spend serious money on premium sashimi-grade tuna.
Exercise 1: Beef Tenderloin (Lowest Stakes)
Start with a 300 g (¾ lb) center-cut beef tenderloin. Beef is more forgiving than fish — the texture window is wider, parasites are not an issue at restaurant-quality grade, and a slightly overcooked tataki still tastes like a great rare steak. Practice the sear-and-ice rhythm three or four times with tenderloin before moving on. Pay attention to how the meat color changes through the cross-section. You’re aiming for the inner 30 mm to remain uniformly deep red with no warming.
Exercise 2: Salmon (Mid Difficulty)
Move to a 250 g portion of skin-on sashimi-grade salmon. Salmon is fatty and the surface oils make crust development easy, but the flesh is delicate and over-searing turns it gray-pink immediately. Sear no more than 8 seconds per face for skin-on salmon, and remember to sear the skin face last and longest (about 15 seconds) — crispy skin against raw flesh is one of the great pleasures of salmon tataki.
Exercise 3: Tuna or Bonito (Mastery Level)
Once you can hit consistent results with beef and salmon, graduate to a 300 g yellowfin tuna or skipjack bonito loin. The window here is the narrowest — these fish go from perfect to overcooked in two seconds, and the price tag of a mistake is steep. Set a stopwatch. Use a torch for the ends if you don’t trust your timing on the pan. Slice immediately after the chill rest and serve at once.
Exercise 4: Build Your Own Tataki Tasting Plate
For a dinner-party-level exercise, prepare three small portions of different proteins side by side — beef, salmon, and tuna, for example — and serve as a tataki sampler with three different dressings (ponzu, sesame-soy, yuzu kosho butter). This forces you to manage three simultaneous searing windows and three chill times, which is the ultimate stress test of your timing.
Advanced Tips From Professional Sushi Chefs
- Skewer fish loins on metal pins before searing. Three parallel metal skewers run lengthwise through the loin let you rotate quickly over a flame or pan with no risk of fingers slipping. This is how Kochi-style street vendors handle whole bonito over straw fires.
- Burn rice straw or rice husks for the most authentic flavor. If you have access to a barbecue and a small bale of food-grade rice straw, build a quick flaming pile and sear the loin held about 15 cm above the flames. The smoky aroma is unmistakable and gives Tosa-style katsuo tataki its signature character.
- Use shio koji for a pre-sear cure. Brush the loin lightly with shio koji 20 minutes before searing. The enzymes tenderize the surface and deepen the umami without overwhelming the natural fish flavor.
- Try a sesame-oil sear for a stronger nutty note. Swap 1 teaspoon of toasted sesame oil into your searing oil. Use sparingly — sesame oil has a much lower smoke point than rice bran, so it should never be more than 10% of the total fat.
- Score the loin lightly before searing. Tiny shallow knife cuts (1 mm deep, every 5 mm) on the surface create more crust area per slice and let aromatics like ginger and garlic press in deeper after slicing.
- Press garnishes into the slices with the flat of the knife. This is the literal tataku (”striking”) step of the traditional method. Lay your slices flat, sprinkle with sliced garlic and ginger, then gently tap the flat of a knife blade against the surface to embed the aromatics. It looks dramatic and concentrates flavor.
- Use a chilled steel plate for service. Restaurants chill a stainless steel or stoneware plate in the freezer for 30 minutes before plating. This keeps slices at peak temperature throughout the meal.
- Save the trim for chazuke. The ends and irregular pieces from your loin are perfect over hot rice with green tea poured on top — a traditional second-meal trick that wastes nothing.
- Cure thicker cuts of beef in soy and sake before searing. A 30-minute marinade in equal parts soy sauce, cooking wine or sake, and a splash of sesame oil produces a tataki with deeper background flavor — popular in modern izakaya-style gyu tataki.
- Reserve the ice bath water. Strained, the slightly seasoned water can be reduced to a glaze that captures rendered surface flavor — useful for spooning over the finished plate.
Recipe Examples: Five Classic Tataki Preparations
1. Katsuo no Tataki (Tosa-Style Bonito)
The original. Skewer a whole skipjack loin on three metal pins. Sear over flaming rice straw for 30 seconds per side (or in a smoking cast-iron pan), plunge into ice water 30 seconds, dry, and slice into 1 cm slabs. Top each slice with paper-thin sliced sweet onion, finely sliced garlic, grated fresh ginger, and a generous tangle of myoga or scallion. Dress with ponzu and a pinch of flaky sea salt. Serve with cold beer.
2. Maguro Tataki Salad
Sear and ice a yellowfin tuna loin as described. Slice into 5 mm pieces and fan over a bed of dressed mixed greens, sliced cucumber, and avocado. Drizzle with sesame-ginger dressing (3 tablespoons rice vinegar, 1 tablespoon soy sauce, 1 tablespoon sesame oil, 1 teaspoon grated ginger, 1 teaspoon honey). Finish with toasted sesame seeds and microgreens. A wildly popular Japanese-American restaurant dish.
3. Gyu Tataki with Wasabi Cream
Crust a beef tenderloin in cracked black pepper and salt, sear all faces in a smoking pan for 25 seconds each, ice bath 60 seconds, rest 30 minutes. Slice paper-thin, fan on a chilled plate, and serve with a quenelle of real wasabi stirred into crème fraîche, plus crispy fried garlic chips and shiso leaves. A classic high-end izakaya offering.
4. Salmon Tataki with Yuzu Kosho
Sear a skin-on salmon block with the skin face down for 15 seconds and the flesh faces for 8 seconds each. Ice bath 30 seconds, rest. Slice 5 mm thick. Plate with a streak of yuzu kosho butter (1 tablespoon softened butter mashed with ½ teaspoon yuzu kosho, smeared on the plate before laying the slices). Garnish with thinly sliced radish and chives. Bright, fatty, and a little spicy.
5. Tofu Tataki (Vegan)
Press a block of extra-firm cotton tofu for 30 minutes between paper towels with a weight on top. Cut into a 4 cm × 4 cm × 10 cm block. Brush with soy sauce and a touch of sesame oil. Sear all faces in a smoking pan for 20 seconds each until well browned. Plunge briefly into ice water, dry, chill 15 minutes. Slice 8 mm thick and serve fanned with ponzu, scallions, grated daikon, and a sprinkle of furikake. Wonderful vegetarian appetizer.
Food Safety: What You Must Know Before Eating Raw Fish
Tataki is, functionally, a raw fish dish for any protein except beef. The brief sear sterilizes only the outer two millimeters; the inner core is as raw as sashimi. That means every food safety rule that applies to sashimi applies here, and you cannot improvise.
- FDA parasite kill standards: Fish must be frozen at –20°C / –4°F for at least 7 days, or at –35°C / –31°F for at least 15 hours, to safely consume raw. Most reputable Japanese fish suppliers in the United States meet this automatically. Salmon and mackerel are especially important to freeze due to Anisakis nematode risk.
- Tuna exception: Tuna species (including bonito) are generally exempt from the freezing requirement because the parasites they host are rarely human pathogens. They can be eaten fresh if sourced from a trusted supplier, though most U.S. fishmongers still flash-freeze for logistics.
- Cold chain: Keep the loin below 4°C (39°F) from purchase through service. Buy ice with your fish and pack it on top in an insulated bag. Use within 24 hours of purchase, ideally same-day.
- Vulnerable populations: Tataki — like sashimi — is not appropriate for pregnant people, immunocompromised individuals, infants, or the elderly. Beef tataki is similarly off-limits for these groups due to listeria and E. coli risk.
- Cross-contamination: Use a dedicated cutting board and knife for the raw protein. Sanitize all surfaces before and after.
Pairing Tataki: Sides, Drinks, and Menus
Because tataki is a cold, intensely flavored small plate, it works best as the opening course of a meal or as a centerpiece on an izakaya-style spread. Pair it with sides that contrast in temperature, texture, or richness.
- Steamed short-grain rice or sushi rice: A small bowl alongside lets you build hand-formed bites at the table.
- Sunomono cucumber salad: Crunchy, vinegary, refreshing — cuts the richness of beef or salmon tataki.
- Edamame with sea salt: Classic izakaya pairing, good as a palate reset.
- Miso soup: Hot and salty, perfect counterpoint to the chilled fish.
- Cold soba noodles with dipping sauce: Builds a complete summer meal.
For drinks, tataki shines with dry, mineral-driven sake — junmai daiginjo or yamahai styles work beautifully — and with crisp Japanese lagers like Asahi Super Dry, Sapporo, or Kirin Ichiban. White wine drinkers should reach for a high-acid, low-oak choice like Muscadet, Chablis, or a bone-dry Riesling. Avoid heavy reds and oaky chardonnays, which steamroll the delicate fish flavor.
Storage and Make-Ahead Notes
Tataki is at its absolute best within 30 minutes of slicing. Slices left even an hour begin to oxidize at the edges, the crust softens from exposure to the cold meat’s moisture, and the dressing breaks down the delicate proteins. You can, however, prep ahead in stages:
- Up to 24 hours ahead: Make the ponzu. Flavor improves substantially with overnight rest.
- Up to 4 hours ahead: Sear and ice-bath the loin, wrap tightly in plastic, and refrigerate. Slice and dress just before serving.
- Not ahead at all: The slicing and plating. Do this within 10 minutes of service.
- Leftovers: Eat within 24 hours and only if refrigerated continuously. Leftover sliced tataki is excellent on top of hot rice with a drizzle of ponzu (a kind of tataki donburi).
Regional Variations You Should Know
Tataki has fanned out across Japan and into the global Japanese food scene. Each region has small but meaningful variations on the core technique:
- Tosa style (Kochi prefecture): The original. Whole bonito loin seared over rice-straw flames, sliced thick (8–10 mm), dressed with salt-and-garlic rather than ponzu. The locals call this shio-tataki.
- Kansai style (Osaka and Kyoto): Often uses tilefish (amadai) or sea bream rather than bonito. Thinner slices, more delicate ponzu.
- Kanto style (Tokyo): Tuna tataki is dominant here, especially as an izakaya appetizer. Often served with grated daikon and a soy-vinegar dressing rather than full ponzu.
- Hokkaido style: Salmon and scallop tataki are common, taking advantage of the region’s cold-water seafood. Often paired with seaweed garnishes.
- Western-Japanese fusion (modern): Beef tataki has spread internationally and now appears in non-Japanese restaurants worldwide. Wagyu sirloin versions are especially popular in high-end izakaya outside Japan.
Tataki in Modern Japanese Cuisine
While tataki has been part of Japanese home cooking for centuries, its popularity in fine dining surged dramatically in the 1980s when Tokyo izakayas began offering gyu tataki — beef tataki — as a luxurious appetizer course. The technique spread quickly into French-Japanese fusion menus where chefs found it pleasingly close to French carpaccio while remaining unmistakably Japanese. By the 2000s, salmon and yellowtail tataki had become menu staples at sushi bars across North America and Europe.
Today tataki is a versatile technique that bridges classical Japanese cuisine and modern fusion cooking. You’ll find duck tataki at Tokyo natural-wine bistros, scallop tataki at Michelin-starred sushiya, tuna tataki at chain Japanese restaurants in suburban America, and increasingly, vegetable tataki — eggplant, mushroom, even watermelon — at progressive plant-based restaurants. The underlying principle stays the same: maximum contrast between a fast-seared crust and a raw, chilled interior. If you have read this far, you have everything you need to start practicing the technique in your own kitchen. For deeper context on the Japanese cuisine that frames tataki, see our complete guide to Japanese food.
Frequently Asked Questions
Is tataki the same as sashimi?
No. Sashimi is completely raw fish, never heated. Tataki is briefly seared on the surface to create a brown crust, then chilled and sliced so the interior remains raw. Both are served cold with dipping sauces, but tataki has the distinctive seared edge that sashimi lacks. See our guide to sashimi for the raw-fish technique.
Can I make tataki with frozen fish from the grocery store?
Only if it is labeled ”sashimi-grade” or ”sushi-grade” and has been previously frozen to FDA parasite-kill standards. Standard frozen grocery fish — flash-frozen tilapia, basa, generic tuna steaks — is not safe to eat raw. Source from a Japanese specialty market or fishmonger who can confirm the freezing protocol.
Why is the inside of my tataki gray instead of red?
You overcooked it. Either the searing time was too long, the pan was too hot, or — most commonly — the ice bath was not cold enough or fast enough to stop carryover cooking. The fix: shorter sear (no more than 12 seconds per face for fish), prepare the ice bath before searing, and submerge within 5 seconds of the loin leaving the pan.
What’s the best oil for tataki?
Use a neutral oil with a high smoke point — rice bran oil (250°C / 482°F), grapeseed oil (216°C / 421°F), or refined peanut oil (232°C / 450°F). Avoid extra-virgin olive oil (smoke point too low), and use sesame oil only as a flavoring (no more than 10% of the total fat).
Do I need a kitchen torch to make tataki?
No, but it helps. A smoking-hot cast-iron pan does an excellent job for the main faces of the loin. A torch is most useful for the end faces (which only need 5 seconds of color) and for adjusting any patchy areas without re-cooking the rest. A propane Bernzomatic-style torch is ideal; smaller crème brûlée torches work but take longer.
Can I make tataki ahead for a dinner party?
You can sear and ice-bath the loin up to 4 hours in advance and hold it wrapped in the refrigerator. Slice and plate within 10 minutes of serving. Slicing too far ahead causes oxidation and texture loss. The ponzu sauce is actually better made 24 hours in advance.
What’s the difference between tataki and aburi sushi?
Aburi means ”flame-seared” and refers specifically to nigiri sushi where the top of an already-sliced piece of fish is briefly torched while sitting on its rice ball. Tataki is whole-loin technique where the entire exterior of a larger piece is seared before slicing. Aburi is plate-side, tataki is mise-en-place.
Can I use a regular kitchen knife for tataki?
Yes, as long as it is razor sharp and long enough to slice the entire width of the loin in one pull stroke. A 240–270 mm yanagiba (Japanese sashimi knife) is ideal, but a sharp 8- to 10-inch chef’s knife works fine for home cooking. The single critical requirement is sharpness — a dull knife crushes the delicate seared edge and tears the raw interior.
Why does my tataki release so much liquid on the plate?
Three possible causes. Either you did not dry the loin thoroughly after the ice bath, you didn’t let it rest long enough after searing for the proteins to firm up, or you applied the dressing too early. The salt and acid in ponzu start drawing moisture out of the slices within minutes. Always dress at the table, not in the kitchen.
Is tataki served warm or cold?
Cold. Tataki is fundamentally a chilled dish — the ice bath is non-negotiable and the slices should be cool when they hit the plate. Western-style seared tuna is sometimes served warm, but that is a different dish, not tataki. The interior temperature of properly executed tataki should be around 4°C (39°F) at the moment of service.
What can I serve with tataki for a full meal?
Build an izakaya-style spread: tataki as the starring small plate, steamed rice, a simple miso soup, sunomono cucumber salad, and a vegetable side like spinach goma-ae or grilled shishito peppers. Add a glass of cold sake or a Japanese lager. For a more substantial meal, follow tataki with a heartier main like teriyaki chicken or Japanese curry rice.
Is beef tataki safe to eat?
For healthy adults, yes — when you use high-quality whole-muscle cuts (tenderloin, eye-of-round) from a reputable source and sear the entire exterior thoroughly. Whole-muscle beef has pathogens only on the surface, which the sear sterilizes. Never make tataki from ground beef, mechanically tenderized beef, or trim, where pathogens may be distributed throughout. Avoid serving to pregnant people, young children, the elderly, or anyone immunocompromised.
How long does cooked tataki last in the fridge?
Sliced tataki should be eaten within 30 minutes of slicing for best quality, but if necessary, can be refrigerated tightly wrapped for up to 24 hours. The texture and crust will degrade noticeably. Unsliced seared-and-chilled loin (still wrapped) holds up better — up to 24 hours in the refrigerator at 4°C (39°F) or below.
Final Thoughts: Mastering the Tataki Mindset
Tataki is one of those techniques that looks complicated and reveals itself as deeply simple once you internalize the underlying logic. You are doing one thing — creating maximum contrast between a deeply browned crust and a raw, cold interior — and every step of the process exists to serve that single aim. The high-heat pan, the absolute dryness of the surface, the salt that draws a tacky film for browning, the fast sear that doesn’t penetrate, the immediate ice bath that halts carryover cooking, the chilled rest that firms the flesh for clean slicing, the sharp knife that cuts in one pull stroke — each step is in service of contrast.
Once you grasp this, you start making your own judgment calls. Thicker loin? Slightly longer sear. Fattier fish? Slightly shorter sear (because fat conducts heat faster than lean flesh). Wagyu beef? Sear cooler and longer to let the fat partially render without melting through. Salmon with skin? Crisp the skin face longest, give the flesh faces a quick kiss. You stop following the recipe and start cooking the technique.
For your first attempt this week, start with beef tenderloin and a heavy cast-iron pan. Spend twenty dollars on a small piece of meat, follow the steps in this guide exactly, and time everything with your phone. After two or three attempts you will hit the sweet spot — and once you have, you can scale to fish with full confidence. Then, when you serve your first plate of jewel-toned tuna tataki with homemade ponzu and a flutter of microgreens to friends who think Japanese food is restaurant-only, you will understand why this technique has endured for four centuries.

Mei Lin Chen
Mei Lin Chen is an Asian food writer and recipe developer. Melbourne-raised and London-based, she has spent over a decade exploring the rice paddies, hawker stalls, and home kitchens of South-East and East Asia. Her recipes balance traditional technique with everyday practicality.