Last updated: March 12, 2026
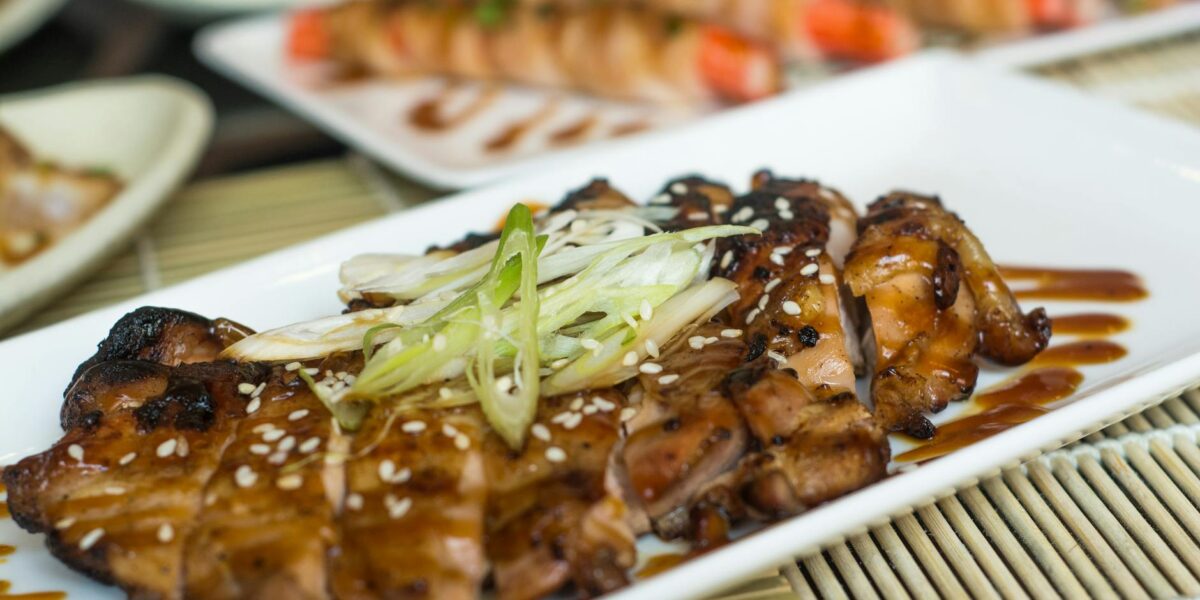
Teriyaki chicken is the gateway drug to Japanese home cooking. A glossy, mahogany-lacquered chicken thigh, the sauce caramelized to the exact moment before it tips into bitterness, served over a mound of short-grain rice that catches every drip. It is one of the most-cooked Japanese dishes outside of Japan, and one of the most misunderstood. The bottled ”teriyaki sauce” at the supermarket is a thick, cornstarch-clouded American invention. The real thing is four ingredients, reduced in a hot pan in under three minutes, and it tastes like nothing you have poured from a bottle.
This is the version we make at home: bone-in or boneless chicken thighs (never breasts, please), a sauce of soy sauce, mirin, sake, and sugar in nearly equal parts, and a pan-searing technique borrowed from Tokyo izakayas. The word teriyaki itself describes a cooking method, not a flavor: teri means shine, yaki means grilled or broiled. The shine comes from the natural sugars in mirin and the slow reduction of the sauce until it coats the back of a spoon. There is no cornstarch, no pineapple, no garlic in the classic version, though we will discuss variations that include them. After thirty minutes from package to plate, you will have a dinner that costs less than a coffee and tastes like the chicken teriyaki bento you remember from a good Japanese deli.
What Teriyaki Chicken Actually Is
Teriyaki, in its Japanese home, is a finishing technique. A protein is grilled, broiled, or pan-seared until cooked, and then a sweet-savory glaze is brushed on or reduced in the pan during the final minutes of cooking. The glaze is not a marinade in the traditional Japanese method; the chicken is cooked first, then sauced. This produces the signature lacquered surface and prevents the sugars from burning during the initial sear. The American version, popularized in Japanese-American diners in the 1960s and 1970s, often marinates the chicken first, which is also delicious but a slightly different animal.
The dish exists in a family of similar Japanese glazed preparations. Yakitori uses skewers and a tare sauce that is brushed repeatedly during grilling. Buri no teriyaki is the same technique applied to yellowtail. Even unagi kabayaki, the glazed grilled eel of summer, is a teriyaki cousin. What unites them is the shine, the balance of sweet and salty, and the patience of layering sauce over heat rather than dumping it on at the end.
Why Chicken Thighs, Not Breasts
This is non-negotiable in our kitchen. Chicken breast is leaner, drier, and lacks the connective tissue and fat that give teriyaki its luxurious mouthfeel. Boneless, skin-on thighs are ideal because the skin renders into a crisp layer that the sauce clings to, and the dark meat stays juicy even when the sauce is reduced over high heat. Boneless skinless thighs are a fine second choice and still vastly better than breast. If you must use breast for dietary reasons, butterfly it to half thickness, pound it gently, and reduce the cooking time by about a third.
The price difference matters too. Thighs are typically the cheapest cut of chicken in American supermarkets, often $2.99 to $4.99 per pound, and they are vastly more forgiving for the home cook. You cannot overcook a thigh in the time it takes to reduce teriyaki sauce. You can absolutely overcook a breast.
The Sauce: Four Ingredients, Nothing More
Classic Japanese teriyaki sauce is built on equal parts soy sauce, mirin, and sake, plus sugar to taste. That’s it. Some recipes drop the sake. Some replace some of the sugar with honey. But the canonical ratio is 1:1:1 with sugar at about half that volume. The sauce is not pre-thickened; it thickens naturally as it reduces with the chicken’s juices in the pan. Cornstarch slurries are an American addition that produces a glossier but slightly gummy sauce. Use it if you like the texture, but the original is cleaner on the palate.
Mirin is the soul of the sauce. It is a sweet rice wine with about 14% alcohol and a high sugar content that provides both sweetness and the characteristic shine. Use hon-mirin (true mirin) if you can find it; the cheaper mirin-fu chomiryo (mirin-style seasoning) is mostly corn syrup and salt and will not give you the same depth. Sake adds aromatic complexity and helps the sauce cling to the chicken; if you cannot get sake, dry sherry is the closest substitute, though dry white wine works in a pinch. Soy sauce should be Japanese-style koikuchi shoyu (regular soy sauce); avoid Chinese light soy, which is saltier, and dark soy, which is too thick and molasses-heavy for this application.
Ingredient List
| Ingredient | Quantity | Notes |
|---|---|---|
| Boneless, skin-on chicken thighs | 1.5 lb (about 6 thighs) | Boneless skinless works; bone-in increases cook time |
| Japanese soy sauce (koikuchi) | 1/3 cup (80 ml) | Kikkoman or Yamasa preferred |
| Hon-mirin | 1/3 cup (80 ml) | True mirin, not mirin-style seasoning |
| Sake | 1/3 cup (80 ml) | Cooking sake or drinking sake both fine |
| Granulated sugar | 2 tablespoons | Adjust to 1 to 3 tbsp to taste |
| Neutral oil | 1 tablespoon | Avocado, grapeseed, or canola |
| Fresh ginger (optional) | 1 thumb-sized piece, sliced | For aromatic depth, fished out before serving |
| Garlic (optional) | 1 clove, smashed | Modern addition; omit for traditional |
| Toasted sesame seeds | 1 teaspoon | For garnish |
| Scallion, sliced thin | 1 stalk | For garnish |
| Steamed short-grain rice | 4 cups cooked | For serving |
This recipe serves four people generously, or six modestly when paired with rice and a vegetable side. The ingredient list looks short because it is short. Everything fancy you have ever seen done with teriyaki sauce – the orange zest variations, the bourbon teriyaki, the Korean fusion versions – is built on this same four-ingredient base.
Equipment You Will Need
A heavy-bottomed skillet, ideally 12 inches, is the main piece of equipment. Cast iron is excellent because it holds heat well during the sauce reduction. A nonstick or carbon-steel pan also works. You want a flat pan, not a wok, because you need the chicken to make full contact with the surface. A spoon or small ladle for basting helps, though a tilt-and-pour technique with the pan also works. A meat thermometer is useful but not essential; the chicken is done when it reaches 165°F (74°C) at the thickest point, though thighs are forgiving up to 180°F as the connective tissue continues to break down.
Step-by-Step Cooking Instructions
Step 1: Prepare the Chicken
Pat the chicken thighs completely dry with paper towels. Moisture is the enemy of a good sear; wet chicken steams in the pan instead of browning. If the thighs have any large flaps of loose skin, trim them so the skin lies flat. If the thighs are very thick or unevenly shaped, you can score the meat side with a few shallow cuts to help them cook more evenly. Do not salt the chicken; the soy sauce provides all the salt the dish needs, and pre-salting can make the surface weep moisture.
Step 2: Mix the Sauce
In a small bowl or measuring cup, combine the soy sauce, mirin, sake, and sugar. Stir to dissolve the sugar. If you are using ginger or garlic, set them aside separately; they will go into the pan, not into the sauce. Place the sauce within arm’s reach of the stove – this dish moves fast once you start cooking.
Step 3: Sear the Chicken Skin-Side Down
Heat the neutral oil in your skillet over medium-high heat until it shimmers. Lay the chicken thighs in the pan skin-side down, taking care not to crowd them; cook in two batches if necessary. Press each thigh gently with a spatula for the first 30 seconds to ensure full skin contact with the pan. Reduce the heat to medium and cook undisturbed for 7 to 8 minutes. The skin should release easily when it is properly browned; if it sticks, give it another minute. You are aiming for deep golden-brown, crackling skin. This is the longest single step in the recipe, and the most important.
Step 4: Flip and Cook the Second Side
Flip each thigh with tongs. Add the ginger slices and smashed garlic clove now if you are using them. Cook the meat side for 4 to 5 minutes, until the chicken is nearly cooked through. If your pan has accumulated a lot of rendered fat, pour off most of it now, leaving about a tablespoon. The pan should be hot but not smoking; if it is smoking, lower the heat slightly.
Step 5: Add the Sauce and Reduce
Give the sauce mixture one more stir to dissolve any sugar that has settled, then pour it into the hot pan all at once. It will bubble up dramatically and the alcohol from the sake and mirin will burn off in a fragrant cloud. Reduce the heat to medium-low and cook, tilting the pan and spooning the sauce over the chicken every 20 seconds or so, for 2 to 3 minutes. The sauce will reduce by about 60% and thicken into a glossy syrup. When it coats the back of a spoon and you can drag a path through it on the pan bottom that holds for a second before filling in, it is done.
Step 6: Rest, Slice, and Plate
Transfer the chicken to a cutting board and let it rest for 3 to 5 minutes. Resting is critical; cutting immediately will let the juices run out. Meanwhile, if your sauce has reduced too much in the pan, add a splash of water and stir to loosen it. Slice each thigh against the grain into half-inch strips. Arrange over hot rice, drizzle generously with the pan sauce, and garnish with toasted sesame seeds and thinly sliced scallion.
Visual Cues at Each Stage
| Stage | What to Look For | What to Adjust |
|---|---|---|
| Oil ready in pan | Shimmering, not smoking | If smoking, lower heat 30 seconds before adding chicken |
| Skin searing | Edges turning golden, audible sizzle | If silent, raise heat; if violent spattering, lower it |
| Skin flip-ready | Deep mahogany color, releases without sticking | If pale, leave another 1 to 2 minutes |
| Chicken nearly done | Meat side firms up, juices run clear | If still pink at center, cook 1 to 2 minutes more before saucing |
| Sauce added | Vigorous bubbling, fragrant steam cloud | If burning smell, immediately lower heat and add 1 tbsp water |
| Sauce reducing | Bubbles slow and become larger and slower | This is normal; sauce is concentrating |
| Sauce done | Coats spoon, leaves a trail on pan bottom | If too thick, add water 1 tsp at a time |
Make-Ahead Marinade Version (American Style)
If you prefer the deeper flavor that comes from marinating, this is the American-Japanese hybrid version popular in West Coast Japanese-American cooking. Combine the sauce ingredients in a zip-top bag with the chicken thighs and refrigerate for 2 to 8 hours. Remove the chicken, reserving the marinade. Pat the chicken very dry (this is essential; wet, sugar-coated chicken will burn before browning), then proceed with the searing steps. Boil the reserved marinade for at least 2 minutes to kill any bacteria, then use it as the pan sauce in step 5. The flavor will be deeper and more uniform but the skin will be slightly less crispy than the unmarinated version.
Tips From Years of Making This
- Do not crowd the pan. If your skillet cannot hold all the thighs with at least half an inch between each, cook in two batches. Crowded chicken steams and never gets crispy skin.
- Start with cold chicken in a hot pan. The temperature differential helps render the skin fat properly. Room-temperature chicken can lead to soft, soggy skin.
- Use a splatter screen. The first 2 minutes of skin-down searing will splatter. A mesh splatter screen saves your stovetop and your forearms.
- Taste the sauce before reducing. If your mirin is on the sweeter side, you may want to drop the sugar to 1 tablespoon. If you are using a saltier soy sauce, add a tiny pinch more sugar.
- Reduce off the chicken if you are nervous. If you fear overcooking, you can pull the chicken from the pan once it is cooked, reduce the sauce on its own for an extra minute, then return the chicken to glaze.
- The sauce continues to thicken as it cools. Pull it slightly looser than you want the final texture. A sauce that coats the spoon at temperature will be syrupy on the plate.
- Save the pan drippings. Any leftover sauce in the pan is gold. Spoon it over the rice, or save it in the fridge as a base for next week’s quick stir-fry glaze.
- Use a heavy lid as a press. If your skin keeps curling, place a smaller lid or a foil-wrapped brick on the chicken for the first 2 minutes of searing. This is sometimes called the ”weighted chicken” technique.
Common Mistakes and How to Avoid Them
The single most common failure with teriyaki chicken is burning the sauce. Sugar caramelizes between 320°F and 360°F, and then it scorches. Once the sauce hits the pan, your heat must come down. If you smell anything bitter or see the sauce going dark too fast, immediately pull the pan off the burner, add a tablespoon of water, and stir vigorously to dilute and cool. You can usually save it.
The second most common mistake is undercooking the skin. Home cooks often flip too early because they get nervous about burning the chicken. With chicken thighs at medium heat, 7 to 8 minutes skin-side down is correct and necessary. The skin will not be properly crisp at 4 minutes. Trust the timing.
The third mistake is over-salting. Soy sauce is salty. If you brine, salt, or season your chicken with salt before cooking, you will end up with a dish that tastes like it came out of a vending machine. The recipe has been calibrated to need no additional salt. Trust it.
Variations
Honey Teriyaki
Replace half the sugar with an equal volume of honey. The sauce will be slightly thicker and more aromatic, with floral notes. Be even more careful about the burn point; honey scorches faster than granulated sugar. This version is excellent on grilled rather than pan-seared chicken.
Pineapple Teriyaki (Hawaiian Style)
Add 1/4 cup of fresh pineapple juice to the sauce. The bromelain in pineapple is a natural tenderizer, which is useful if you must use chicken breast. Cook the sauce a touch longer to reduce the extra liquid. Hawaiian teriyaki, sometimes called huli huli, is a major American regional variant and pairs especially well with grilling.
Spicy Teriyaki
Add 1 teaspoon of shichimi togarashi or 1/2 teaspoon of ichimi togarashi to the sauce. For a more aggressive heat, swirl in 1 tablespoon of Korean gochujang at the end of reduction. The fermented chili paste adds depth as well as heat.
Teriyaki Salmon
The same sauce and same method work beautifully on skin-on salmon fillets. Sear skin-side down for 4 minutes, flip and cook 2 to 3 minutes, then add sauce and reduce for 1 minute. Salmon is far more delicate than chicken; do not push past medium doneness or it will dry out.
Vegetarian Teriyaki Tofu
Press a block of extra-firm tofu for 30 minutes, slice into thick planks, and dust lightly with cornstarch. Pan-fry until golden on all sides, then add sauce and reduce. The cornstarch coating gives the tofu a chicken-skin-like crispness that absorbs the sauce wonderfully.
Air Fryer Teriyaki Chicken
Air-fry the seasoned chicken thighs at 400°F for 12 to 14 minutes, flipping halfway. Meanwhile, reduce the sauce in a small saucepan on the stovetop. Toss the cooked chicken in the reduced sauce just before serving. You sacrifice some of the pan-glaze interaction but gain hands-off cooking and lower fat content.
What to Serve With Teriyaki Chicken
Steamed Japanese short-grain rice is the default and the best. The slightly sticky, plump grains catch the sauce in a way that long-grain rice simply cannot. Brown rice works for a healthier version; the nuttiness pairs nicely with the salty-sweet sauce, though the texture is firmer. For low-carb, cauliflower rice is acceptable but does not absorb sauce well; skip the sauce-heavy approach and serve the chicken with a little extra pan jus instead.
For vegetables, the classic accompaniments are steamed or stir-fried broccoli, snap peas, or shishito peppers. A simple cucumber sunomono salad (sliced cucumber tossed with rice vinegar, sugar, and salt) provides cooling acidic contrast. For a complete bento-style plate, add a soft-boiled egg, a small pile of pickled ginger, and a few orange wedges.
Nutritional Information
| Per Serving (1/4 of recipe, chicken only) | Amount |
|---|---|
| Calories | 385 kcal |
| Protein | 32 g |
| Total Fat | 18 g |
| Saturated Fat | 5 g |
| Carbohydrates | 15 g |
| Sugars | 12 g |
| Fiber | 0 g |
| Sodium | 1240 mg |
| Cholesterol | 165 mg |
| Iron | 2 mg (12% DV) |
| Vitamin B12 | 0.9 mcg (37% DV) |
| Selenium | 28 mcg (51% DV) |
Add roughly 220 calories and 45g carbohydrates for a one-cup serving of cooked white rice. The sodium content is significant; if you are watching salt intake, use reduced-sodium soy sauce, which will drop the per-serving sodium to about 850 mg without meaningfully changing the flavor. The protein-to-calorie ratio is excellent for a savory main, making this a strong choice for high-protein meal prep.
Storage and Reheating
Teriyaki chicken stores beautifully and is one of the few seared dishes that arguably tastes better the next day. The sauce continues to penetrate the meat overnight, and the cold chicken on top of warm rice is a classic Japanese lunch.
- Refrigerator: Store in an airtight container for up to 4 days. Keep any leftover sauce in the same container so the chicken stays moist.
- Freezer: Wrap individual portions tightly in plastic wrap, then in a freezer bag. Lasts up to 3 months. Thaw overnight in the refrigerator before reheating.
- Reheating in microwave: Cover loosely with a damp paper towel and microwave at 50% power in 30-second intervals. Full power will toughen the chicken.
- Reheating in pan: Add 1 tablespoon of water to a cold pan, place the chicken in, cover, and heat over medium-low for 4 to 5 minutes. The water creates steam that gently rewarms without drying.
- Reheating in air fryer: 350°F for 4 minutes. The skin will re-crisp surprisingly well.
- Meal prep portions: Pack chicken over rice with a layer of plastic wrap between hot and cold components. Add the vegetables to a separate compartment to keep them from steaming.
Sourcing Your Ingredients
Quality of ingredients matters more for teriyaki than for most home recipes, because there are so few of them. The sauce is the dish, and the sauce is only four things. A good Japanese soy sauce is widely available; Kikkoman is the default and is genuinely good, though brands like Yamasa and Marunaka are excellent step-ups available at Asian markets. For mirin, the difference between true hon-mirin and the cheap mirin-style seasoning is dramatic; the hon-mirin will cost three to four times as much but lasts forever in the fridge. Our guide to mirin covers the full spectrum of options and how to identify the real stuff on a shelf.
Sake for cooking can be either drinking sake or specifically labeled ”cooking sake” (ryorishu), which has added salt to make it ineligible for the alcohol tax in Japan. Either works. Avoid anything labeled ”rice cooking wine” from the Chinese ingredients aisle; that’s a different product entirely. For sugar, plain granulated white sugar is correct; brown sugar adds molasses notes that are not traditional, though some recipes do call for it.
Frequently Asked Questions
Can I make teriyaki chicken without sake?
Yes. The simplest substitution is to use an equal amount of water plus an extra tablespoon of mirin. Dry sherry, Chinese Shaoxing wine, or even dry vermouth all work as 1:1 swaps with slightly different aromatic profiles. The flavor will be very close to the original; only a trained palate will catch the difference.
Is bottled teriyaki sauce the same as homemade?
No, and it’s not particularly close. Bottled sauces are almost always pre-thickened with cornstarch or xanthan gum, contain preservatives and acidifiers, and usually skip the sake entirely. They taste of soy sauce and corn syrup. Homemade takes five minutes longer than opening a bottle and tastes dramatically better. If you must use bottled, look for brands without high fructose corn syrup; Soy Vay and Mr. Yoshida’s are reasonable shortcut choices.
Can I use chicken breast?
You can, but thighs are vastly better. If you must use breast, butterfly it to half thickness, reduce searing time to 3 to 4 minutes per side, and consider using the marinade version for 30 minutes to add moisture before cooking. Pull the chicken at 158°F internal and let carryover heat take it to 160°F; any further and it will be dry.
Why is my sauce not getting thick?
Three usual suspects. One: your heat is too low; the sauce needs to bubble actively to reduce. Two: you’ve added water along the way, perhaps to deglaze; this dilutes the sauce. Three: you’re impatient. The thickening happens in the last 30 seconds. Wait for the bubbles to slow and grow larger; that is the visual cue that the water content has dropped and the sauce is ready.
Can I add cornstarch to thicken the sauce?
You can. Mix 1 teaspoon of cornstarch with 1 tablespoon of cold water and stir into the sauce in the last 30 seconds of cooking. This is non-traditional but produces a noticeably thicker, glossier sauce. Many American Japanese restaurants use this technique. It is a matter of preference; the original four-ingredient sauce thickens naturally with reduction.
How do I make this gluten-free?
Substitute tamari for the soy sauce; tamari is fermented similarly but typically without wheat. Verify the mirin and sake are also gluten-free; most are, but check the label. Coconut aminos can replace soy sauce for a soy-free, gluten-free option, though it is significantly sweeter and you should drop the sugar in the recipe to compensate.
Can I grill this instead of pan-searing?
Absolutely, and grilling is closer to the traditional Japanese method. Grill chicken thighs over direct medium heat for 4 to 5 minutes per side. Reduce the sauce separately on the stove or on a side burner. Brush the chicken with the reduced sauce in the final 90 seconds of grilling, flipping and re-brushing once. This gives you smoky char in addition to the glaze.
What’s the difference between teriyaki and yakitori?
Yakitori uses bite-sized chunks of chicken skewered on bamboo and grilled over charcoal, usually binchotan. The sauce, called tare, is similar to teriyaki but often built over years from repeated dippings and brushings. Teriyaki refers more broadly to the glazing technique on whole pieces of protein. Our yakitori guide goes deep on the skewered version, and our yakitori don recipe shows you how to turn the skewers into a rice bowl meal.
Can I scale this recipe up for a crowd?
Yes, but with two cautions. First, do not crowd the pan; sear in batches of 5 to 6 thighs at a time. Second, reduce the sauce in a separate pan when cooking large batches; it will not reduce properly in a pan jammed with chicken. Toss the cooked chicken in the reduced sauce just before serving. This is how Japanese restaurants handle volume.
What rice is best for teriyaki chicken?
Japanese short-grain rice (often labeled uruchimai or by brand names like Nishiki, Tamanishiki, or Koshihikari) is the correct choice. Its higher starch content gives it a slightly sticky, plump texture that holds sauce. See our Asian rice variety guide for a deeper dive on choosing rice for different dishes. Avoid long-grain rice like jasmine or basmati, which don’t catch the sauce as well.
Why is American teriyaki so different from Japanese teriyaki?
The American version evolved primarily in Seattle and Hawaii, where Japanese immigrants adapted recipes to local tastes and available ingredients. American teriyaki tends to be sweeter, thicker (from cornstarch), more garlicky, and often marinade-based rather than glaze-based. Both are valid; they’re just different evolutions of the same technique. The Seattle-style teriyaki, in particular, became its own regional cuisine in the 1970s and 1980s.
The Cultural Context
Teriyaki as a Japanese cooking technique dates back to the Edo period (1603-1868), when soy sauce, mirin, and sake had all become widely available household ingredients. The earliest written references describe the technique applied to fish, particularly yellowtail (buri), which was abundant in winter. Chicken teriyaki as we know it became popular in Japan only in the postwar period, when chicken became more affordable and home grilling tools and gas stoves spread. The dish then traveled with Japanese immigrants to Hawaii, Brazil, and the American West Coast, where it took on local accents.
The Seattle teriyaki story is worth knowing. In 1976, a Japanese immigrant named Toshihiro Kasahara opened Toshi’s Teriyaki in Seattle’s University District. His version, marinated rather than glazed, sweeter than Japanese traditional, and sold over a heap of rice, was an instant hit. Dozens of similar teriyaki spots opened in the next two decades, and by the 1990s, ”teriyaki” in Seattle meant something specific and beloved that was not quite Japanese but was unmistakably its descendant. There are now over 100 teriyaki restaurants in the Seattle area, more per capita than anywhere outside Japan.
The global teriyaki story is similar but smaller in scale. Brazilian teriyaki, called frango com molho teriyaki, is heavily marinated and often grilled over churrasco-style coals. Australian teriyaki tends to use a thicker, honey-heavy sauce. British teriyaki is bottled. None of these are wrong; they’re all what happens when a technique meets a new pantry. The recipe in this article is closer to the traditional Japanese version, but you should feel free to push it toward whichever regional accent you grew up with.
Pairing Suggestions
For drinks, a slightly chilled junmai sake is the classic pairing. The rice-derived sweetness and clean finish complement the soy-driven savoriness of the sauce without competing. A crisp Japanese lager like Asahi or Sapporo also works beautifully, and is a more accessible everyday choice. For non-alcoholic pairings, cold barley tea (mugicha) or genmaicha (brown rice tea) cut through the richness and reset the palate between bites.
If you are building a multi-course Japanese-style meal, teriyaki chicken pairs well with miso soup as a starter, a small sunomono salad, and a piece of grilled fish or simmered vegetable as a third dish. The Japanese ichi-ju-san-sai (one soup, three sides) format works beautifully here, with the teriyaki as the protein centerpiece.
Final Thoughts
Teriyaki chicken is one of the most rewarding 30-minute dinners you can learn to cook well. The technique transfers to fish, tofu, pork, and even vegetables. The sauce ratio is worth memorizing – one part soy, one part mirin, one part sake, half part sugar – because it will serve you for a lifetime of weeknight cooking. Once you have made it three or four times, you will stop measuring and start eyeballing, which is when you know you have absorbed the dish into your kitchen for good.
The version above is the way we make it most weeks, in a cast-iron skillet, over a flame too hot to be safe in shoes you care about, with the smoke alarm pulled off the wall just in case. The sauce gets glossy. The skin gets crisp. The rice underneath gets dressed in pan drippings. And dinner happens, twenty-five minutes after the grocery bag hits the counter. That is the case for cooking at home, and teriyaki chicken makes it as well as anything we know.

Mei Lin Chen
Mei Lin Chen is an Asian food writer and recipe developer. Melbourne-raised and London-based, she has spent over a decade exploring the rice paddies, hawker stalls, and home kitchens of South-East and East Asia. Her recipes balance traditional technique with everyday practicality.