Last updated: March 15, 2026
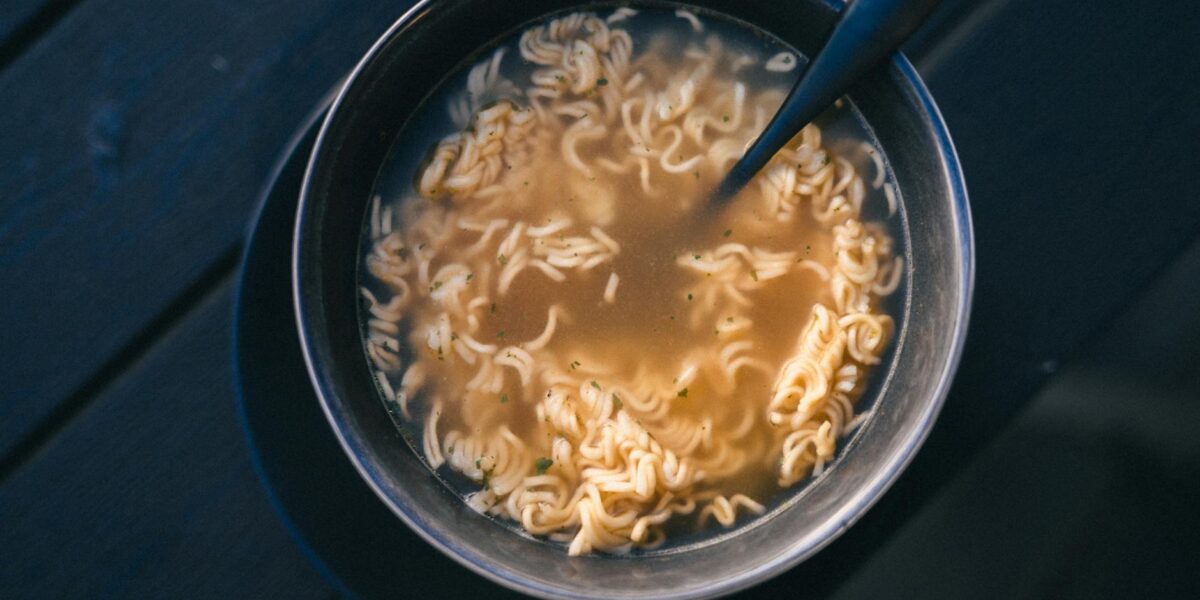
Making homemade ramen noodles from scratch transforms a simple bowl of soup into something extraordinary. While instant noodles and even many restaurant versions rely on dried or factory-made noodles, fresh ramen noodles have a springy, chewy texture and alkaline bite that is impossible to replicate with store-bought alternatives. Once you understand the science behind the dough — and master a few key techniques — you can produce restaurant-quality noodles in your own kitchen whenever you want.
This guide covers everything you need to know about making fresh ramen noodles at home, from choosing the right flour and understanding the role of kansui (alkaline mineral water) to rolling, cutting, and pairing your noodles with different broth styles. Whether you are a ramen obsessive or a curious home cook, this is your complete roadmap to perfect homemade ramen noodles.
What Makes Ramen Noodles Different from Other Noodles?
Ramen noodles belong to a family of Chinese-origin wheat noodles that were adapted and refined in Japan over the past century. What sets them apart from Italian pasta, hand-pulled noodles (la mian), udon, or rice noodles comes down to one critical ingredient: an alkaline component called kansui.
Kansui is a solution of potassium carbonate and sodium carbonate dissolved in water. When added to wheat flour dough, it raises the pH from a neutral 7 to somewhere between 9 and 11. This higher pH environment fundamentally changes the noodle in several ways:
- Color: The alkaline environment causes flavonoid pigments naturally present in wheat flour to turn yellow. This is why ramen noodles are yellow even without egg — the color comes from chemistry, not ingredients.
- Texture: Kansui strengthens the gluten network, giving ramen its characteristic firm, springy, bouncy chew. The noodles resist becoming soggy in hot broth far longer than non-alkaline noodles.
- Flavor: There is a subtle mineral, slightly eggy flavor that alkaline noodles have. It is a taste most people associate with ramen without being able to name it.
- Aroma: Fresh alkaline noodles have a distinctive wheat-forward aroma when cooked that dried noodles cannot match.
Understanding this chemistry is not just academic — it is the foundation for every decision you will make while crafting your noodles, from hydration level to resting time.
Essential Equipment for Making Ramen Noodles at Home
You do not need a commercial noodle machine to make excellent homemade ramen noodles. Here is what you will need, from essential to optional:
| Equipment | Purpose | Essential? | Alternatives |
|---|---|---|---|
| Digital kitchen scale | Precise measurement of flour, water, kansui | Yes | None — baking by volume is too imprecise |
| Large mixing bowl | Combining flour and liquid | Yes | Stand mixer bowl |
| Pasta machine (hand-crank or electric) | Rolling dough to uniform thickness | Highly recommended | Rolling pin and strong arms |
| Bench scraper | Cutting dough, cleaning work surface | Yes | Large knife |
| Plastic wrap or zip-lock bags | Resting dough without drying out | Yes | Damp towel |
| Cornstarch or potato starch | Dusting cut noodles to prevent sticking | Yes | Semolina flour |
| Sharp knife or noodle cutter attachment | Cutting noodles to desired width | Yes | Pizza cutter for wide noodles |
| Spray bottle | Adding water gradually to dough | Helpful | Measuring cup, added slowly |
| Stand mixer with dough hook | Kneading the stiff dough | Optional | Hand kneading (more labor-intensive) |
| Large pot | Boiling noodles | Yes | None |
The most impactful investment is a pasta machine. Ramen dough is extremely stiff — much stiffer than Italian pasta dough — and rolling it thin by hand requires significant effort. A basic hand-crank pasta machine (like an Atlas 150 or Marcato) works perfectly and typically costs under $40.
Ingredients: Understanding Every Component
Homemade ramen noodles use surprisingly few ingredients. Each one plays a critical role, and understanding them will help you customize your noodles for different ramen styles.
Flour
The protein content of your flour determines gluten development, which directly affects chew and texture. For ramen noodles, you want a flour with 10 to 13 percent protein. Bread flour (typically 12 to 13 percent) is the most commonly available option for home cooks and produces excellent results. All-purpose flour (10 to 11 percent) makes a softer, more tender noodle that works well for lighter broth styles.
Some serious ramen makers seek out high-gluten flour (14 percent and above) or Japanese noodle flours, but bread flour is the sweet spot for most home applications. You can also blend flours: 70 percent bread flour with 30 percent all-purpose creates a versatile, medium-textured noodle.
Kansui (Alkaline Mineral Water)
Kansui is the ingredient that makes ramen noodles taste like ramen. Traditional kansui is a solution of potassium carbonate (K₂CO₃) and sodium carbonate (Na₂CO₃) in water. You can find bottled kansui at Japanese grocery stores and online Asian ingredient retailers.
If you cannot find kansui, there is a reliable substitute: baked baking soda. When you bake regular baking soda (sodium bicarbonate, NaHCO₃) at 250°F (120°C) for one hour, it converts to sodium carbonate (Na₂CO₃), also called washing soda. Dissolved in water, this creates a workable substitute for kansui. The ratio is typically 1 to 2 percent of the flour weight.
Important safety note: Baked baking soda (sodium carbonate) is caustic. It can irritate skin and eyes. Handle it with care — do not inhale the powder, and wash your hands after handling. Once it is incorporated into dough and the noodles are cooked, it is completely safe to eat.
Salt
Salt strengthens the gluten network and adds flavor to the noodle itself. Most ramen noodle recipes call for 1 to 2 percent of the flour weight in salt. Fine sea salt or table salt dissolves more readily in the kansui solution.
Water
The hydration ratio — the percentage of water relative to flour weight — is one of the most important variables in ramen noodle making. Ramen noodles are typically made at very low hydration: between 28 and 40 percent. Compare this to Italian pasta at 45 to 55 percent or bread dough at 60 to 75 percent. This low hydration is what makes the dough so stiff and gives the noodles their dense, chewy texture.
Lower hydration (28 to 33 percent) produces thinner, firmer noodles suited to rich tonkotsu or heavy miso broths. Higher hydration (35 to 40 percent) creates softer, more pliable noodles better suited to lighter shoyu or shio broths.
Step-by-Step: How to Make Ramen Noodles from Scratch
This master recipe produces enough noodles for four generous servings. Once you are comfortable with the process, you can adjust hydration, thickness, and cut width to match any ramen style.
Master Recipe: Homemade Ramen Noodles
Yield: 4 servings (approximately 480 g of fresh noodles)
Active time: 45 minutes
Resting time: 30 minutes to 2 hours
Total time: 1 hour 15 minutes to 2 hours 45 minutes
Ingredients:
- 300 g bread flour (or a 70/30 blend of bread flour and all-purpose)
- 120 g water (40 percent hydration)
- 6 g baked baking soda (sodium carbonate) or 1 tablespoon liquid kansui
- 3 g fine salt
- Cornstarch or potato starch for dusting
Step 1: Prepare the Kansui Solution
If using baked baking soda, prepare it ahead of time: spread regular baking soda on a foil-lined baking sheet and bake at 250°F (120°C) for one hour. It will lose about a third of its weight and become a fine, grainy powder. Store in an airtight container — it keeps indefinitely.
Dissolve the baked baking soda (or liquid kansui) and salt into the measured water. Stir until completely dissolved. The solution will feel slippery between your fingers — that is the alkalinity at work.
Step 2: Mix the Dough
Place the flour in a large mixing bowl. Using a spray bottle or pouring very slowly in a thin stream, add the kansui solution to the flour while mixing with your other hand or a fork. Your goal is to distribute the liquid as evenly as possible throughout the flour.
At this point, the mixture will not look like dough. It will look like a bowl of shaggy, irregular crumbles — something between coarse sand and small pebbles. This is normal and expected at 40 percent hydration. Do not add more water. The dough will come together during kneading and resting.
Step 3: Knead the Dough
Turn the crumbly mixture out onto a clean work surface. Gather it into a rough mound and begin pressing it together with your palms. Use your body weight to compress and fold the dough repeatedly. This is hard work — the dough is extremely stiff.
Knead for 10 to 15 minutes by hand. The dough will gradually smooth out from a crumbly mess into a firm, smooth ball. If you have a stand mixer, use the dough hook on low speed for 8 to 10 minutes instead.
You can also use the pasta machine as a kneading aid: flatten the dough as much as you can by hand, pass it through the machine on the widest setting, fold it in thirds, rotate 90 degrees, and repeat. Ten to fifteen passes through the machine will develop the gluten thoroughly.
Step 4: Rest the Dough
Wrap the dough tightly in plastic wrap and let it rest at room temperature for at least 30 minutes, and preferably 1 to 2 hours. Resting allows the gluten to relax (making the dough easier to roll), and lets moisture distribute evenly throughout. Some ramen makers rest their dough overnight in the refrigerator for even better results.
After resting, you will notice the dough feels noticeably smoother and more pliable. The yellow color will have deepened as the alkaline reaction with the flour pigments continues.
Step 5: Roll the Dough
Divide the dough into four equal portions. Keep the pieces you are not working with wrapped to prevent drying.
Flatten one portion into a rough rectangle with your hands. If using a pasta machine, start on the widest setting and pass the dough through. Fold it in half, rotate 90 degrees, and pass through again. Repeat this folding-and-rolling process three to four times on the widest setting to further develop gluten and create a uniform sheet.
Then progressively reduce the thickness setting, passing the dough through each setting once or twice, until you reach your desired thickness:
- Thick noodles (tsukemen, miso ramen): Stop at setting 4 or 5 on most machines (about 2 mm)
- Medium noodles (shoyu, shio ramen): Stop at setting 5 or 6 (about 1.5 mm)
- Thin noodles (tonkotsu, hakata-style): Stop at setting 6 or 7 (about 1 mm)
If rolling by hand, use a heavy rolling pin and roll from the center outward, rotating the dough 90 degrees periodically for even thickness. Aim for a uniform sheet about 1 to 2 mm thick.
Step 6: Cut the Noodles
Dust the rolled sheet generously with cornstarch or potato starch on both sides. Fold the sheet loosely into thirds (like folding a letter), being generous with starch between layers.
Using a sharp knife, cut across the folded sheet to your desired width:
- Thin/straight (hosomen): 1 to 1.5 mm — classic Hakata-style tonkotsu
- Medium (chuumen): 2 to 3 mm — versatile, works with most broths
- Thick/wide (futomen): 4 to 5 mm — tsukemen dipping noodles, miso ramen
If you have a pasta machine cutter attachment, the narrow (spaghetti) cutter produces noodles around 2 mm, which works well for most ramen styles.
Immediately toss the cut noodles with additional starch and shake off the excess. Separate any noodles that stick together. Gather each portion into a loose nest.
Step 7: Cook the Noodles
Bring a large pot of water to a vigorous, rolling boil. You want plenty of water — at least 2 liters per serving — so the noodles have room to move and the water temperature does not drop too much when you add them.
Do not salt the cooking water. The noodles already contain salt and kansui, and you will be serving them in seasoned broth.
Shake off excess starch from the noodles and drop them into the boiling water. Stir immediately with chopsticks to separate any stuck noodles. Cook for 60 to 90 seconds for thin noodles, 90 seconds to 2 minutes for medium, and 2 to 3 minutes for thick noodles. The noodles are done when they are just tender but still have a firm bite at the center — what the Japanese call katamen (firm texture).
Drain thoroughly and add directly to your hot broth. Fresh ramen noodles wait for no one — serve immediately.
Common Mistakes and How to Avoid Them
Making homemade ramen noodles is straightforward once you understand the process, but these common pitfalls can trip up first-time noodle makers:
| Mistake | Why It Happens | How to Fix It |
|---|---|---|
| Dough is too crumbly and will not come together | Underhydration or uneven water distribution | Be patient — knead for a full 10 to 15 minutes. Use the pasta machine lamination method. If truly dry after extended kneading, mist with a spray bottle (1 to 2 g at a time) |
| Dough is too sticky and soft | Too much water added, or flour measured by volume instead of weight | Add flour 1 tablespoon at a time. Always weigh ingredients with a scale |
| Noodles tear when rolling through the pasta machine | Gluten has not relaxed enough, or rolling too fast between thickness settings | Rest the dough longer (at least 30 minutes). Do not skip thickness settings — go one step at a time |
| Noodles stick together after cutting | Insufficient starch dusting | Be generous with cornstarch or potato starch on every surface. Toss cut noodles immediately |
| Noodles are gummy or mushy | Overcooked, or too much water in the dough | Reduce cooking time. Start checking at 60 seconds. Use a lower hydration ratio next time |
| Noodles lack chew and feel like regular pasta | Missing or insufficient kansui/alkaline component | Ensure you are using baked baking soda (not regular) or proper kansui. Check that the baking soda was baked long enough |
| Noodles have a strong chemical or soapy taste | Too much kansui | Reduce kansui to 1 percent of flour weight. A slight mineral taste is normal; a strong chemical taste means too much |
| Dough springs back aggressively when rolling | Gluten is overdeveloped or not rested | Cover and rest for 15 to 30 minutes, then try again. The gluten will relax |
| Uneven noodle thickness | Dough sheet not uniform before cutting | Fold and re-roll through the pasta machine 3 to 4 times on the widest setting before progressing to thinner settings |
| Noodles break apart in the broth | Underdeveloped gluten | Knead longer or use more lamination passes through the pasta machine. Use bread flour instead of all-purpose |
Matching Noodle Styles to Broth Types
One of the great advantages of making your own ramen noodles is the ability to customize them for different ramen broth styles. Professional ramen shops obsess over noodle-broth pairing, and now you can too.
| Broth Style | Noodle Type | Hydration | Thickness | Why This Pairing Works |
|---|---|---|---|---|
| Tonkotsu (pork bone) | Thin, straight (hosomen) | 28-30% | 1-1.5 mm | Thin noodles cling to the thick, creamy broth, delivering flavor in every bite |
| Shoyu (soy sauce) | Medium, wavy (chuumen) | 33-36% | 2-3 mm | Wavy noodles trap the lighter broth in their curves, and the softer texture complements the delicate flavors |
| Shio (salt) | Medium-thin, straight | 33-36% | 1.5-2 mm | A clean, elegant noodle that does not overpower the subtle, clear broth |
| Miso | Thick, wavy or curly | 35-38% | 3-4 mm | Robust noodles stand up to the bold, hearty miso broth. The waves hold onto the thick soup |
| Tsukemen (dipping) | Extra thick, chewy | 35-40% | 4-5 mm | Thicker noodles have more surface area to pick up the concentrated dipping broth, and their chew is satisfying when eaten cold or room temperature |
| Tantanmen (sesame) | Medium, straight | 33-35% | 2-2.5 mm | Medium noodles balance the rich sesame and chili flavors without competing |
To create wavy noodles, there is a simple technique: after cutting the noodles, scrunch them together in your hands, pressing and compressing them. The noodles will crinkle and wave naturally. Alternatively, some cooks bunch the noodles together and press them with a bamboo rolling mat (makisu) to create more uniform waves.
The Science of Kansui: Why Alkalinity Matters
Understanding the science behind kansui helps you troubleshoot and customize. Here is what happens at the molecular level when you add an alkaline component to wheat flour dough:
Gluten structure: The elevated pH changes the electrical charge on gluten proteins (glutenin and gliadin), causing them to form a tighter, more elastic network. This is why ramen noodles are bouncier than regular pasta even at the same hydration level. The alkaline environment promotes more disulfide bonds between protein chains, creating a stronger matrix.
Starch behavior: At higher pH, wheat starch granules absorb water differently during cooking. They swell more slowly and resist gelatinization, which is why ramen noodles hold their texture in hot broth longer than other wheat noodles.
Color change: Wheat flour contains naturally occurring flavonoids (primarily chrysin and related compounds). These pigments are colorless at neutral pH but turn yellow in alkaline conditions. This is the same chemistry that turns blueberry juice green when you add baking soda. The yellower the noodle, the more alkaline the dough — which is why over-alkalinized noodles can look artificially bright.
Flavor development: The mineral, slightly eggy taste of ramen noodles comes directly from the alkaline salts. Different ratios of potassium carbonate to sodium carbonate produce subtly different flavors. Traditional kansui from Inner Mongolia (where the water is naturally alkaline and mineral-rich) is prized for its complex flavor profile.
Practice Exercises for Building Your Skills
Like any craft, making great ramen noodles takes practice. Here are five exercises to build your skills progressively:
Exercise 1: The Basic Batch
Make the master recipe exactly as written. Focus on learning the feel of the dough and getting comfortable with your pasta machine. Do not worry about perfection — eat the results with a simple ramen broth and enjoy the fact that you made noodles from scratch.
Exercise 2: The Hydration Experiment
Make three small batches at different hydration levels: 30 percent, 35 percent, and 40 percent. Use 100 g of flour for each. Compare how the dough feels, how easy it is to roll, and how the cooked noodles differ in texture. This will teach you more about ramen noodle science than any book.
Exercise 3: Cutting Precision
Make one batch and cut it into three different widths: thin (1 mm), medium (2 mm), and thick (4 mm). Cook each width with the same broth and notice how dramatically the width changes the eating experience. This exercise trains your cutting skills and helps you find your personal preference.
Exercise 4: Wavy vs. Straight
From a single batch, make half the noodles straight and half wavy (using the scrunching technique). Serve both in the same bowl or side by side. Pay attention to how the wavy noodles interact with the broth differently — they hold more liquid and have a different mouthfeel.
Exercise 5: Overnight Rest
Make a batch in the evening, wrap the dough tightly, and refrigerate overnight. Roll and cut the next day. Compare the texture and flavor to freshly made noodles from the same recipe. Many ramen makers find that an overnight rest produces a noticeably smoother, more flavorful noodle as the alkaline reaction and gluten relaxation continue over time.
Advanced Tips for Exceptional Ramen Noodles
Once you have the basics down, these techniques will elevate your homemade ramen noodles to the next level:
Aging the Noodles
After cutting, place the portioned noodle nests on a tray, cover loosely, and refrigerate for one to three days before cooking. During this time, the gluten continues to relax and the alkaline reaction deepens. Aged noodles cook more evenly and have a more developed flavor. Professional ramen shops typically age their noodles for one to two days.
Adding Egg for Richness
While traditional ramen noodles do not contain egg, some styles (particularly in Sapporo-style miso ramen) use egg for added richness and color. Replace 20 to 30 percent of the water weight with beaten egg. Note that this makes the dough slightly easier to work with but produces a more delicate noodle.
Whole Wheat and Alternative Flours
Substitute 10 to 20 percent of the bread flour with whole wheat flour for a nuttier, more complex flavor. Going beyond 20 percent will weaken the gluten structure. Some adventurous noodle makers use small amounts of rye flour or buckwheat flour for additional flavor complexity.
Freezing for Later
Fresh ramen noodles freeze exceptionally well. Portion the cut noodles into individual serving nests, dust generously with starch, place on a parchment-lined tray, and freeze until solid. Transfer to freezer bags, pressing out all air. They keep for up to two months. Cook directly from frozen — just add 30 seconds to the cooking time.
Adjusting Alkalinity
Start with 2 percent kansui (relative to flour weight) and adjust based on your preference. Less kansui (1 percent) produces a milder, wheat-forward noodle. More kansui (3 percent) creates a stronger, springier noodle with a more pronounced mineral flavor. Going above 3 percent risks an unpleasant soapy taste.
Recipe Examples: Three Bowls to Showcase Your Noodles
Now that you can make fresh ramen noodles, here are three complete bowls that showcase different noodle styles. For detailed broth-making instructions, see our complete guide to ramen broth.
Quick Shoyu Ramen (30 Minutes)
This simplified shoyu ramen uses a quick dashi-based broth enhanced with soy sauce and sesame oil.
- Noodles: Medium, wavy (35 percent hydration, 2 mm cut)
- Broth: 800 ml dashi (kombu and bonito), 3 tablespoons soy sauce, 1 tablespoon mirin, 1 teaspoon sesame oil
- Toppings: Soft-boiled egg, sliced scallions, nori, chashu pork
- Bring dashi to a simmer. Add soy sauce, mirin, and sesame oil. Cook noodles separately, drain, and add to bowls. Ladle hot broth over noodles. Top and serve immediately.
Spicy Miso Ramen (45 Minutes)
A hearty bowl featuring thick noodles and bold miso flavor.
- Noodles: Thick, wavy (38 percent hydration, 3 to 4 mm cut)
- Broth: 800 ml chicken stock, 4 tablespoons red or awase miso, 1 tablespoon chili oil, 1 tablespoon grated ginger, 2 cloves garlic (minced)
- Toppings: Corn kernels, bean sprouts, ground pork, butter, chili threads
- Sauté ginger and garlic in a pot, add stock, bring to a simmer. Dissolve miso into the broth (do not boil after adding miso). Add chili oil. Cook noodles separately, drain, add to bowls. Ladle broth and add toppings.
Cold Tsukemen (Dipping Noodles)
A summer-friendly style where cold noodles are dipped into a concentrated, rich broth.
- Noodles: Extra thick, chewy (40 percent hydration, 4 to 5 mm cut)
- Dipping broth: 400 ml concentrated pork and chicken stock (reduced by half), 3 tablespoons soy sauce, 1 tablespoon rice vinegar, 1 tablespoon sugar, fish sauce to taste
- Accompaniments: Chashu pork, nori, yuzu zest, sliced scallions
- Cook noodles until just done, then rinse under cold water until completely cool. This firms up the texture. Serve noodles on a plate or bamboo mat alongside a bowl of the warm, concentrated dipping broth.
Storing and Preserving Fresh Ramen Noodles
Fresh homemade ramen noodles are best cooked the day they are made, but you have several storage options:
- Same day: Dust generously with starch and keep in a sealed container at room temperature for up to 4 hours.
- Refrigerator: Place portioned noodle nests in a sealed container or zip-lock bag with generous starch dusting. They keep for 2 to 3 days. The texture may firm up slightly, which is actually desirable for some styles.
- Freezer: Flash-freeze individual nests on a parchment-lined tray, then transfer to freezer bags. Good for up to 2 months. Cook from frozen — do not thaw first.
- Drying: Hang noodles on a drying rack or lay them flat on a parchment-lined tray for 24 to 48 hours until completely dry and brittle. Store in an airtight container at room temperature for up to 1 month. These will need a longer cooking time (3 to 5 minutes).
Troubleshooting: Dial In Your Perfect Noodle
Ramen noodle making is an iterative process. Here is how to adjust your recipe based on results:
If your noodles are too soft: Reduce hydration by 2 to 3 percent. Use bread flour instead of all-purpose. Reduce cooking time. Add slightly more kansui (0.5 percent more).
If your noodles are too firm or tough: Increase hydration by 2 to 3 percent. Knead longer to develop gluten more evenly. Rest the dough longer before rolling. Consider using a flour blend with some all-purpose to reduce protein content.
If your noodles taste too alkaline: Reduce kansui by 0.5 percent increments. Make sure you are using the correct amount of baked baking soda (6 g per 300 g flour is a good starting point). Cook the noodles for 15 to 30 seconds longer — more cooking time dissipates some of the alkaline taste.
If your noodles lack flavor: Increase salt slightly (try 1.5 percent of flour weight). Rest the dough overnight in the refrigerator. Try using a higher-quality flour or a Japanese bread flour like Hokkaido-milled varieties.
If your noodles fall apart in broth: Increase kneading time. Use bread flour. Make sure you are not overcooking. Check that your kansui or baked baking soda is active — old baking soda that has not been properly baked will not provide enough alkalinity.
How Homemade Ramen Noodles Compare to Other Noodle Types
Understanding where ramen noodles sit in the broader noodle landscape helps you appreciate what makes them unique — and why they pair so well with specific broths and preparations. Here is how they compare to noodles you might already know how to make:
Compared to Italian pasta, ramen noodles use lower hydration and include an alkaline component, giving them more spring and chew. Where Italian pasta is designed to carry sauce on its surface, ramen noodles are designed to absorb and interact with broth.
Compared to hand-pulled noodles (la mian), ramen noodles are rolled and cut rather than stretched. La mian achieves its texture through extreme gluten development via stretching and relies on a different balance of alkaline salts. The two techniques share historical DNA — ramen evolved from Chinese noodle traditions — but the resulting noodles are distinct.
Compared to udon, ramen noodles are thinner, firmer, and more flavorful on their own. Udon noodles achieve their soft, pillowy chew through high hydration (45 to 50 percent) and foot-kneading rather than alkalinity. Udon is a blank canvas; ramen noodles are a deliberate flavor statement.
Frequently Asked Questions
Can I make ramen noodles without kansui or baked baking soda?
Technically yes, but the noodles will be more like Italian pasta than ramen. The alkaline component is what gives ramen its characteristic yellow color, springy texture, and mineral flavor. Without it, you are making a fine wheat noodle — just not a ramen noodle.
Is baked baking soda safe to eat?
Yes, absolutely. Sodium carbonate (baked baking soda) is used in many food applications, including pretzel making, Chinese noodle production, and as a food processing aid. Once incorporated into dough and cooked, it is completely safe. Just handle the dry powder with care, as it can irritate skin and eyes.
Why is my dough so hard to knead?
Ramen dough at 28 to 40 percent hydration is supposed to be stiff — much stiffer than bread dough or Italian pasta dough. This is normal. Use the pasta machine lamination technique to make kneading easier: pass the dough through on the widest setting, fold in thirds, rotate, and repeat 10 to 15 times. This develops gluten without exhausting your hands.
Can I use a food processor to mix the dough?
Yes, and many home ramen makers prefer it. Pulse the flour in a food processor while drizzling in the kansui solution. Pulse until the mixture forms small, uniform crumbles (about 30 to 45 seconds). Then transfer to a work surface and knead by hand or by pasta machine. The food processor distributes moisture more evenly than hand mixing.
How long do fresh ramen noodles keep?
In the refrigerator, 2 to 3 days. In the freezer, up to 2 months. Dried at room temperature, up to 1 month. For best results, cook them the day they are made or freeze them immediately after cutting.
Can I make ramen noodles with gluten-free flour?
Unfortunately, the gluten in wheat flour is essential to ramen noodle texture. Without gluten, the alkaline component cannot create the characteristic chew and spring. For a gluten-free noodle soup experience, consider rice noodles or glass noodles in your broth instead.
What is the difference between kansui water and lye water?
Kansui and lye water are related but different. Kansui is a solution of potassium carbonate and/or sodium carbonate. Lye water (used in some Chinese and Southeast Asian noodles and mooncakes) is a sodium hydroxide solution, which is more strongly alkaline. They are not interchangeable — lye water is much more caustic and used at much lower concentrations. For ramen, stick with kansui or baked baking soda.
Do I need a pasta machine?
Not strictly, but it makes the process dramatically easier and produces more consistent results. Ramen dough is very stiff and rolling it thin by hand requires significant effort and a heavy rolling pin. A basic hand-crank pasta machine costs under $40 and will last years. If you plan to make noodles more than once, it is a worthwhile investment.
Why are my noodles white instead of yellow?
The yellow color comes from the alkaline reaction with flour pigments. If your noodles are white, either you did not add enough kansui/baked baking soda, or your baking soda was not fully converted. Make sure you bake the baking soda at 250°F (120°C) for a full hour, and use at least 1.5 to 2 percent of flour weight.
Can I flavor the noodles with additions like spinach or turmeric?
Yes, though purists may object. Spinach powder (1 to 2 percent of flour weight) creates green noodles, and turmeric adds extra yellow color and a subtle earthy flavor. Reduce the water slightly to account for moisture in wet additions. Just keep in mind that these flavors will be subtle — the broth and toppings dominate the final bowl.
From Scratch to Bowl: Your Ramen Noodle Journey
Making homemade ramen noodles from scratch is one of the most rewarding Asian cooking techniques you can learn. The process is meditative, the science is fascinating, and the results — springy, chewy, golden noodles with that unmistakable alkaline bite — are genuinely better than anything you can buy at the store.
Start with the master recipe, practice the exercises, and do not be afraid to experiment. Adjust your hydration, play with thickness and cut, and taste the difference between wavy and straight. Every batch teaches you something new about the relationship between flour, water, alkalinity, and heat.
Pair your fresh noodles with a rich homemade broth, top with a perfect soft-boiled egg and sliced chashu, and you will have a bowl of ramen that rivals your favorite Japanese restaurant. That first slurp of noodles you made with your own hands — from flour and water and a little alkaline magic — is a moment you will not forget.

Mei Lin Chen
Mei Lin Chen is an Asian food writer and recipe developer. Melbourne-raised and London-based, she has spent over a decade exploring the rice paddies, hawker stalls, and home kitchens of South-East and East Asia. Her recipes balance traditional technique with everyday practicality.