Last updated: March 06, 2026
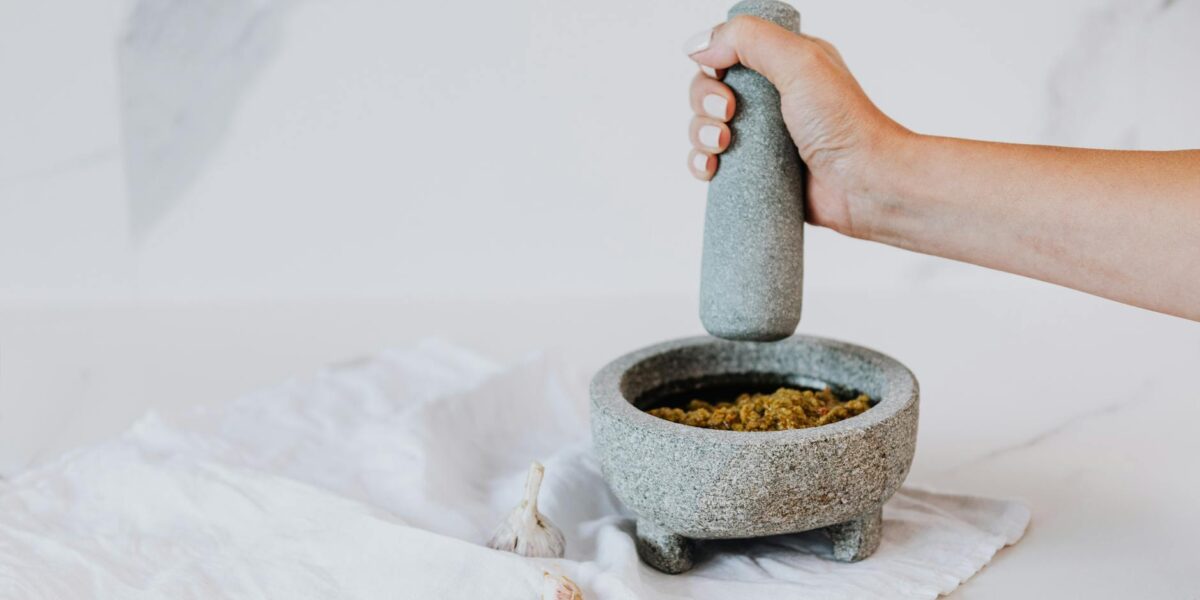
Walk into any Thai kitchen and the first thing you’ll notice is someone hunched over a granite mortar, pounding aromatics into a fragrant paste. Thai curry paste — prik gaeng — is the soul of Thai cooking, a concentrated flavor bomb that transforms coconut milk and protein into the curries that have made Thai food one of the most beloved cuisines on the planet. While store-bought jars are convenient, making Thai curry paste from scratch is a skill that will permanently change how you cook Thai food at home.
This guide covers everything you need to know about making Thai curry paste: the three major types (red, green, and yellow), the essential equipment, step-by-step techniques, common mistakes to avoid, and recipes that put your homemade paste to work. Whether you’re a complete beginner or someone who wants to level up beyond jarred paste, this is your complete roadmap.
What Is Thai Curry Paste?
Thai curry paste is a wet spice paste made by pounding together fresh aromatics — chili peppers, lemongrass, galangal, garlic, shallots, and other ingredients — into a smooth, intensely flavored base. Unlike Indian curry powders, which rely on dried ground spices, Thai curry pastes use fresh ingredients that create bright, layered flavors with a characteristic freshness that dried spice blends cannot replicate.
The paste serves as the foundation for virtually every Thai curry dish. When fried in oil or coconut cream, the paste blooms — its volatile compounds release, the sugars caramelize, and the raw pungency mellows into a complex, aromatic base. This process, called pad prik gaeng (stir-frying the curry paste), is the single most important step in making a great Thai curry.
There are dozens of regional curry pastes across Thailand, but the three most common — and the ones you’ll find in restaurants worldwide — are red curry paste (prik gaeng phet), green curry paste (prik gaeng khiao wan), and yellow curry paste (prik gaeng karee). Each has a distinct flavor profile, heat level, and set of traditional uses, though they share a common technique.
The Three Major Types of Thai Curry Paste
Understanding the differences between red, green, and yellow curry paste is the first step toward mastering Thai curries. Each paste uses a different combination of chilies and aromatics, producing distinct colors, heat levels, and flavor profiles.
| Feature | Red Curry Paste | Green Curry Paste | Yellow Curry Paste |
|---|---|---|---|
| Thai Name | Prik Gaeng Phet | Prik Gaeng Khiao Wan | Prik Gaeng Karee |
| Primary Chilies | Dried red spur chilies | Fresh green Thai chilies | Dried yellow/red chilies |
| Heat Level | Medium-hot | Hot (often the hottest) | Mild to medium |
| Flavor Profile | Deep, earthy, savory | Bright, herbaceous, sharp | Warm, fragrant, mellow |
| Color Source | Dried red chilies | Fresh green chilies + herbs | Turmeric + curry powder |
| Key Unique Ingredients | Shrimp paste, coriander root | Thai basil, makrut lime zest | Turmeric, curry powder, cinnamon |
| Classic Dishes | Red curry with duck, Panang curry | Green curry with chicken/eggplant | Yellow curry with potatoes |
| Best Proteins | Duck, beef, shrimp, tofu | Chicken, fish balls, pork | Chicken, fish, vegetables |
Red Curry Paste (Prik Gaeng Phet)
Red curry paste is arguably the most versatile of the three. It gets its color from dried red spur chilies (prik chee fa), which have moderate heat and a slightly sweet, fruity flavor. The paste typically includes lemongrass, galangal, garlic, shallots, coriander root, coriander seeds, cumin seeds, white peppercorns, shrimp paste, and makrut lime zest. The result is a deep, savory paste with rounded heat and earthy complexity. Red curry paste is the base for classic Thai red curry, Panang curry, and Massaman curry (which adds its own spices on top).
Green Curry Paste (Prik Gaeng Khiao Wan)
Green curry paste is the most herbaceous and often the spiciest. It relies on fresh green Thai bird’s eye chilies (prik kee noo) and green spur chilies, plus generous amounts of fresh cilantro root and stems, makrut lime zest, and sometimes Thai basil. The word wan in its Thai name means ”sweet,” not because of sugar but because of the aromatic sweetness from the fresh herbs. This paste powers Thai green curry, one of the most popular Thai dishes worldwide. The bright, punchy heat from fresh chilies gives green curry its distinctive kick — don’t be fooled by the color.
Yellow Curry Paste (Prik Gaeng Karee)
Yellow curry paste shows the Indian influence on Thai cooking. It uses turmeric (fresh or dried) and sometimes Madras curry powder alongside the standard Thai aromatics. The flavor is warmer, more fragrant, and gentler than red or green — think cinnamon, star anise, and cumin alongside the lemongrass and galangal. Yellow curry is often paired with potatoes, onions, and chicken, and is commonly served with roti or rice. It’s the most approachable Thai curry for beginners and people who prefer milder heat.
Essential Equipment for Making Thai Curry Paste
You have two main options for making curry paste: the traditional mortar and pestle, or a modern food processor. Both work, but they produce noticeably different results.
Mortar and Pestle (Krok Saak)
The granite mortar and pestle (krok saak) is the traditional tool and produces the best results. When you pound ingredients, you rupture cell walls and release essential oils in a way that cutting or blending cannot replicate. The paste develops a deeper, more unified flavor and a slightly coarser texture that fries beautifully. A Thai granite mortar is heavy (usually 8-12 pounds), with a rough interior that grips ingredients as you pound. Look for one that’s at least 8 inches in diameter — smaller mortars make the process frustratingly slow.
Food Processor or Blender
A food processor is faster and easier but produces a smoother, more homogeneous paste. The trade-off is a slightly less complex flavor — the blade cuts ingredients rather than rupturing them, so fewer aromatic oils are released. If using a food processor, you may need to add a tablespoon or two of oil or water to help the blade catch the ingredients. A mini food processor (3-4 cup capacity) works better than a full-size model for curry paste quantities.
Other Useful Tools
Beyond the primary grinding tool, you’ll want a sharp chef’s knife for prep work, a spice grinder (or clean coffee grinder) for toasting and grinding dry spices, a good wok for frying the paste, and small prep bowls for organizing your ingredients before you start pounding. A fine-mesh strainer is helpful for sifting ground spices.
Key Ingredients and Where to Find Them
The ingredient list for Thai curry paste may look long, but most components are easy to find at Asian grocery stores. Here’s what you need and why each ingredient matters.
Dried red chilies — The backbone of red and yellow curry pastes. Look for Thai dried spur chilies (prik chee fa haeng), which are mild and fruity. Soak them in warm water for 15-20 minutes before using. For extra heat, add a few dried bird’s eye chilies.
Fresh green chilies — Essential for green curry paste. Thai green bird’s eye chilies and green spur chilies provide the color and heat. If you can’t find Thai varieties, serrano peppers are a reasonable substitute, though less aromatic.
Lemongrass — Use only the bottom 3-4 inches of the stalk, after removing the tough outer layers. Slice thinly before pounding. Lemongrass provides the citrusy, floral backbone of every Thai curry paste.
Galangal — A rhizome related to ginger but with a sharper, more piney flavor. Fresh galangal is essential — dried or powdered galangal is a poor substitute. Peel and slice thinly before using.
Garlic and shallots — Thai garlic cloves are smaller and more pungent than Western varieties. Use about twice as many cloves if using regular garlic. Thai shallots (hom daeng) are small, reddish-purple, and intensely flavored.
Coriander root — Often discarded in Western cooking, coriander root is a critical ingredient in Thai curry paste. It has a deep, earthy flavor distinct from cilantro leaves or stems. If unavailable, use a ratio of 2 parts cilantro stems to 1 part coriander seeds as a substitute.
Makrut lime zest — The zest of the makrut lime (sometimes called kaffir lime) adds an unmistakable citrus perfume. Use only the green outer zest, not the white pith. If unavailable, regular lime zest plus a few makrut lime leaves can approximate the flavor.
Shrimp paste (kapi) — Fermented shrimp paste provides the deep umami foundation. Thai kapi is milder and smoother than Malaysian belacan. A little goes a long way. For a vegan alternative, use fermented soybean paste or white miso mixed with a dash of soy sauce.
Dry spices — Coriander seeds, cumin seeds, and white peppercorns are toasted and ground before being added to the paste. Always toast and grind whole spices fresh rather than using pre-ground versions — the difference in aroma is dramatic.
Turmeric — Used primarily in yellow curry paste, fresh turmeric root gives a vibrant golden color and warm, slightly bitter flavor. Dried turmeric powder works but contributes a slightly dusty note. Fresh turmeric will stain everything it touches, so wear gloves.
How to Make Red Curry Paste: Step-by-Step
Red curry paste is the best starting point for beginners because it uses dried chilies (which are easier to work with than fresh) and has the most balanced flavor profile. This recipe makes about 1/2 cup of paste — enough for one large batch of curry serving 4-6 people.
Ingredients
- 10-12 dried red spur chilies, seeds removed, soaked in warm water for 20 minutes
- 1 tablespoon coriander seeds
- 1 teaspoon cumin seeds
- 5-6 white peppercorns
- 2 stalks lemongrass (bottom 3-4 inches only), thinly sliced
- 1-inch piece galangal, peeled and sliced
- 4 cloves garlic
- 3 small shallots (or 1 large), roughly chopped
- 2 coriander roots (or 3 tablespoons cilantro stems)
- Zest of 1 makrut lime (or 1 regular lime)
- 1 teaspoon shrimp paste (kapi)
- 1/2 teaspoon salt
Step 1: Toast and Grind the Dry Spices
Place the coriander seeds, cumin seeds, and white peppercorns in a dry skillet over medium heat. Toast for 2-3 minutes, shaking the pan frequently, until the spices become fragrant and the coriander seeds darken slightly. Transfer immediately to a plate to cool — they’ll continue toasting from residual heat if left in the pan. Once cool, grind to a fine powder using a spice grinder or the mortar and pestle. Set aside.
Step 2: Prepare and Drain the Chilies
After soaking for 20 minutes, drain the chilies and squeeze out excess water. Pat dry with paper towels. Excess moisture will make the paste watery and affect how it fries later. If you want a milder paste, remove all seeds. For more heat, leave some seeds in. Cut the chilies into rough pieces.
Step 3: Pound or Process the Paste
Mortar and pestle method: The traditional order matters. Start with the hardest, most fibrous ingredients first. Add the salt (it acts as an abrasive) along with the lemongrass and pound until it breaks down into fibers. Add the galangal and continue pounding. Next add the garlic and shallots, followed by the coriander root. Once these form a rough paste, add the drained chilies and pound until smooth. Finally, add the ground dry spices, makrut lime zest, and shrimp paste. Pound everything together until completely smooth and homogeneous. This takes 15-25 minutes of steady pounding.
Food processor method: Add all ingredients to the food processor at once. Pulse several times to break down the larger pieces, then process continuously for 2-3 minutes, scraping down the sides every 30 seconds. Add 1-2 tablespoons of neutral oil if the blade isn’t catching the ingredients. Process until as smooth as possible. The paste won’t be quite as smooth as the mortar version, but it will still make excellent curry.
Step 4: Test the Paste
Fry a small spoonful of the paste in a tablespoon of oil for 30 seconds, then taste. Adjust seasoning: add more chilies for heat, more shrimp paste for depth, or more salt to brighten the flavors. The paste should smell intensely aromatic and taste savory, spicy, and slightly salty — it will mellow when cooked with coconut milk.
How to Make Green Curry Paste
Green curry paste follows the same basic technique as red but uses fresh green chilies instead of dried red ones. This changes the flavor dramatically — green paste is brighter, more herbaceous, and often hotter.
Ingredients
- 15-20 fresh green Thai bird’s eye chilies
- 5-6 fresh green spur chilies (or serrano peppers)
- 1 tablespoon coriander seeds (toasted and ground)
- 1 teaspoon cumin seeds (toasted and ground)
- 5 white peppercorns (toasted and ground)
- 3 stalks lemongrass (bottom 3-4 inches), thinly sliced
- 1-inch piece galangal, peeled and sliced
- 6 cloves garlic
- 4 small shallots, chopped
- 3 coriander roots with stems (or 1/4 cup cilantro stems)
- Zest of 2 makrut limes
- 1 teaspoon shrimp paste
- 1/2 teaspoon salt
- Handful of Thai basil leaves (optional, for extra color)
Follow the same pounding order as red curry paste: salt and lemongrass first, then galangal, garlic and shallots, coriander root, and finally the fresh chilies. Fresh chilies break down faster than dried, so the total pounding time is slightly shorter — about 12-20 minutes. Add the Thai basil leaves at the very end if using, and pound just until incorporated. Process the ground spices, lime zest, and shrimp paste last.
The finished paste should be vivid green. If it looks pale, you can add a small handful of blanched spinach or extra cilantro — this is a common restaurant trick that doesn’t significantly affect flavor.
How to Make Yellow Curry Paste
Yellow curry paste is the mildest of the three and the most influenced by Indian spice traditions. It adds turmeric and sometimes Madras curry powder to the standard Thai aromatics, creating a warming paste that pairs beautifully with potatoes, onions, and chicken.
Ingredients
- 5-6 dried red spur chilies, soaked and drained
- 1 tablespoon coriander seeds (toasted and ground)
- 1 teaspoon cumin seeds (toasted and ground)
- 1/2 teaspoon fenugreek seeds (toasted and ground)
- 2 stalks lemongrass (bottom 3-4 inches), sliced
- 1-inch piece galangal, peeled and sliced
- 2-inch piece fresh turmeric, peeled and sliced (or 1 tablespoon turmeric powder)
- 4 cloves garlic
- 3 small shallots, chopped
- 1 teaspoon shrimp paste
- 1 teaspoon Madras curry powder (optional)
- 1/2 teaspoon cinnamon
- 1/2 teaspoon salt
The technique is identical to red curry paste. The fresh turmeric should be added after the garlic and shallots. If using turmeric powder instead, add it at the end with the dry spices. The finished paste will be golden-yellow and fragrant with warm spice notes that differentiate it sharply from red and green pastes.
Common Mistakes When Making Thai Curry Paste
Making curry paste from scratch is straightforward, but a few common mistakes can significantly affect the final result. Here are the most frequent issues and how to fix them.
| Mistake | Why It Happens | How to Fix It |
|---|---|---|
| Paste is too coarse or fibrous | Lemongrass and galangal weren’t sliced thin enough before pounding | Slice lemongrass paper-thin and galangal as thin as possible. Pound these first until fully broken down before adding other ingredients |
| Paste tastes raw or harsh | Paste wasn’t fried long enough before adding liquid | Fry paste in coconut cream or oil for 3-5 minutes over medium heat until fragrant and the oil separates. This step is critical |
| Curry lacks depth or tastes flat | Skipping shrimp paste or using pre-ground spices | Always use shrimp paste for umami. Toast and grind whole spices fresh — pre-ground spices lose potency within weeks |
| Green paste turns brown | Oxidation from over-processing or slow pounding | Work quickly with fresh green chilies. Add a few blanched spinach leaves for color stability. Use immediately or freeze |
| Paste is too watery | Soaked chilies or wet ingredients weren’t drained properly | Squeeze soaked chilies dry and pat with paper towels. Avoid adding water to the mortar — use oil sparingly in a food processor instead |
| Too spicy or not spicy enough | Not adjusting chili quantity or seed content | Remove all seeds for mild paste. For more heat, add bird’s eye chilies. Always do a fry-and-taste test before committing |
| Burned dry spices | Toasting at too high heat or not stirring | Use medium heat and shake the pan constantly. Remove spices from the pan immediately when fragrant — they burn quickly |
| Paste doesn’t emulsify into curry | Adding coconut milk too fast, or using thin coconut milk to fry | Fry paste in coconut cream (the thick layer on top of the can) first. Add thin coconut milk gradually after the paste is fragrant |
How to Cook with Thai Curry Paste
Having great paste is only half the equation. How you cook with it determines whether your curry tastes like a Thai restaurant or a watered-down imitation.
The Frying Step (Pad Prik Gaeng)
This is the most important step in Thai curry making and the one most home cooks skip or rush. Heat your wok or pan over medium-high heat. Scoop the thick coconut cream from the top of an unshaken can of coconut milk and add it to the pan. Let it simmer until the oil starts to separate from the solids — this takes 3-5 minutes and is called ”cracking” the coconut cream.
Add 2-4 tablespoons of curry paste (depending on your heat preference and serving size) and stir-fry vigorously in the cracked coconut cream. The paste should sizzle and become very fragrant. You’ll see the oil turn the color of the paste — red, green, or yellow — and the raw smell will transform into a deep, roasted aroma. This takes 3-5 minutes. Do not rush this step. If the paste starts to stick, reduce the heat slightly.
Building the Curry
Once the paste is fried, add your protein and stir to coat it in the paste. Cook for 1-2 minutes, then add the remaining coconut milk (the thin liquid from the can). Season with fish sauce, palm sugar (or brown sugar), and a squeeze of lime. Add vegetables that need longer cooking (like potatoes, carrots, or eggplant) now. Simmer for 10-20 minutes until the protein is cooked and the vegetables are tender.
Add quick-cooking vegetables (Thai basil, bell peppers, snap peas) in the last 2-3 minutes. Taste and adjust: more fish sauce for salt, more sugar for sweetness, more lime for brightness. A great Thai curry has a balance of salty, sweet, spicy, and sour — no single flavor should dominate.
Storing and Freezing Curry Paste
Homemade curry paste stores well and actually improves slightly over the first day as flavors meld.
Refrigerator: Transfer paste to a clean jar and press plastic wrap directly onto the surface to prevent oxidation. It keeps for 2-3 weeks in the fridge. The paste may darken slightly, but the flavor remains excellent.
Freezer: Freeze paste in ice cube trays for perfectly portioned amounts. Each cube is roughly 1-2 tablespoons — about one serving’s worth. Once frozen, pop the cubes out and store in a freezer bag. Frozen paste keeps for 3-6 months. Cook directly from frozen — no need to thaw. You can also freeze in tablespoon-sized dollops on a parchment-lined baking sheet.
Oil seal method: For longer refrigerator storage, press the paste into a jar and pour a thin layer of neutral oil over the top. This creates an oxygen barrier that prevents browning and extends shelf life to about 4-5 weeks.
Practice Exercises for Beginners
If you’re new to making curry paste from scratch, here are five progressive exercises to build your skills.
Exercise 1: Pound aromatics only. Start with just lemongrass, galangal, garlic, and shallots in a mortar. Practice the pounding technique until you can reduce them to a smooth paste in under 10 minutes. This builds the muscle memory and rhythm you need without wasting expensive ingredients.
Exercise 2: Make a simple red curry paste. Follow the red curry paste recipe above, using the full mortar and pestle method. Time yourself. Most beginners take 25-35 minutes the first time. Your goal is to get below 20 minutes with practice.
Exercise 3: Compare mortar vs. food processor. Make the same red curry paste recipe using both methods side by side. Cook a small curry with each and taste the difference. This teaches you when the extra effort of pounding is worth it and when the processor is good enough.
Exercise 4: Make green curry paste. Working with fresh chilies is different from dried. The paste is wetter, the pounding rhythm changes, and you need to work faster to preserve color. Make a green paste and use it to cook Thai green curry.
Exercise 5: Develop your own blend. Once comfortable with the three classic pastes, try modifying a recipe. Add extra makrut lime zest for brightness, throw in some toasted peanuts for a quick Panang-style paste, or incorporate fermented shrimp paste and tamarind for a southern Thai-style sour curry. Understanding how each ingredient contributes to the whole lets you create custom pastes tailored to your taste.
Advanced Tips for Better Curry Paste
Once you’ve mastered the basics, these techniques will take your curry paste from good to exceptional.
Dry-roast your shallots and garlic. Before adding them to the mortar, char whole unpeeled shallots and garlic cloves in a dry wok or over an open flame until the skins are blackened and the insides are soft. This adds a smoky sweetness and extra depth to the paste — it’s a technique used in many regional Thai pastes, especially in northern and northeastern styles.
Make your own chili blend. Don’t limit yourself to a single type of chili. Many Thai cooks combine different dried chilies for complexity — large, mild prik chee fa for body and color, small prik kee noo haeng for heat, and sometimes a few ancho or guajillo chilies for fruity, smoky notes. Blending chilies is how restaurants create signature paste flavors.
Toast your shrimp paste. Wrap a portion of shrimp paste in aluminum foil and toast it in a dry pan or under the broiler for 1-2 minutes per side. This intensifies the umami, mellows the raw fermented smell, and makes the paste easier to incorporate.
Use a slow pounding rhythm. The ideal mortar technique is a firm, downward stroke followed by a slight grinding twist at the bottom. Avoid fast, light tapping — it splatters ingredients without breaking them down. Pound with your shoulder and arm, not your wrist, to avoid fatigue. The pestle should touch the bottom of the mortar with each stroke.
Season your paste aggressively. Remember that the paste will be diluted by coconut milk, protein, and vegetables. It should taste almost too salty and too spicy on its own — this ensures the finished curry has proper seasoning. Always do a fry-and-taste test before adding the paste to a full curry.
Bloom your paste longer than you think. Most home cooks fry the paste for 30-60 seconds. Thai cooks fry it for 3-5 minutes or longer, until the oil turns bright with the paste’s color and the aroma fills the kitchen. This patient frying step is the single biggest difference between a mediocre curry and a great one.
Recipe Examples Using Homemade Curry Paste
Homemade curry paste isn’t limited to traditional coconut curries. Here are several ways to put your paste to work.
Quick Thai Red Curry with Shrimp
Crack 1/2 cup coconut cream in a wok. Add 3 tablespoons red curry paste and fry for 3 minutes. Add 1 pound of shrimp and toss until pink. Add 1 can coconut milk, 2 tablespoons fish sauce, 1 tablespoon palm sugar, and sliced Thai eggplant or bamboo shoots. Simmer for 5 minutes. Finish with Thai basil and a squeeze of lime. Serve over jasmine rice.
Green Curry Fried Rice
Heat oil in a wok over high heat. Add 2 tablespoons green curry paste and stir-fry for 1 minute. Add 3 cups day-old cooked rice and toss vigorously. Add 1 tablespoon fish sauce, 1 teaspoon sugar, and stir-fry for 2-3 minutes until the rice is evenly coated and slightly crispy. Top with a fried egg, sliced cucumber, and Thai basil. This is a brilliant way to use leftover paste and cold rice — check our fried rice recipe for more techniques.
Yellow Curry Chicken with Potatoes
Crack coconut cream and fry 3 tablespoons yellow curry paste until fragrant. Add 1 pound cubed chicken thigh and sear for 2 minutes. Add 1 can coconut milk, 2 diced potatoes, and 1 diced onion. Season with fish sauce, sugar, and a pinch of tamarind. Simmer for 20-25 minutes until the potatoes are tender. Serve with roti canai or steamed rice.
Curry Paste Marinades
Mix 2 tablespoons of any curry paste with 1/4 cup coconut milk, 1 tablespoon fish sauce, and 1 tablespoon oil. Use as a marinade for chicken, pork, or tofu for 30 minutes to 2 hours. Grill, broil, or pan-fry. The paste creates a beautifully spiced crust that’s impossible to achieve with dry spice rubs alone.
Curry Paste Stir-Fry Sauce
Dissolve 1-2 tablespoons curry paste into 2 tablespoons oil and use it as the base for any stir-fry. It adds instant depth and complexity to simple vegetable or noodle stir-fries. Try it with rice noodles, snap peas, and prawns for a quick weeknight dinner.
Homemade vs. Store-Bought Curry Paste
Is it worth making curry paste from scratch when good brands like Mae Ploy, Maesri, and Aroy-D are readily available? The honest answer: it depends on the situation.
Homemade paste has a brighter, more complex flavor with fresher aromatics. The aroma is noticeably different — more lemongrass and galangal, less one-dimensional heat. Store-bought paste is more consistent, shelf-stable, and convenient for weeknight cooking. Many excellent Thai restaurants actually use a combination: a commercial base enhanced with freshly pounded aromatics.
For a special dinner party or when cooking a single-curry meal, homemade paste is absolutely worth the effort. For quick Tuesday-night dinners, a quality jarred paste is perfectly respectable. The best approach for most home cooks is to make a large batch of paste on the weekend, freeze it in portions, and use it throughout the month — giving you homemade quality with jarred convenience.
Frequently Asked Questions
Can I make Thai curry paste without shrimp paste?
Yes. For a vegetarian or vegan version, substitute shrimp paste with an equal amount of fermented soybean paste (tao jiao) or white miso. Add a dash of soy sauce for extra umami. The flavor profile will be slightly different but still delicious. Some cooks add a small piece of dried seaweed for that sea-like depth.
How spicy is homemade Thai curry paste?
That’s entirely up to you — one of the biggest advantages of making your own paste. For a mild paste, use large dried spur chilies with all seeds removed. For authentic Thai heat, add bird’s eye chilies. Remember that the heat is diluted significantly by coconut milk, so the paste should taste spicier than you want the finished curry to be.
What’s the best mortar and pestle for Thai curry paste?
A heavy granite mortar and pestle, at least 8 inches wide and 4-5 inches deep. Thai-style granite sets (look for ”krok saak”) are ideal because the interior is rough-textured, which grips ingredients better than polished stone. Avoid marble, wood, or ceramic mortars — they’re too smooth for effective curry paste pounding.
Can I substitute ingredients I can’t find?
Some substitutions work better than others. Serrano peppers for Thai chilies: acceptable. Regular ginger for galangal: not ideal, as they taste quite different, but passable. Lime zest for makrut lime zest: fine for beginners. Cilantro stems for coriander root: good substitute. The one ingredient with no real substitute is lemongrass — it’s the backbone of the paste, so source it if at all possible.
How much curry paste should I use per serving?
A general rule is 1-2 tablespoons of paste per serving, or 3-4 tablespoons per can of coconut milk. Taste as you go — homemade paste varies in intensity depending on the chilies, so a fixed ratio doesn’t always work. Start with less and add more after frying and tasting.
Why does my curry paste taste different from restaurant curry?
The most common reasons: not frying the paste long enough (3-5 minutes minimum), not cracking the coconut cream before adding the paste, using thin coconut milk instead of cream for frying, or not seasoning aggressively enough with fish sauce and sugar. Thai curries need a careful balance of salty, sweet, spicy, and sour — most home cooks under-season.
Can I use Thai curry paste for non-curry dishes?
Absolutely. Mix curry paste into marinades for grilled meats, stir it into mayo or butter for a spiced spread, blend it into salad dressings, add it to fried rice, or dissolve it into hot broth for a quick soup base. Curry paste is one of the most versatile condiments you can have in your fridge.
What’s the difference between Panang curry paste and red curry paste?
Panang curry paste is essentially a red curry paste with the addition of roasted peanuts and extra makrut lime zest. It’s richer and slightly sweeter, with a thicker sauce that clings to the protein. If you have red curry paste, you can make Panang by adding a tablespoon of ground roasted peanuts and extra lime zest to your base paste.
Master the Paste, Master Thai Cooking
Learning to make Thai curry paste from scratch is one of the most rewarding skills in Asian home cooking. It connects you directly to the flavors and traditions of Thai cuisine in a way that opening a jar never can. The first time you pound lemongrass and galangal in a mortar and smell those oils release, you’ll understand why Thai cooks have been doing it this way for centuries.
Start with a simple red curry paste. Practice the technique. Taste the difference against your usual store-bought brand. Once you experience the brightness and depth of a freshly pounded paste, you’ll find it hard to go back. Then branch out to green and yellow, experiment with your own blends, and explore the dozens of regional Thai pastes — from the fiery southern sour curry pastes to the herb-heavy northern varieties.
The mortar and pestle is waiting. Your Thai curries are about to get a whole lot better.

Mei Lin Chen
Mei Lin Chen is an Asian food writer and recipe developer. Melbourne-raised and London-based, she has spent over a decade exploring the rice paddies, hawker stalls, and home kitchens of South-East and East Asia. Her recipes balance traditional technique with everyday practicality.