*Last Updated: 2026-03-23*
Our **kimchi recipe** has been tested across two kitchens — Melbourne and London — and refined through dozens of batches until we landed on a method that respects the original while being genuinely accessible for home cooks.
> **Key Takeaways**
> – Authentic kimchi starts with napa cabbage salted for at least two hours to build the right texture and microbial environment.
> – Fermentation begins within 12–24 hours and develops its best character between day 5 and day 10 at room temperature (18–22 °C).
> – A 2 kg cabbage yields approximately 1.5 kg of finished kimchi — enough for a month of meals as a side dish.
> – Kimchi stays enjoyable for up to six months in the refrigerator, and the flavour deepens considerably over time.
> – A vegan version using mushroom soy sauce and kelp broth works remarkably well without sacrificing depth.
—
## What Is Kimchi? A Brief Cultural History
Kimchi is not a single dish — it is a category. It refers to any salted, fermented vegetable preparation made using Korean techniques, and it has been part of Korean daily life for well over a thousand years. The earliest recorded forms used only salt and vegetables; gochugaru (Korean red pepper flakes) did not enter the picture until chillies arrived on the Korean Peninsula from the Americas via trade routes in the early 17th century. That addition transformed kimchi from a relatively simple preserved vegetable into the complex, fiery staple we know today.
What sets kimchi apart from other fermented foods is the specific microbial ecosystem it cultivates. The fermentation is driven primarily by lactic-acid bacteria — in particular, species within the *Lactobacillus* genus — which convert sugars into lactic acid, creating the characteristic sour, tangy flavour while also making the food safe and shelf-stable. Research published in the *Journal of Medicinal Food* identifies over 200 microbial strains active during kimchi fermentation, with *Lactobacillus plantarum* and *Leuconostoc mesenteroides* among the most prominent contributors to both flavour and probiotic activity.
### Kimjang — the UNESCO-Recognised Community Tradition
In November 2013, UNESCO inscribed Kimjang — making and sharing kimchi in the Republic of Korea on its Representative List of the Intangible Cultural Heritage of Humanity. Kimjang refers to the seasonal, communal practice of preparing large quantities of kimchi in late autumn, typically November and December, before the deep winter sets in. Neighbours, extended families, and community groups gather to salt and season hundreds of kilograms of cabbage together — the labour shared, the outcome divided equally.
What UNESCO recognised was not just a food tradition, but a social institution. Kimjang reinforces solidarity, ensures food security for the coming winter, and transmits knowledge across generations in a way that no recipe book fully can. When we make kimchi at home, even in a small London flat, we are — in a modest way — participating in that same unbroken thread.
### The 200+ Varieties of Kimchi You Should Know
Korea has over 200 documented regional varieties of kimchi, each shaped by local climate, available produce, and family tradition. Along the southern coast, kimchi tends to be saltier and more heavily seasoned to withstand warmer temperatures. Northern regions historically made milder, less salty versions suited to colder winters. Beyond geography, the main varieties include kkakdugi (diced radish kimchi), oi sobagi (stuffed cucumber kimchi), nabak-kimchi (water kimchi with a light, clean brine), and yeolmu kimchi (young radish kimchi). Our guide to [Asian cooking ingredients](/asian-cooking-ingredients/) covers several of the harder-to-source items you will encounter across these styles.
### Why Baechu-Kimchi Is the One We Start With
Baechu-kimchi — whole napa cabbage kimchi — is the variety most people mean when they say kimchi. Napa cabbage offers a sturdy, layered texture that holds paste between every leaf without turning mushy over weeks of fermentation. Its mild, slightly sweet flavour provides an honest base for the bold combination of gochugaru, garlic, fish sauce, and aromatics. It is forgiving for beginners, scales easily, and teaches you every core technique you will use for any other variety. We always return to it.
—
## Ingredients for a Kimchi Recipe (What You Actually Need)
Good kimchi starts with honest ingredients. There are no shortcuts worth taking on the core three — cabbage, salt, and gochugaru — but the supporting cast allows more flexibility than you might expect.
### The Non-Negotiables: Napa Cabbage, Salt, and Gochugaru
Napa cabbage (also called Chinese leaf in UK supermarkets) is the foundation. Look for a firm, heavy head with tightly packed leaves — loose, wilted heads will ferment unevenly. The salt must be non-iodised; iodised table salt inhibits lactic-acid bacteria and can prevent proper fermentation. Korean coarse sea salt (cheonilyeom) is ideal, but any coarse non-iodised sea salt works. Gochugaru is Korean red pepper flakes — not chilli powder, not cayenne. The texture is coarser and the flavour more complex, with a mild sweetness underneath the heat. It is widely available online and in Asian grocery stores; our [Asian cooking ingredients guide](/asian-cooking-ingredients/) lists reliable UK suppliers.
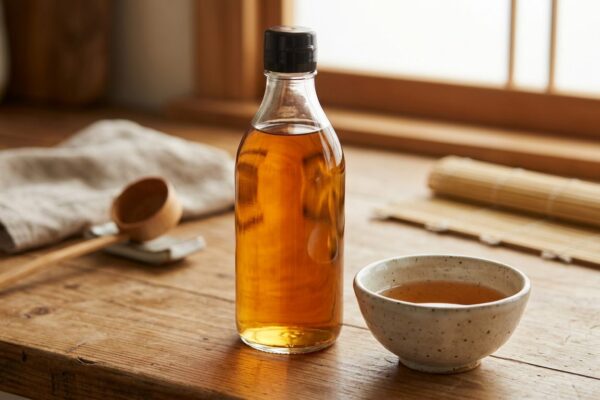
### The Umami Layer: Fish Sauce, Salted Shrimp, and the Vegan Swap
Traditional baechu-kimchi uses two fermented seafood products: fish sauce (aekjeot) and salted fermented shrimp (saeujeot). Together they deliver that deep, saline, oceanic umami that makes kimchi taste like more than the sum of its parts — think of them as the bass line beneath the melody of gochugaru and garlic. For a fully plant-based version, we use a combination of mushroom soy sauce and kelp granule broth. The swap works well because kelp provides a comparable mineral depth, and mushroom soy adds the fermented, salty character. It will not be identical to the traditional version, but it is genuinely good kimchi in its own right.
### Aromatics and Vegetables That Build the Flavour
Garlic and ginger are non-negotiable aromatics — use fresh, not pre-minced from jars. Scallions (spring onions) add a sharp, grassy note and contribute to the visual appeal of the finished kimchi. Korean radish (mu) adds crunch and a pleasant peppery sweetness; daikon is a fair substitute. Some home cooks add a small amount of Asian pear or grated apple for natural sweetness and to help soften the cabbage slightly during fermentation. It is optional, but we include half a pear in our standard batch.
| Ingredient | Quantity | Notes |
|————|———-|——-|
| Napa cabbage | 2 kg (1 large head) | Cut into 2-inch squares |
| Korean coarse sea salt (non-iodised) | 80 g (approx. 3 Tbsp) | For the brine |
| Gochugaru | 80 g (approx. ½ cup) | Adjust to heat preference |
| Fish sauce | 60 ml (¼ cup) | Or mushroom soy + kelp broth for vegan |
| Salted fermented shrimp (saeujeot) | 30 g (2 Tbsp) | Omit for vegan version |
| Garlic | 6 cloves, minced | Fresh only |
| Fresh ginger | 2 Tbsp, grated | Approximately a 4 cm knob |
| Scallions | 4, sliced diagonally | |
| Korean radish or daikon | 300 g, julienned | |
| Asian pear (optional) | ½, grated | Adds sweetness and softens cabbage |
| Sugar | 1 tsp | Supports fermentation |
| Water | 4 L | For the initial brine |
—
## How to Make Kimchi: Our Step-by-Step Method
### Step 1 — Salting the Cabbage (the Most Important Stage)
This stage is not just about adding salt — it is about drawing moisture from the cabbage, creating the correct saline environment for lactic-acid bacteria to thrive, and softening the leaves so they can be coated evenly with paste.
1. Dissolve 80 g of coarse non-iodised sea salt in 4 L of cold water in a large non-reactive bowl (glass, ceramic, or food-safe plastic).
2. Cut the napa cabbage into roughly 2-inch square pieces, discarding the very base.
3. Submerge the cabbage pieces in the brine, pressing them down. Cover with a plate if needed to keep everything submerged.
4. Leave for 2 hours, turning the cabbage once halfway through. You want the leaves to become limp and pliable — they should bend without snapping.
5. Taste a piece. It should be pleasantly salty but not overwhelming. If it is intensely salty, rinse longer; if barely salty, add another 15–20 minutes in brine.
6. Drain in a colander, rinse briefly under cold running water, and let drain thoroughly for 15 minutes. Squeeze out any excess moisture with your hands.
### Step 2 — Making the Kimchi Paste (Yangnyeom)
The paste is where personality enters the recipe. Every Korean household has its own proportions; ours errs toward garlic-forward with moderate heat.
1. Add garlic, ginger, and optional grated pear to a food processor. Pulse until coarsely blended — you want texture, not a smooth purée.
2. Transfer to a large mixing bowl. Add fish sauce (or vegan alternative), salted shrimp, sugar, and julienned radish.
3. Gradually fold in the gochugaru, starting with 60 g and adding more to taste. The paste should be deep red, fragrant, and coarse — picture the colour of a setting sun.
4. Add sliced scallions and fold gently to combine. If the paste feels too dry, stir in a tablespoon or two of the reserved cabbage brine.
5. Taste the paste directly. It should be spicy, salty, and deeply savoury. Adjust with more gochugaru for heat, fish sauce for salt, or a pinch of sugar if it feels sharp.
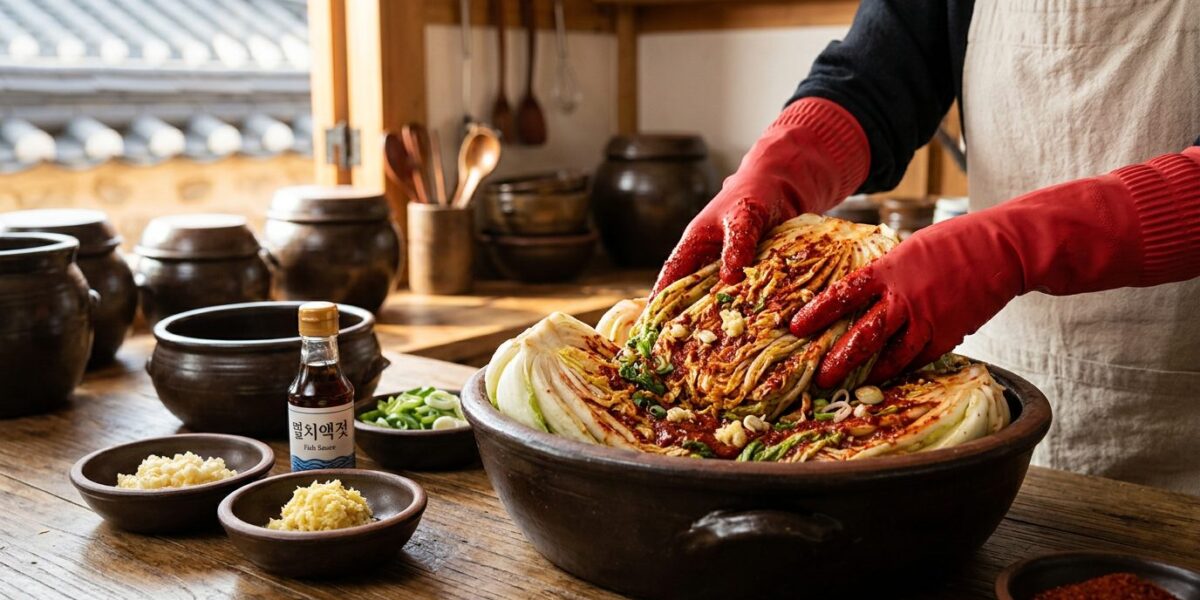
### Step 3 — Mixing, Packing, and the First Fermentation
1. Wear rubber or disposable gloves — gochugaru will stain your hands and the capsaicin will irritate any small cuts.
2. Add the drained cabbage to the bowl of paste and toss with both hands, working the paste between every leaf until every piece is coated uniformly.
3. Pack the kimchi tightly into a clean, wide-mouthed glass jar (a 2-litre jar works well for this batch). Press down firmly with each addition so the brine rises above the vegetables. Leave 3–4 cm of headspace — gases produced during fermentation will expand the contents.
4. Seal loosely (or use a kimchi crock with a water-seal lid) and place on a plate to catch any overflow.
5. Leave at room temperature — 18–22 °C is the target range — for 24 hours. After 12 hours, press the kimchi down with a clean spoon to keep the vegetables submerged. After 24 hours, taste and decide: if you prefer a fresher, crunchier kimchi, transfer to the fridge now. For more tanginess, leave another 24 hours at room temperature before refrigerating.
—
## Fermentation Guide — From Fresh to Fully Ripe
Fermentation is not a switch — it is a slow transformation. Understanding the timeline lets you pull kimchi at exactly the stage that suits your cooking.
### The Fermentation Timeline: Day 1 Through Week 4
| Stage | Time | Flavour Profile | Best Used For |
|——-|——|—————–|—————|
| Fresh | Day 1–2 | Crunchy, salty, sharp heat | Eating straight as a side |
| Early | Day 3–5 | Tangy, bright, aromatic | Kimchi fried rice, grain bowls |
| Mid | Day 6–10 | Sour, complex, full-bodied | Kimchi stew (jjigae), dumplings |
| Late | Week 2–4 | Deeply fermented, mellow, umami-rich | Kimchi pancakes, braised dishes |
### How to Tell When Your Kimchi Is Ready
There is no single moment of readiness — it depends entirely on what you intend to use it for. That said, several sensory signals tell you fermentation is progressing correctly. Bubbles should be visible in the brine when you press the kimchi down; this is CO₂ produced by the bacteria and a reliable sign of active fermentation. The brine will turn slightly cloudy and develop a pleasant, clean sourness — similar to sauerkraut, but layered with the heat and aromatics. The cabbage will darken slightly and soften further, but should retain a satisfying bite.
### Storage Tips and How Long Kimchi Keeps
Once moved to the refrigerator, fermentation slows dramatically but does not stop entirely. At 4 °C, a well-made batch keeps its best eating quality for 4–6 months. Beyond that it becomes quite sour and soft but is still perfectly safe and ideal for cooked applications like stew or pancakes. Always keep the vegetables submerged beneath the brine; if the brine level drops, press the kimchi down or add a small amount of lightly salted water. Keep the lid tight.
—
## Kimchi Troubleshooting and Common Mistakes
### Why Is My Kimchi Not Fermenting?
Lack of visible bubbling after 48 hours usually points to one of three causes: the salt was iodised (which suppresses lactic-acid bacteria), the temperature is too cold (below 15 °C), or the vegetables were rinsed so thoroughly that the salt level in the final mix is too low to support the right microbial balance. The fix is to move the jar somewhere warmer — a spot near (but not on) a radiator works — and give it another 24 hours before drawing conclusions.
### Too Salty, Too Sour, or Not Spicy Enough?
Three of the most common complaints, each with a straightforward remedy. If the kimchi tastes aggressively salty after rinsing, the cabbage needed longer in the rinse — a second rinse with plain water and a longer drain usually brings it into balance. If it is souring faster than you expected, the room temperature is likely too warm; move it to a cooler spot or refrigerate earlier. If the heat feels muted, the gochugaru brand may be milder than expected — Korean brands vary considerably in Scoville level — or you simply need a larger quantity next time.
### Is It Safe? Recognising Spoilage vs. Normal Fermentation
Normal fermentation produces bubbles, a sour smell, some cloudiness in the brine, and possibly a white, powdery residue on the surface of the brine — this is kahm yeast and is harmless. True spoilage is unmistakable: fuzzy green, blue, or black mould, a putrid or rotten smell (distinct from the sharp, clean sourness of good kimchi), or a sliminess on the cabbage leaves rather than a firm, slightly softened texture. If you are ever genuinely uncertain, discard the batch. Kimchi is inexpensive to remake, and this situation is rare with clean equipment and correct salt levels.
—
## How to Use Kimchi in Cooking
Once you have a jar of kimchi at each stage — fresh, mid-fermented, and overripe — a whole range of dishes opens up. Here are three ways we reach for it most often. You will find even more ideas across [our Asian recipes collection](/asian-recipes/).
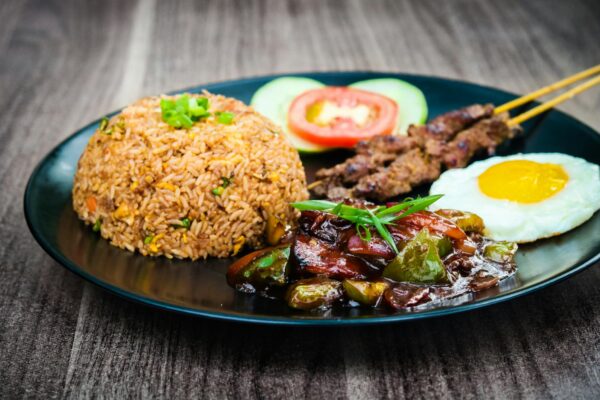
### Kimchi Fried Rice (Kimchi Bokkeumbap)
This is the dish that turns leftover rice and mid-stage kimchi into something genuinely satisfying. Fry a couple of teaspoons of sesame oil in a hot wok, add chopped kimchi and a spoonful of its brine, then fold in day-old cooked rice. The starch absorbs the spicy, tangy liquid as the rice crisps slightly against the wok. A fried egg on top — yolk runny — and a drizzle of gochujang finish it. The whole dish takes ten minutes.
### Kimchi Jjigae (Kimchi Stew) — Perfect for Overripe Kimchi
Overripe kimchi that has become too sour to eat straight is the ideal ingredient for kimchi jjigae. Simmer sliced kimchi with pork belly (or firm tofu for a plant-based version), gochujang, anchovy stock, and cubed silken tofu for 25–30 minutes. The extended cooking mellows the sourness into a rich, warming broth. It is the kind of dish that has been feeding Korean families through winters for generations — straightforward, unfussy, and deeply good.
### Quick Uses: Kimchi Pancakes, Tacos, and Grain Bowls
Kimchi pancakes (kimchijeon) require nothing more than chopped kimchi mixed into a batter of plain flour, egg, and cold water, fried in a lightly oiled pan until golden and crispy at the edges. For a more unexpected use, try kimchi in soft corn tacos alongside grilled fish or pulled chicken — the acidity and heat cut through rich proteins the same way a good salsa would. In grain bowls, a spoonful of mid-fermented kimchi alongside roasted sweet potato, steamed brown rice, and a soft-boiled egg delivers contrast in every mouthful: warm and cool, soft and crunchy, mild and sharp. If you enjoy bold, layered dishes, our [Pad Thai recipe](/pad-thai-recipe/) is another weeknight favourite that balances similarly contrasting flavours.
—
## FAQ
**What are the main ingredients in a kimchi recipe?**
The foundational ingredients are napa cabbage, non-iodised coarse sea salt, gochugaru, garlic, and ginger. Most traditional recipes also include fish sauce and salted fermented shrimp for umami depth, plus scallions and Korean radish. A vegan version replaces the seafood products with mushroom soy sauce and kelp broth without major compromise to the overall flavour.
**How long does homemade kimchi last in the fridge?**
Properly made kimchi stored in an airtight jar at 4 °C stays at its best eating quality for four to six months. The flavour continues to evolve — becoming progressively more sour and mellow — and even older, more heavily fermented kimchi remains safe and excellent for cooked applications like stew and pancakes.
**Can I make a vegan kimchi recipe without fish sauce?**
Yes, and it works well. The key is replacing both the fish sauce and the salted shrimp with ingredients that deliver a similar saline, umami character. We use two tablespoons of mushroom soy sauce combined with two tablespoons of kelp granule broth. A small amount of white miso stirred into the paste adds further fermented depth. The result is not identical to the traditional version, but it is genuinely complex and satisfying kimchi.
**Why does my kimchi smell like alcohol?**
A mild alcohol aroma, particularly in the first 24–48 hours of fermentation, is normal. It indicates the presence of wild yeasts that activate early before the lactic-acid bacteria take over and acidify the environment sufficiently to suppress them. This is harmless and the smell fades as fermentation progresses. If the alcohol smell persists beyond day three or intensifies rather than fading, your fermentation temperature may be too warm — aim for 18–22 °C during the initial fermentation phase.
**Do I need special equipment to make kimchi at home?**
No specialist equipment is required. A large non-reactive bowl (glass or food-safe plastic, not aluminium or uncoated cast iron), a wide-mouthed glass jar with a lid, and a pair of rubber or disposable gloves are everything you need. Dedicated kimchi crocks with water-seal lids are a worthwhile investment if you plan to make large batches regularly, but they are not necessary for your first attempt.
—
*Last Updated: 2026-03-23*

Mei Lin Chen
Mei Lin Chen is an Asian food writer and recipe developer. Melbourne-raised and London-based, she has spent over a decade exploring the rice paddies, hawker stalls, and home kitchens of South-East and East Asia. Her recipes balance traditional technique with everyday practicality.